ARTE
BELLEZA Y BIENESTAR
ARTESANÍA
CULTURA E HISTORIA
ENTRETENIMIENTO
MEDIO AMBIENTE
COMIDA Y BEBIDAS
INGENIERÍA INVERSA
CIENCIAS
DEPORTES
TECNOLOGÍA
TECNOLOGÍA VESTIBLE
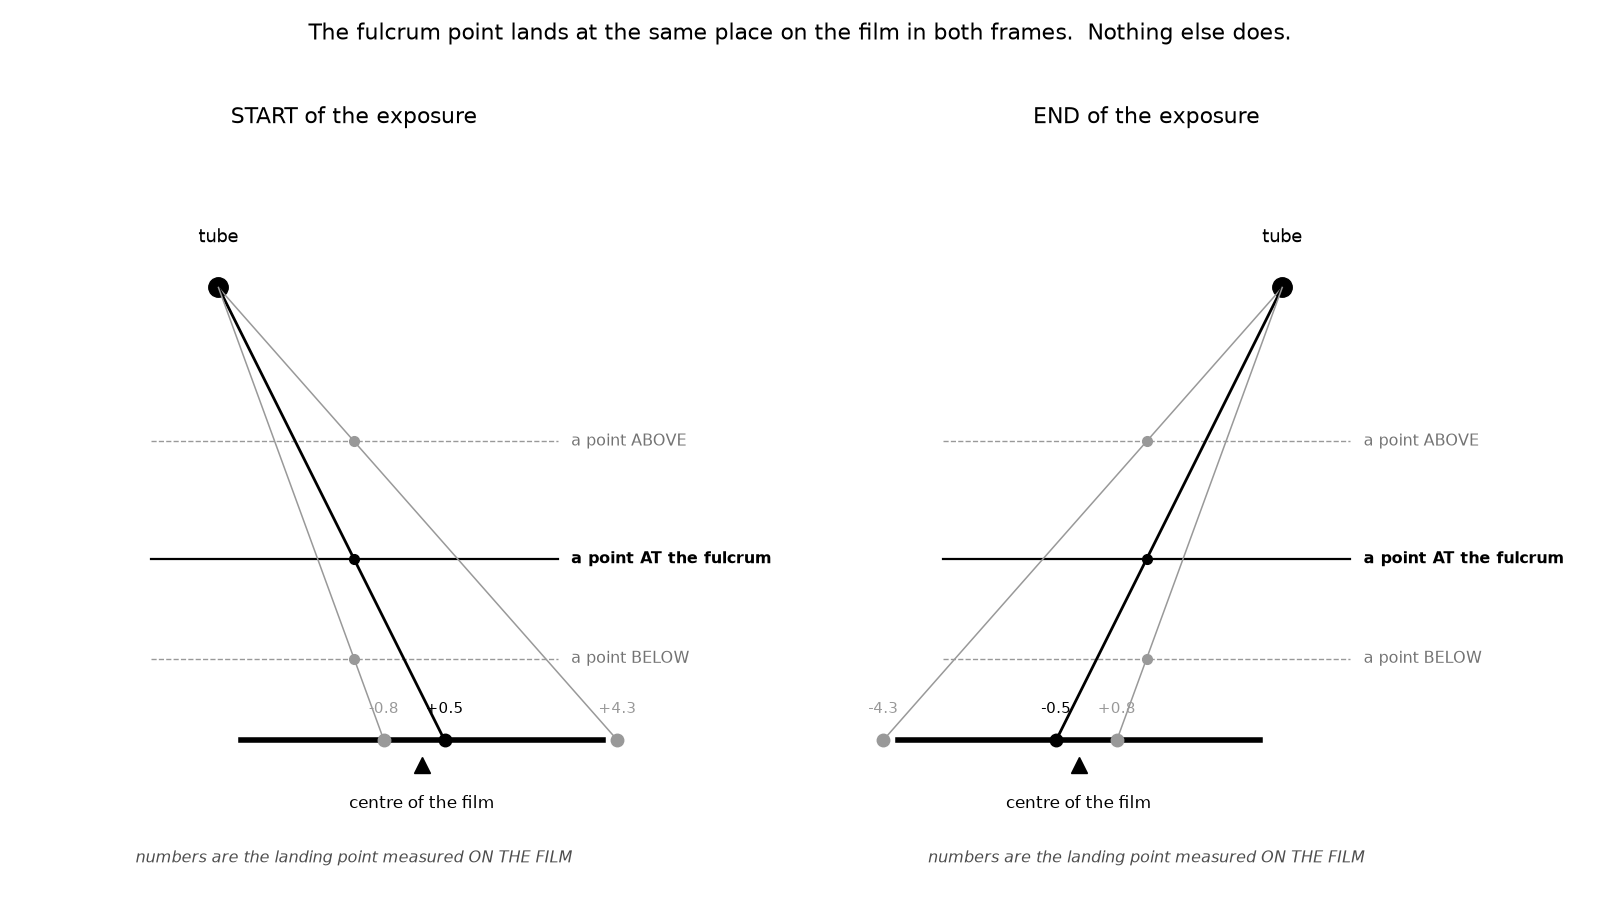


Planigraphy — Blurring Everything But One Plane
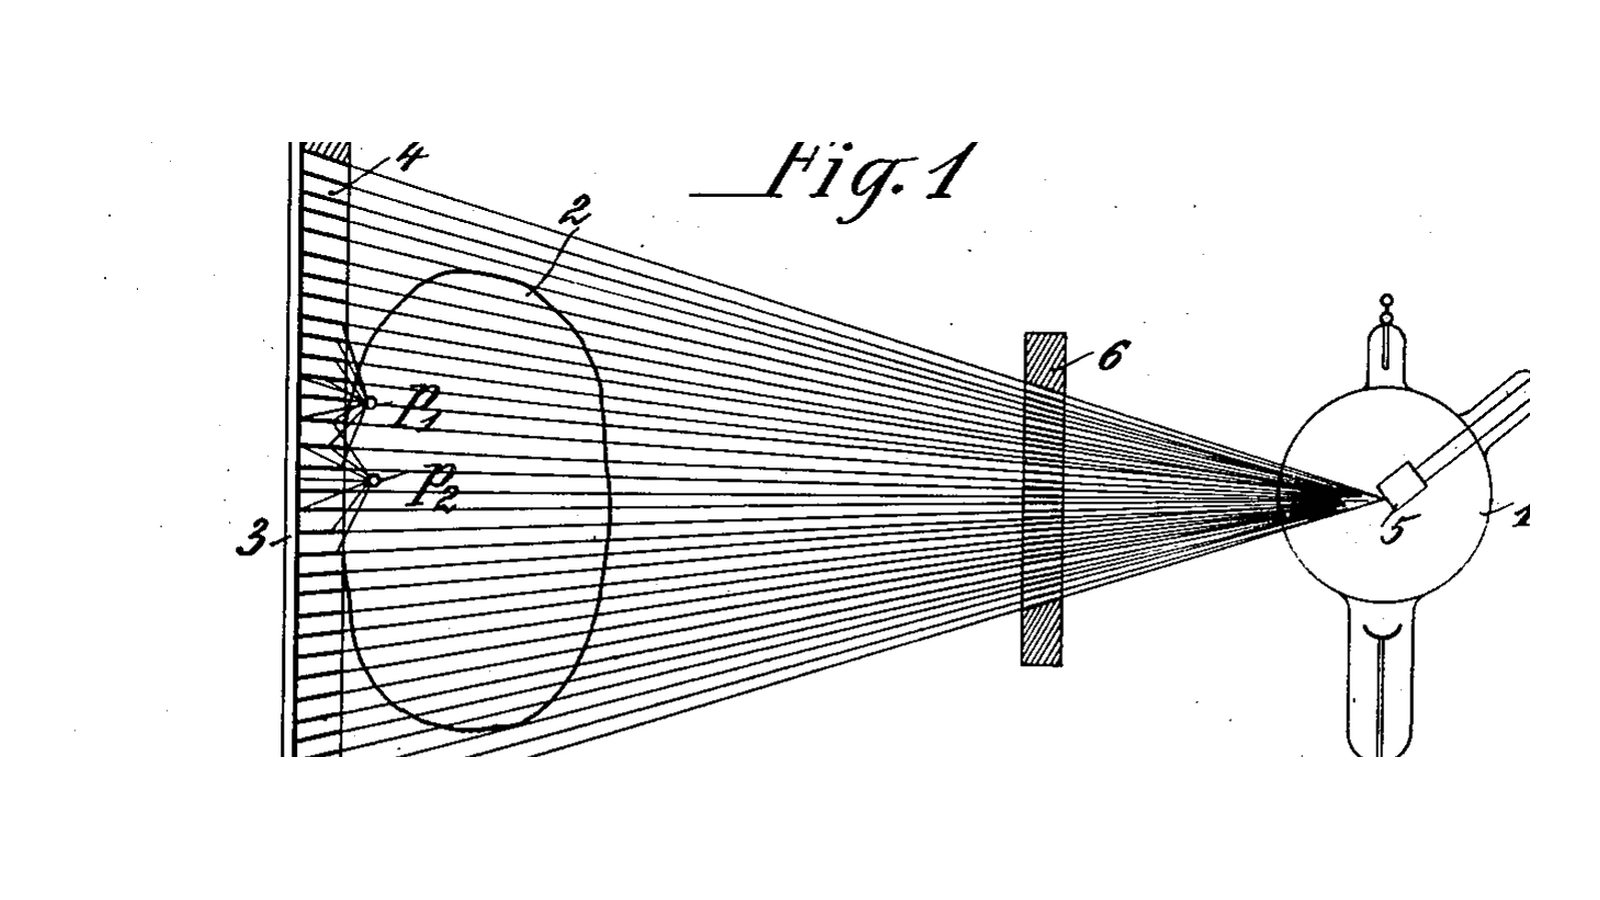
A radiograph is a shadow, and a shadow is everything in the way, added together. A chest film is the ribs and the heart and the lungs and the spine all printed on top of one another, and no amount of care with exposure separates them, because the information that would separate them was never recorded.
The trick that came before computers is almost embarrassingly simple. **Move the source and the film in opposite directions during the exposure, pivoting about one chosen height.** Anything at that height projects onto the same spot on the film the whole time and comes out sharp. Anything above or below it walks across the film and smears into a streak. You have not removed the other layers - they are still there, contributing fog - but you have made exactly one plane legible.
Several people arrived at it at once, which usually means the idea was ready. **Alessandro Vallebona** described "stratigraphy" in Italy in 1930. **Jean Kieffer** patented an apparatus for body-section roentgenography in the United States in 1929, built as the laminagraph in 1934 with Sherwood Moore. **Bernard Ziedses des Plantes** in the Netherlands announced his "tomograph" in 1932 and published the method in 1935, and it is his name that stuck to the technique.
**On citations, honestly:** this blueprint gives no patent number for planigraphy. Kieffer's 1929 patent and Ziedses des Plantes' 1936 patent on seriescopy are both recorded in the literature and neither number could be verified from a primary source here, so neither is cited. The dated published record is solid and that is what is used.
**You will build it with light**, which is the honest way round: the geometry is the entire invention and it does not care what is casting the shadow. Then you will do the same thing digitally - photograph from several angles and shift-and-add - and discover that choosing the shift afterwards gives you any plane you like from one set of exposures. That is tomosynthesis, it is how a modern mammography machine works, and it is one short step from the idea that ends this batch: stop blurring toward a plane, and compute it instead.
Intermedio
2 hours
Instrucciones
1
1
Build the linkage: two arms, one fulcrum, opposite ends
Build the linkage: two arms, one fulcrum, opposite ends
The mechanism is a lever. A rigid rod carries the light source at one end and the detector platform at the other, pivoting on a fixed fulcrum between them. Push the source left and the detector goes right, automatically and in the correct ratio.
Cut a 600 mm length of aluminium bar or straight timber. Drill a pivot hole 400 mm from one end. Mount it on a bolt through a rigid upright so it swings freely in one plane only - any wobble in the other axis blurs the plane you are trying to keep sharp.
The source goes on the LONG end, the detector platform on the short end. The ratio of the two arm lengths sets the fulcrum height, and getting that ratio right is what decides which plane comes out sharp. Work it out from the notebook step before you drill.
The detector platform must stay HORIZONTAL as the arm swings, not tilt with it. Hang it from the arm on its own small pivot, like a swing seat, so gravity keeps it level.
Materiales para este paso:
 Pletina de aluminio1 pieza
 Tablero contrachapado1 pieza
 Tornillo de cabeza cilíndrica con hexágono interior4 piezas
 Tuerca hexagonal4 piezas
 Arandela plana8 piezas
Herramientas necesarias:
 Taladro inalámbrico
 Juego de brocas
 Sierra para metales
 Calibre digital de 6 pulgadas
 Juego de llaves Allen
 Regla
Regla2
2
A subject with known layers
A subject with known layers
You need something whose layers you can identify with certainty, because the whole measurement is about which layer stayed sharp.
Cut three sheets of clear acrylic or stiff transparency and mark each with a different distinctive pattern - a row of washers glued down, a paper letter, a grid of drawn dots. Stack them on spacers at 0, 200 and 400 mm above the detector platform, measured and written down.
Use OPAQUE objects on TRANSPARENT sheets. The point is that light passes the sheets and is stopped by the markers, which is exactly what a body does to X-rays: mostly transparent, with dense things in it.
Set the fulcrum at the height of the middle sheet. That is the layer that should survive; the other two should streak.
Materiales para este paso:
 Lámina de acrílico3 piezasArandela plana12 piezas
 Papel1 hoja
 Espiga de madera4 piezas
Herramientas necesarias:
 Cúter de precisiónReglaCalibre digital de 6 pulgadas
 Rotulador permanente
3
3
Swing it, and see one layer survive
Swing it, and see one layer survive
Put a phone camera on the detector platform facing up, or tape a sheet of paper there and photograph the whole rig from the side afterwards - either works, the camera is simply easier.
Darken the room. Start a long exposure - two to four seconds - and swing the arm smoothly through its full travel exactly once during it. Smooth and once: a jerky swing puts extra brightness wherever it slowed down, and a swing that reverses mid-exposure smears the sharp plane too.
Take three photographs: one with no swing at all, one with a short swing, one with the full swing.
The no-swing frame is an ordinary radiograph - all three layers sharp, all superimposed, illegible. The short swing softens the outer layers slightly. The full swing should leave the middle layer clearly readable with the other two reduced to streaks. Compare them side by side; that comparison IS the invention.
Herramientas necesarias:
 Linterna LED de inspección
 Trípode (fibra de carbono, rótula de bola)
 Cronómetro
4
4
The same thing digitally, and it gets better
The same thing digitally, and it gets better
Now do it without moving anything during an exposure.
Leave the stack alone and take **nine separate photographs**, moving the light source to a different position along the swing for each one and keeping the camera fixed. Write down the source position for every frame.
In the notebook step, shift each frame sideways by an amount proportional to its source position, then average them. Objects at one particular height line up in every shifted frame and reinforce; everything else lands in different places and averages toward grey.
Then change the shift and re-average. **You get a different plane, from the same nine photographs.** One set of exposures, any number of slices, chosen afterwards.
That is the whole difference between the 1930s machine and everything after it. Ziedses des Plantes had to choose the plane mechanically before the exposure and re-shoot the patient for every new one. You are choosing it in arithmetic, and the patient went home.
Herramientas necesarias:
Linterna LED de inspecciónTrípode (fibra de carbono, rótula de bola)Regla5
5
Which plane, and how thick
Which plane, and how thick
Cargando el cuaderno de Jupyter…
6
6
When no plane comes out sharp
When no plane comes out sharp
Three questions about the geometry, in the order that makes them quickest to answer.
Flow
Loading...
7
7
Compendium: streaks, spirals, and what this could never do
Compendium: streaks, spirals, and what this could never do
**Why the blur is a streak, not a haze.** A blurred photograph spreads every point into a disc. This spreads every out-of-plane point into a LINE, along the direction the tube travelled. That is why linear tomograms have a characteristic striped look, and why a rib running parallel to the tube travel stays annoyingly visible while one running across it vanishes.
**Which is why the motion got complicated.** Circular, elliptical, hypocycloidal and spiral tube paths were all built, precisely to stop the smear having a preferred direction. A hypocycloidal tomogram is dramatically cleaner than a linear one and the machine to make it is a serious piece of engineering - a whole industry of mechanism existed to work around the fact that the maths had not been done yet.
**What it could never do.** The out-of-plane material is still there. It is spread thin, but it is added to every point of your sharp plane as a haze, and it does not subtract. Soft tissues differ from each other by a per cent or two in absorption; the fog from everything else swamps that completely. Tomography could show you a bone or a cavity in a chosen plane. It could never show you the difference between two soft tissues, and that is the limitation that stood until 1971.
**Where it went.** Straight into modern practice, unchanged in principle. Digital breast tomosynthesis takes a short arc of exposures and shift-and-adds them exactly as you did in step 4 - the reconstruction is more sophisticated, but a radiologist scrolling through the planes of a tomosynthesis study is scrolling through Ziedses des Plantes' fulcrum heights, chosen after the fact.
**And the thought it leaves you with.** In step 4 you had nine photographs and you threw most of the information in them away to make each picture. Every plane you computed used all nine frames and discarded whatever did not line up. Somebody was eventually going to ask what happens if you keep it all and solve for the object instead. That is blueprint nine.
Materiales
8- 1 piezaMarcador de posición
- 1 piezaMarcador de posición
- Marcador de posición
- 4 piezasMarcador de posición
- 20 piezasMarcador de posición
- 3 piezasMarcador de posición
- 1 hojaMarcador de posición
- 4 piezasMarcador de posición
Herramientas requeridas
11- 1 vendor sell this, none ship to you yetMarcador de posición
- Marcador de posición
- Marcador de posición
- Marcador de posición
- Marcador de posición
- Marcador de posición
- Marcador de posición
- Marcador de posición
- Marcador de posición
- Marcador de posición
- Marcador de posición
Blueprints relacionados
Estos blueprints comparten conocimiento — técnicas, materiales o principios



CC0 Dominio público
Este Blueprint se publica bajo CC0. Eres libre de copiar, modificar, distribuir y usar este trabajo para cualquier propósito, sin pedir permiso.
Apoya al Maker comprando productos a través de su Blueprint, donde gana una Comisión del Maker establecida por los vendedores, o crea una nueva iteración de este Blueprint e inclúyela como conexión en tu propio Blueprint para compartir ingresos.