ARTE
BELLEZA Y BIENESTAR
ARTESANÍA
CULTURA E HISTORIA
ENTRETENIMIENTO
MEDIO AMBIENTE
COMIDA Y BEBIDAS
INGENIERÍA INVERSA
CIENCIAS
DEPORTES
TECNOLOGÍA
TECNOLOGÍA VESTIBLE
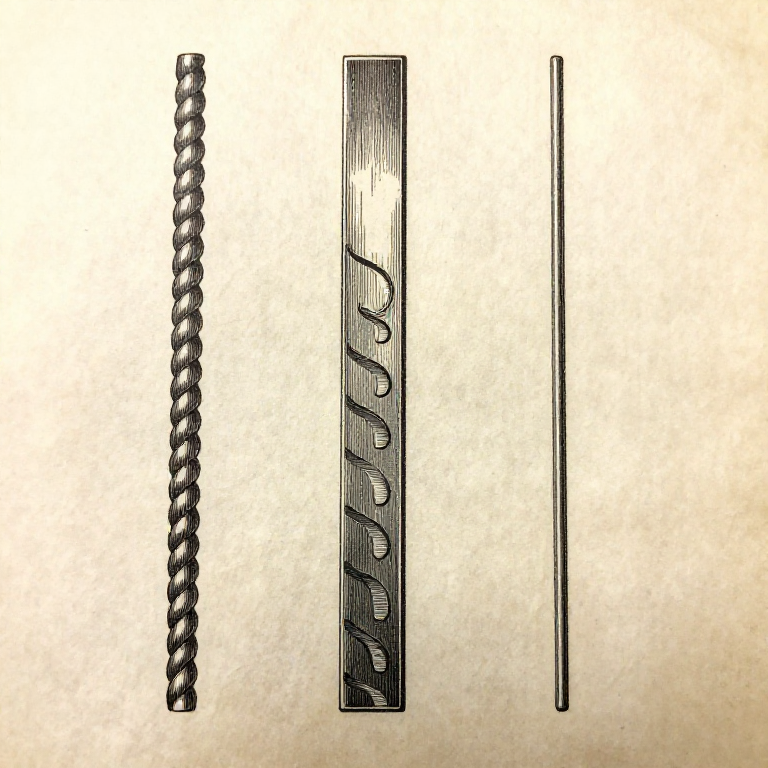


Running a Bead: Travel Speed Is Not a Matter of Taste
A bead is a line of weld metal laid down in one pass. It is the unit everything else is built out of, and it is where a welder is taught, because a bead run on a flat plate with no joint under it shows every fault without hiding any of them.
Three things are read off a finished bead: its width, its height, and the row of ripples on top. Each of those reports on one of the variables from the previous rung.
This rung also works out heat input in joules per millimetre — the number that connects current, arc voltage and travel speed, and the one that decides how far the work will pull out of shape.
Principiante
4 hours
Instrucciones
1
1
What a bead is telling you
What a bead is telling you
**Width** reports arc length and weave. A bead two to three times the core diameter is a stringer, run straight. Much wider than that on a straight run means the arc is too long.
**Height** reports travel speed. Too slow and the metal piles up into a tall, narrow, rope-like bead that has barely fused into the plate beneath it. Too fast and the bead is thin, stringy and often has a crack down the middle of the crater at the end.
**The ripples** report steadiness. Even crescents, evenly spaced, all pointing backwards, mean a steady speed and a steady arc. Ripples that bunch and stretch mean a hand that is speeding up and slowing down.
A bead that is about twice as wide as it is high, flat-faced or slightly convex, blending into the plate at both toes without a sharp step, is a good one.
Materiales para este paso:
 Placa de acero dulce2 piezas
 Electrodo de soldadura1 paquete
Herramientas necesarias:
 Soldadora de arco
 Careta de soldar de oscurecimiento automático
 Guantes de soldador
 Lupa de relojero
2
2
Heat input, and why the speed is already decided
Heat input, and why the speed is already decided
Cargando el cuaderno de Jupyter…
Herramientas necesarias:
 Ordenador de sobremesa
3
3
Stringer or weave
Stringer or weave
A **stringer** is run straight along the joint with no side-to-side movement. It puts less heat into the plate per unit length of joint, cools faster, and is what you want on thin material, on high-strength steels, and for the root run of a multi-pass weld.
A **weave** swings the rod side to side to fill a wider gap in one pass. It is slower along the joint, so it puts in much more heat, and it is the right answer for filling a wide V and for capping a multi-pass weld.
The practical limit on a weave is about two and a half to three times the core diameter of the electrode. Wider than that and the pool is too big for the arc to hold — it sags in the flat position and simply falls out in any other.
Pause very slightly at each edge of a weave. That is where the pool has to wash into the parent metal, and a weave that sweeps straight through leaves cold, unfused edges under a bead that looks fine from the top.
Materiales para este paso:
Placa de acero dulce2 piezasElectrodo de soldadura1 paqueteHerramientas necesarias:
Soldadora de arcoCareta de soldar de oscurecimiento automáticoGuantes de soldador4
4
Starting, restarting and filling the crater
Starting, restarting and filling the crater
The two weakest points of a bead are its two ends.
**At the start** the plate is cold, so the first 10-20 mm gets less penetration than the rest. Strike about 10 mm ahead of where the weld is to begin, run back to the start, then go forward over the strike point — by the time you cross it the plate is warm.
**At a restart** the old crater must be chipped and brushed clean of slag first. Restart on the front edge of the crater, hold long enough to fill it, then move on. Restarting on top of slag is the commonest way to bury an inclusion.
**At the end** stopping dead leaves a crater — a dish of metal that has solidified last, fed by nothing, and it very often cracks down the middle. Fill it: pause, or swing back over the last 10 mm of the bead before lifting away.
Materiales para este paso:
Placa de acero dulce2 piezasElectrodo de soldadura1 paqueteHerramientas necesarias:
Soldadora de arcoCareta de soldar de oscurecimiento automáticoGuantes de soldador Martillo
 Juego de cepillos de alambre
 Vara de atizar escoria
Materiales
2- 2 piezasMarcador de posición
- 1 paqueteMarcador de posición
Herramientas requeridas
8- Marcador de posición
- Marcador de posición
- Marcador de posición
- Marcador de posición
- Marcador de posición
- Marcador de posición
- Marcador de posición
- Marcador de posición
Blueprints relacionados
Estos blueprints comparten conocimiento — técnicas, materiales o principios
CC0 Dominio público
Este Blueprint se publica bajo CC0. Eres libre de copiar, modificar, distribuir y usar este trabajo para cualquier propósito, sin pedir permiso.
Apoya al Maker comprando productos a través de su Blueprint, donde gana una Comisión del Maker establecida por los vendedores, o crea una nueva iteración de este Blueprint e inclúyela como conexión en tu propio Blueprint para compartir ingresos.