Kerjasama
SENI
KECANTIKAN & KESEJAHTERAAN
KRAFTANGAN
BUDAYA & SEJARAH
HIBURAN
ALAM SEKITAR
MAKANAN & MINUMAN
KEJURUTERAAN TERBALIK
SAINS
SUKAN
TEKNOLOGI
BOLEH PAKAI
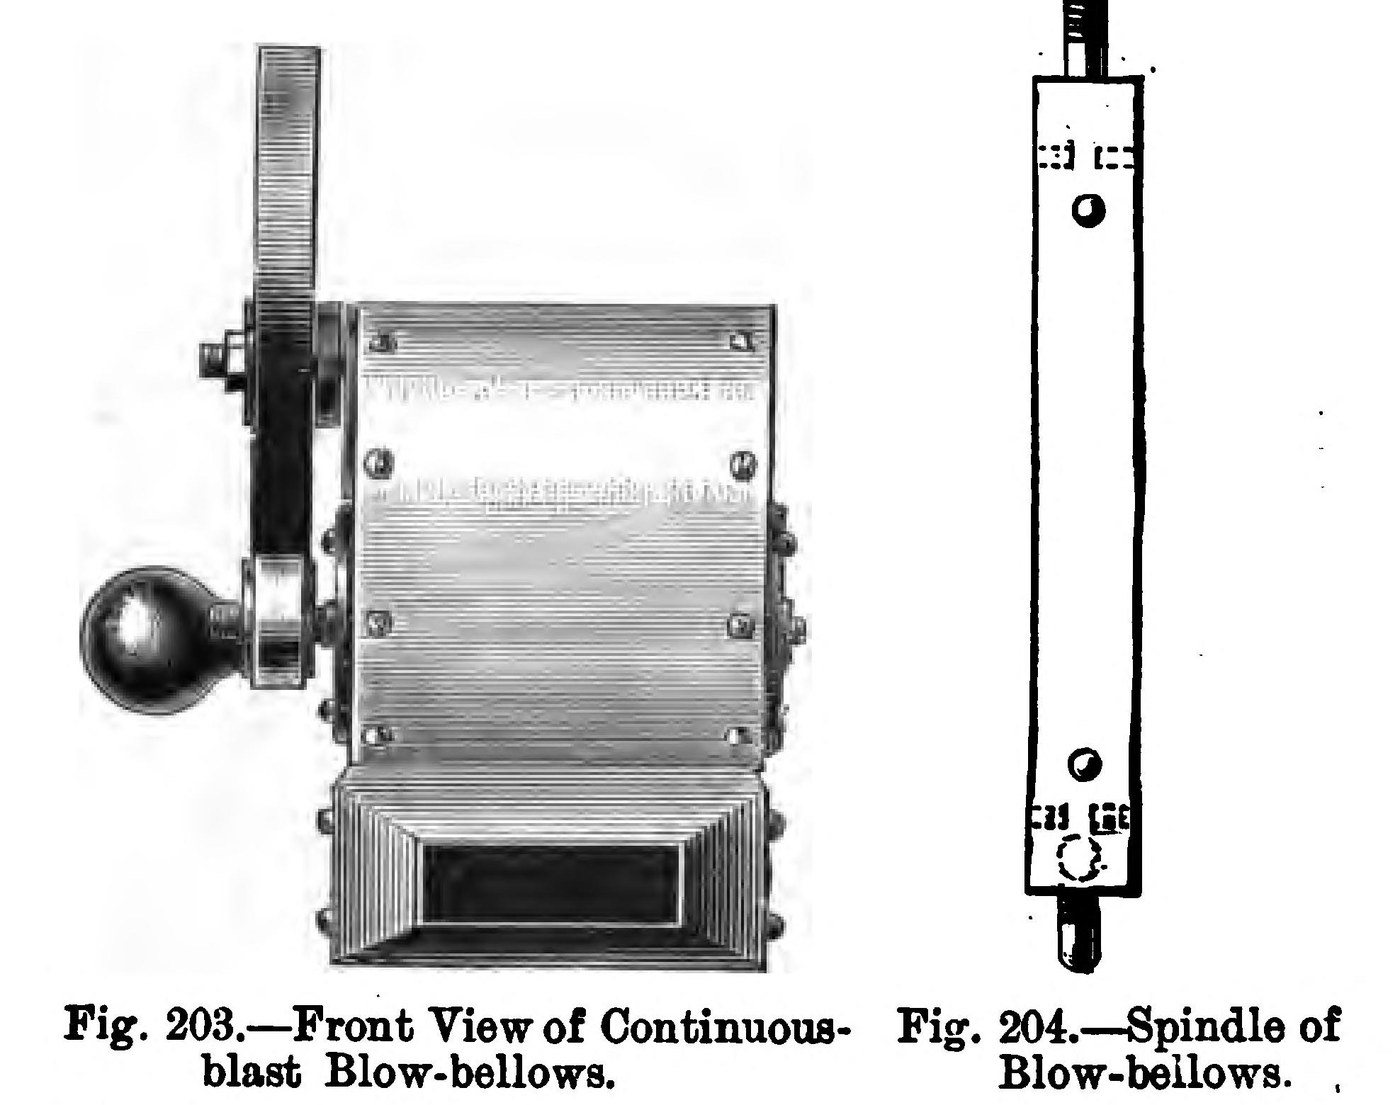


Air Blower: a Hand-Cranked Fan Blow-Bellows for a Portable Forge (Hasluck, 1904)
An air blower gives a fire a steady stream of air. Hasluck's Smiths' Work (1904) shows a small one for a home-made forge: a brass box with a four-winged tin fan on an iron spindle, spun fast by a hand wheel pressing on a rubber-covered roller. Unlike old bellows it blows continuously, through an outlet 2 1/2 in wide and 3/4 in deep.
The book's drawings carry no sizes for the box, so its size, the sheet thickness and the metals of the wire and the plate are unknown here; the tools are ours.
Source: P. N. Hasluck, Smiths' Work (1904), pp. 140-143, Figs. 202-211. Picture: their Figs. 203-204.
Pertengahan
Two days
Arahan
1
1
Read Hasluck
Read Hasluck
"When this is all done, turn the handle rapidly; the fan inside will then revolve at a good rate, and a strong draught will be obtained."
2
2
Cut out the box
Cut out the box
Cut the two sides and the bottom of the box from sheet brass, and a piece for the top covering, but do not join them yet. Hasluck gives no sizes for the box (unknown); its outlet is to be 2 1/2 in wide and 3/4 in deep.
Bahan untuk langkah ini:
 Kepingan Loyang1 sides, bottom and covering
Alatan diperlukan:
 Gunting kepingan logam
 Dimensi tidak diketahui
3
3
Make the fan
Make the fan
Make the iron spindle (Figs. 204, 205). Drill two holes in each of its four sides, one at each end, tap them, and screw in pieces of wire about 5/16 in long. Cut four pieces of tin, a little narrower than the box, and punch holes in them to match. Slip each wing over its wires, put a washer over each wire and rivet it over. Five or six wings may be used; then solder pieces of wire between them to stiffen them (Fig. 211).
Bahan untuk langkah ini:
 Rod besi1 spindle
 Logam tidak diketahui1 wire
 Kepingan besi putih1 four wings
 Sesendal Rata8 keping
Alatan diperlukan:
 Gerimit tangan
 Set pemotong ulir
 Gergaji BesiGunting kepingan logam
 Tukul rivet
 Alat pematerian
4
4
Fit the spindle and close the box
Fit the spindle and close the box
Screw the brass bearings (Fig. 206), a ring with three spokes and a hole in the middle, to the two sides. Fit the iron spindle in the bearings, screw the sides and bottom together, then screw the covering over the top.
Bahan untuk langkah ini:
Kepingan Loyang1 two bearings Skru mesin1 set
Alatan diperlukan:
Gerimit tanganSet pemotong ulir5
5
Fit the hand wheel
Fit the hand wheel
The wheel has to be bought. Turn a brass spindle for it (Fig. 207), thread it at each end and fix it with a nut to a plate (Fig. 208); put on the wheel, hold it with a washer and another nut, and fit the knob on rather loosely. Before fixing the wheel, turn a small piece of wood (Fig. 209), put an india-rubber band over it and screw it onto the projecting end of the iron spindle. Fix the wheel so it presses tightly against this roller. Instead, both wheels may be grooved and driven by a band.
Bahan untuk langkah ini:
 Roda tangan besi1 keping
 Bar Loyang1 wheel spindleLogam tidak diketahui1 plate
 Nat Heksagon2 kepingSesendal Rata1 keping
 Papan kayu1 roller
 Gelang getah1 keping
Alatan diperlukan:
 Mesin Pelarik LogamSet pemotong ulirGerimit tangan
6
6
Fit the nose-piece
Fit the nose-piece
Cut the nose-piece from sheet brass to the pattern (Fig. 210) and bend it at right angles along the dotted lines so it fits over the outlet end of the box. Rivet or solder its two edges together, drill it and screw it on. Turn the handle quickly to test the draught.
Bahan untuk langkah ini:
Kepingan Loyang1 nose-pieceAlatan diperlukan:
Gunting kepingan logamAlat pematerianGerimit tangan Cermin mata keselamatan
7
7
History and honest limits
History and honest limits
Hasluck's "Home-made Portable Forges" chapter offers this fan as a cheaper, steadier alternative to the old leather bellows, costing about half as much. He adds that gun-metal is better than brass for all parts except the covering and nose-piece.
The drawings carry no sizes, so the box size, the sheet thickness and the metals of the wing wires and wheel plate are unknown; the tools are ours.
Bahan
11- 1 nose-piecePemegang Tempat
- 1 spindlePemegang Tempat
- 1 platePemegang Tempat
- 1 four wingsPemegang Tempat
- 9 kepingPemegang Tempat
- 1 setPemegang Tempat
- 1 kepingPemegang Tempat
- 1 wheel spindlePemegang Tempat
- 2 kepingPemegang Tempat
- 1 rollerPemegang Tempat
- 1 kepingPemegang Tempat
Alatan Diperlukan
9- Pemegang Tempat
- Pemegang Tempat
- Pemegang Tempat
- Pemegang Tempat
- Pemegang Tempat
- Pemegang Tempat
- 2 vendors sell this, none ship to you yetPemegang Tempat
- Pemegang Tempat
- Pemegang Tempat
Blueprint ini membuat

CC0 Domain Awam
Blueprint ini dikeluarkan di bawah CC0. Anda bebas menyalin, mengubah, mengedar, dan menggunakan karya ini untuk sebarang tujuan, tanpa meminta kebenaran.
Sokong Pembuat dengan membeli produk melalui Blueprint mereka di mana mereka memperoleh Komisen Pembuat ditetapkan oleh Penjual, atau cipta iterasi baru Blueprint ini dan sertakan ia sebagai sambungan dalam Blueprint anda sendiri untuk berkongsi hasil.