Kerjasama
SENI
KECANTIKAN & KESEJAHTERAAN
KRAFTANGAN
BUDAYA & SEJARAH
HIBURAN
ALAM SEKITAR
MAKANAN & MINUMAN
KEJURUTERAAN TERBALIK
SAINS
SUKAN
TEKNOLOGI
BOLEH PAKAI
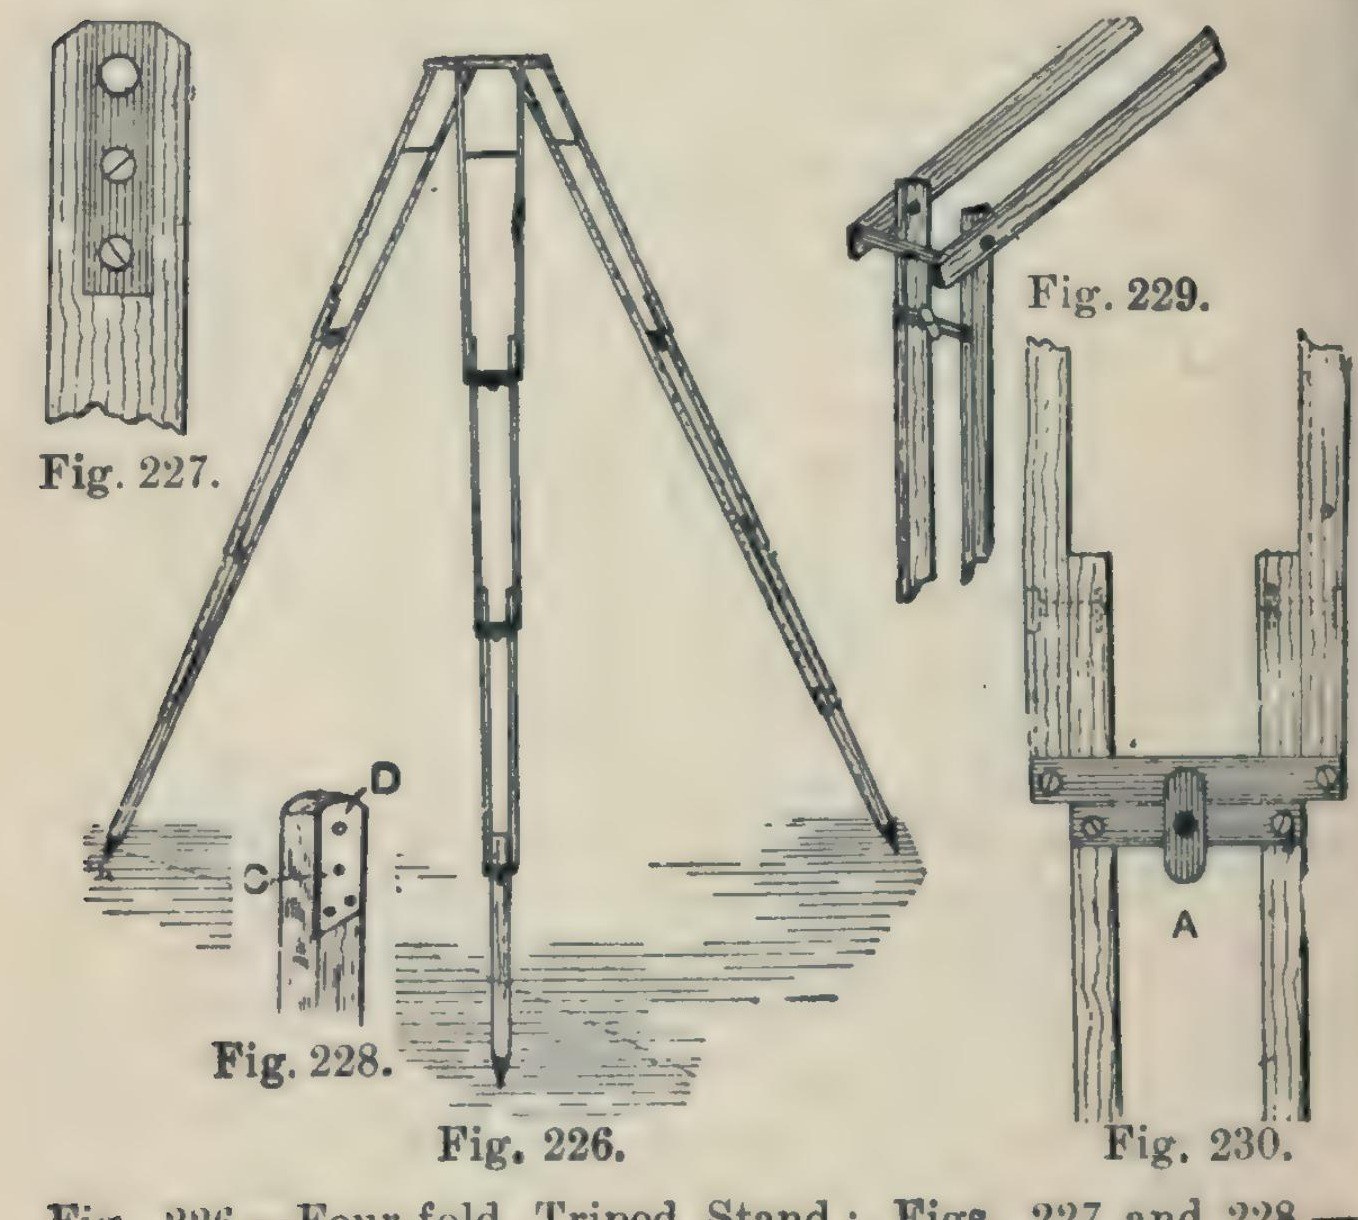


Camera Tripod: a Four-Fold Ash Tripod Stand (Hasluck, 1902)
A light, compact folding camera stand: three legs, each of seven ash laths riveted so it folds in four, locked open by brass buttons, on a triangular ash top with brass pins and a hole for the camera screw.
Hasluck says the same method makes stands that fold in three or two.
Source: Paul N. Hasluck, Photographic Cameras and Accessories (1902), pp. 153-157. Picture: Figs. 226-230 of the book.
Pertengahan
Unknown
Arahan
1
1
Cut the ash laths
Cut the ash laths
Cut laths of good ash, true and square or the stand won't be rigid, and round the edges slightly: six 17 1/4 x 5/8 x 3/8 in, six 16 x 5/8 x 3/8 in, six 15 1/2 x 5/8 x 3/8 in, and three 14 x 5/8 x 5/8 in.
Bahan untuk langkah ini:
 Papan kayu ash1 21 laths
Alatan diperlukan:
 Gergaji belakang
 Ketam blok
2
2
Fit the top ends and stretcher
Fit the top ends and stretcher
On each 17 1/4 in lath let in flush a 1/16 in brass plate, 1 1/4 in long, with a 3/16 in hole 1/4 in from the top, held by two countersunk brass screws; bore the wood to match and take off the top corners. On one lath of each pair cut a groove inside, about 3/16 in deep and 3 1/2 in long, starting 2 in from the top, and hinge a 1/8 in brass rod stretcher in it on a pin. On the other lath cut a curved groove 1 1/2 in long, 3/16 in wide, with a small hole at the bottom where the rod catches.
Bahan untuk langkah ini:
 Kepingan Loyang1 1/16 in plates
 Skru kayu1 small brass screws
 Bar Loyang1 1/8 in stretcher
Alatan diperlukan:
 Bingkai Gergaji Besi dengan Mata
 Kikir Logam
 Gerimit tangan
 Pahat kayu
 Pemutar skru rata
3
3
Bore and rivet the legs
Bore and rivet the legs
Bore the rivet holes: in the long laths 1 3/4 in from the lower end, counterbored so the copper rivet head sits flush, then 1/8 in through; in the 16 in and 15 1/2 in laths 1/2 in and 1 3/4 in from the ends; in each 14 in piece 1/2 in from one end, and taper its other end for a pointed iron shoe or a steel point and ferrule. Rivet the 21 laths into three legs with 1/8 in copper rivets and washers: a 16 in lath inside each 17 1/4 in one, a 15 1/2 in lath inside that, the 14 in foot between the last pair. Rivets flush, just tight enough to fold but not loose.
Bahan untuk langkah ini:
 Rivet tembaga1 1/8 in, with washers
 Logam tidak diketahui3 iron shoes or steel points
Alatan diperlukan:
 Gerimit engkol dan mataGerimit tangan
 Tukul rivet
4
4
Add cross strips and lock buttons
Add cross strips and lock buttons
Screw 1/16 in brass strips across the bottom ends of each pair of laths (Fig. 229). Under them screw strips carrying a small brass button riveted at the centre; turned, the button hooks over the strip above and locks the joint open (Fig. 230).
Bahan untuk langkah ini:
Kepingan Loyang1 cross strips, buttonsSkru kayu1 kepingAlatan diperlukan:
Bingkai Gergaji Besi dengan MataKikir LogamPemutar skru rataTukul rivet5
5
Make the top
Make the top
Plane ash to 1/2 in and draw an equilateral triangle with 8 1/2 in sides. Bisect the angles; 2 in from each corner draw a line at right angles, go 1/2 in in along the sides, and mark three rectangles 2 7/8 x 3/4 in; cut the outline (Fig. 231). Fix a 3/16 in brass rod, one end tapered, across each rectangle, bored 3/8 in from the outer edge and projecting about 1/2 in, for the legs to hang on. Bore a 1/4 in hole in the centre for the camera screw and glue felt on top.
Bahan untuk langkah ini:
Papan kayu ash1 topBar Loyang3 3/16 in pins Kain kempa bulu1 keping
 Gam haiwan1 keping
Alatan diperlukan:
Ketam blokGergaji belakangGerimit engkol dan mataGerimit tangan6
6
Finish
Finish
Glasspaper and varnish the wood, and lacquer the brass.
Bahan untuk langkah ini:
 Varnis selak1 varnish
 Bahan tidak diketahui1 brass lacquer
Alatan diperlukan:
 Kertas Pasir
Bahan
10- 1 topPemegang Tempat
- 1 cross strips, buttonsPemegang Tempat
- 1 kepingPemegang Tempat
- 3 3/16 in pinsPemegang Tempat
- 1 1/8 in, with washersPemegang Tempat
- 3 iron shoes or steel pointsPemegang Tempat
- 1 kepingPemegang Tempat
- 1 kepingPemegang Tempat
- 1 varnishPemegang Tempat
- 1 brass lacquerPemegang Tempat
Alatan Diperlukan
10- Pemegang Tempat
- Pemegang Tempat
- Pemegang Tempat
- Pemegang Tempat
- Pemegang Tempat
- Pemegang Tempat
- Pemegang Tempat
- Pemegang Tempat
- Pemegang Tempat
- Pemegang Tempat
Blueprint ini membuat

CC0 Domain Awam
Blueprint ini dikeluarkan di bawah CC0. Anda bebas menyalin, mengubah, mengedar, dan menggunakan karya ini untuk sebarang tujuan, tanpa meminta kebenaran.
Sokong Pembuat dengan membeli produk melalui Blueprint mereka di mana mereka memperoleh Komisen Pembuat ditetapkan oleh Penjual, atau cipta iterasi baru Blueprint ini dan sertakan ia sebagai sambungan dalam Blueprint anda sendiri untuk berkongsi hasil.