Kerjasama
SENI
KECANTIKAN & KESEJAHTERAAN
KRAFTANGAN
BUDAYA & SEJARAH
HIBURAN
ALAM SEKITAR
MAKANAN & MINUMAN
KEJURUTERAAN TERBALIK
SAINS
SUKAN
TEKNOLOGI
BOLEH PAKAI
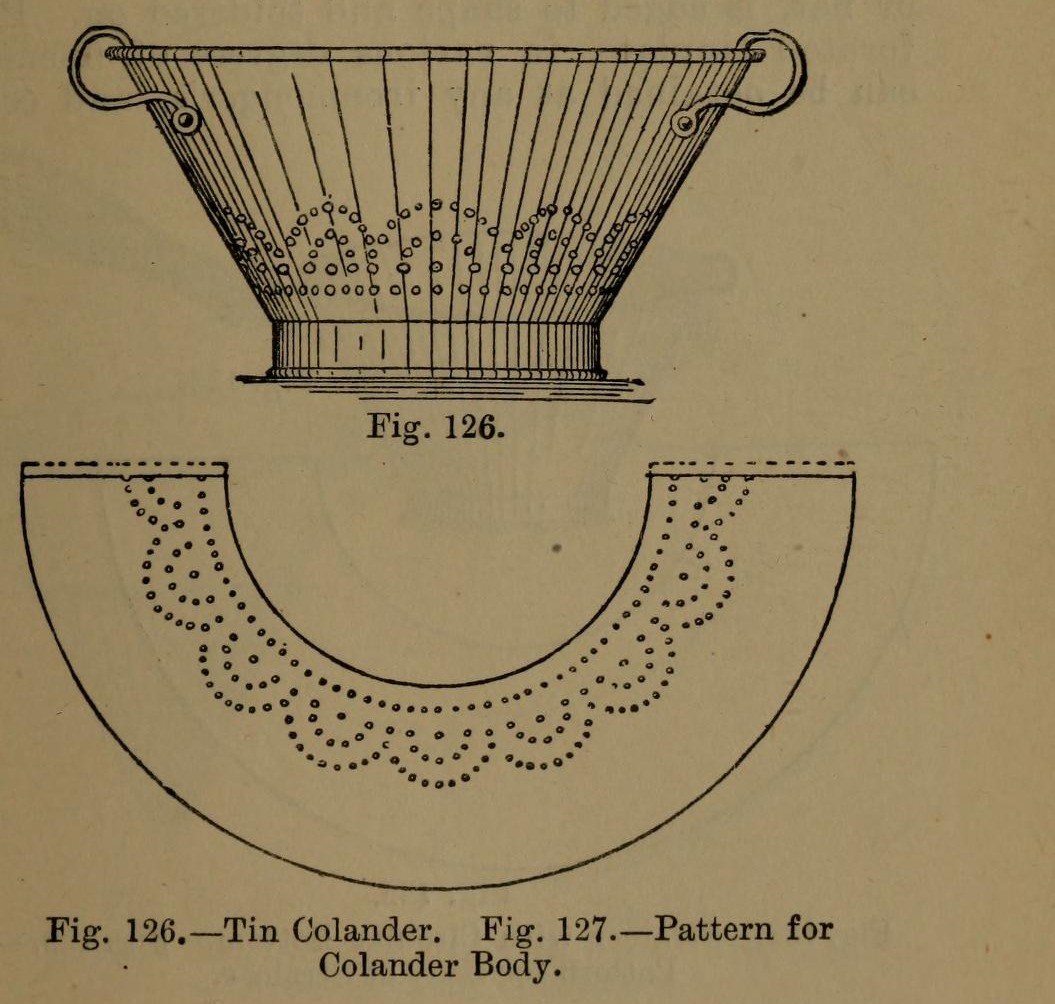


Colander: a Tinplate Colander with Perforated Body and Bottom (Hasluck, 1907)
A tinsmith's colander for straining: a tapered tinplate body and a hollowed bottom, both punched full of holes, standing on a wired hoop, with two bow handles.
The body pattern is a ring segment: outer radius = top diameter, inner radius = bottom diameter, which gives sides at 60 degrees.
Source: Paul N. Hasluck, Tinplate Work (1907), pp. 50-51. Unknown: sizes, solder. Picture: Figs. 126-127 of the book.
Pertengahan
Unknown
Arahan
1
1
Set out the body pattern
Set out the body pattern
Choose the top and bottom diameters. On tinplate, strike an arc with radius equal to the top diameter and, from the same centre, one equal to the bottom diameter (Fig. 127); the sides then slope at 60 degrees. Mark the rows of holes, add edges for a grooved seam and the wire, and cut it out.
Bahan untuk langkah ini:
 Kepingan besi putih1 body
Alatan diperlukan:
 Jangka lukis
 Penyurat
 Gunting kepingan logam
2
2
Break, punch and planish the body
Break, punch and planish the body
'Break' the pattern through the rollers, turning it the opposite way each pass, so it won't crease when bent. Punch the holes on a hardwood block, then flatten and planish the burrs.
Alatan diperlukan:
 Mesin gulung plat
 Penebuk lubang kepingan logam
 Blok Kayu Keras
 Tukul perata
3
3
Seam and wire the body
Seam and wire the body
Set off the edges for a grooved seam, bend the body to shape and seam it. Solder the seam inside. Set off an edge on the wide end and wire it with No. 10 B.W.G. wire. If you like, raise a swage about 1 1/2 in below the wired edge: it stiffens the colander and looks better.
Bahan untuk langkah ini:
 Dawai besi1 No. 10 B.W.G.
 Pateri timah-plumbum1 seam
Alatan diperlukan:
 Tukul Kayu
 Pancang
 Besi Pateri Elektrik
 Fluks
4
4
Make and fit the bottom
Make and fit the bottom
Cut out the bottom, hollow it and edge it to fit the small end. Inside, mark circles from 1 in across at the centre, each 1 in wider than the last, out to the edge. Punch holes at short intervals round them and flatten the burrs on an upturned hollowing hammer. Solder the bottom on.
Bahan untuk langkah ini:
Kepingan besi putih1 bottomPateri timah-plumbum1 bottomAlatan diperlukan:
Jangka lukisGunting kepingan logamPenebuk lubang kepingan logamTukul perataBesi Pateri ElektrikFluks5
5
Add the hoop and handles
Add the hoop and handles
Cut a strip 1 1/2 in wide, as long as the circumference of the bottom. Wire it with No. 10 B.W.G., round it, seam it and solder it on as the foot. Rivet a pair of bow handles opposite each other at the top.
Bahan untuk langkah ini:
Kepingan besi putih1 hoopDawai besi1 hoopPateri timah-plumbum1 hoop Hulu2 bow handles
 Rivet besi1 number not given
Alatan diperlukan:
Gunting kepingan logamBesi Pateri ElektrikFluks Tukul rivet
6
6
Clean and scald
Clean and scald
Clean with turpentine and whiting, then polish with dry whiting. Before first use, steep it a short time in boiling water, as for any metal article for the kitchen.
Alatan diperlukan:
 Turpentin
 Kalsium karbonat (kapur putih halus)
 Air
Bahan
5- 1 hoopPemegang Tempat
- 1 hoopPemegang Tempat
- 1 hoopPemegang Tempat
- 2 bow handlesPemegang Tempat
- 1 number not givenPemegang Tempat
Alatan Diperlukan
15- Pemegang Tempat
- Pemegang Tempat
- Pemegang Tempat
- Pemegang Tempat
- Pemegang Tempat
- Pemegang Tempat
- Pemegang Tempat
- Pemegang Tempat
- Pemegang Tempat
- Pemegang Tempat
- Pemegang Tempat
- Pemegang Tempat
- Pemegang Tempat
- Pemegang Tempat
- Pemegang Tempat
Bahan Blueprint Bersambung


Blueprint ini membuat
CC0 Domain Awam
Blueprint ini dikeluarkan di bawah CC0. Anda bebas menyalin, mengubah, mengedar, dan menggunakan karya ini untuk sebarang tujuan, tanpa meminta kebenaran.
Sokong Pembuat dengan membeli produk melalui Blueprint mereka di mana mereka memperoleh Komisen Pembuat ditetapkan oleh Penjual, atau cipta iterasi baru Blueprint ini dan sertakan ia sebagai sambungan dalam Blueprint anda sendiri untuk berkongsi hasil.