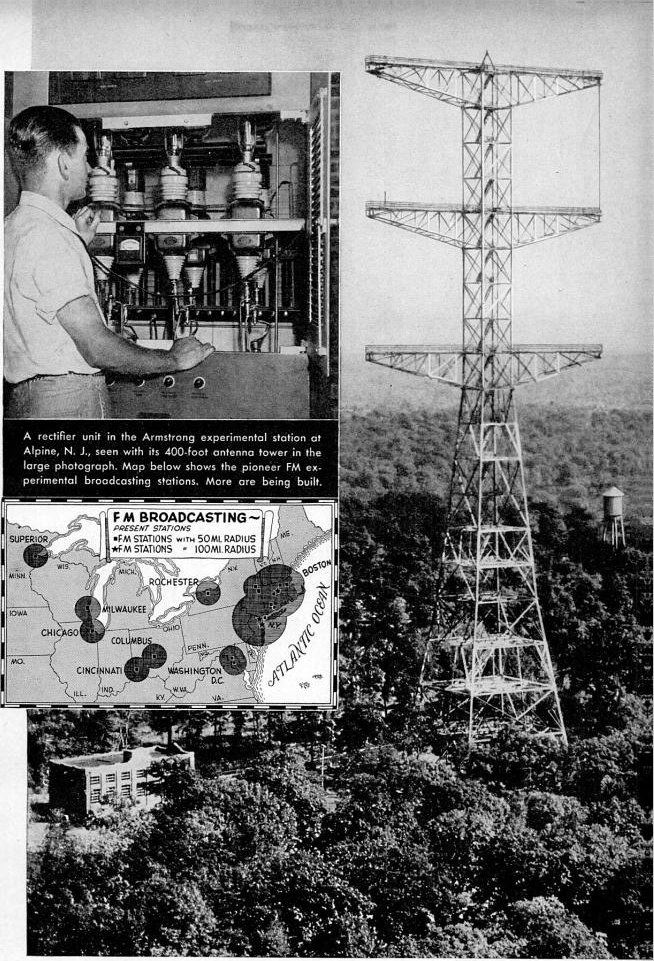


Frequency Modulation
Arahan
Show where noise lives on an AM carrier
Show where noise lives on an AM carrier
Understand the enemy before designing around it.
- Generate an amplitude-modulated carrier and view it on the oscilloscope — a sine wave whose envelope carries the audio.
- Inject a brief impulse into the signal path, simulating a spark or lightning.
- Detect the AM and listen to the recovered audio.
- Now look at the envelope on the scope during the impulse.
The impulse rides directly on the envelope, and because an AM detector recovers exactly that envelope, the click passes straight through to the listener. No amount of filtering after detection helps, because by then the click and the programme are the same kind of thing.
This is why AM broadcast is unlistenable during a thunderstorm and why a car AM radio buzzes under power lines. It is not a defect of any particular receiver — it is a consequence of using amplitude to carry the message, which is exactly what atmospheric noise also arrives as.Bahan untuk langkah ini:
 Kit Perintang1 kit
 Kit Kapasitor1 kit
 Papan Berlubang / Papan Prototaip1 keping
 Dawai Pateri1 reel
Alatan diperlukan:
 Penjana Isyarat
 Penjana Fungsi
 Osiloskop
 Penganalisis Spektrum / Perisian FFT
 Multimeter Digital Gred Makmal
 Stesen Pematerian
 Cermin Mata Keselamatan Jernih
Modulate frequency instead, with a varactor
Modulate frequency instead, with a varactor
Build the transmitter side and watch the carrier move.
- Build a stable LC oscillator at a convenient frequency — a few MHz is easy to work with.
- Include a varactor diode as part of the tuning capacitance — a reverse-biased diode whose junction capacitance varies with applied voltage.
- Apply an audio signal to the varactor bias and observe the oscillator output on a spectrum analyser.
- Measure how far the carrier moves for a given audio amplitude.
The carrier amplitude stays constant while its frequency sweeps back and forth in step with the audio. That swing is the deviation, and it — not the audio amplitude — is what now carries loudness.
Deviation is a design choice, and it is the whole argument. Broadcast FM uses ±75 kHz to carry 15 kHz of audio: five times more spectrum than the message strictly needs. That deliberate excess is precisely where the noise advantage comes from, and it is why the narrow-band analysis of the 1920s concluded FM was pointless.
The varactor is a modern convenience; Armstrong had to shift a reactance valve or mechanically vary a capacitor. The principle is identical and the varactor simply makes it a two-component job.Bahan untuk langkah ini:
 Diod varaktor2 keping
 Dawai Kuprum Bersalut Enamel5 mKit Kapasitor1 kitKit Perintang1 kit
Alatan diperlukan:
OsiloskopPenganalisis Spektrum / Perisian FFTPenjana IsyaratMultimeter Digital Gred Makmal Bekalan Kuasa Meja Boleh Laras
 Meter LCR mejaStesen PematerianCermin Mata Keselamatan Jernih
Look at the spectrum and find the sidebands
Look at the spectrum and find the sidebands
FM spreads energy in a way that surprises everyone the first time they see it.
- Modulate with a single steady audio tone and view the spectrum.
- Count the sidebands either side of the carrier and note their spacing.
- Now increase the deviation while keeping the audio frequency fixed, and watch the pattern change.
- Find a deviation at which the CARRIER itself disappears.
FM produces a theoretically infinite series of sidebands spaced at the modulating frequency, whose amplitudes follow Bessel functions — and at certain modulation indices the carrier amplitude passes through zero entirely. Seeing the carrier vanish while the signal is still being transmitted is genuinely startling, and it is the standard way to calibrate deviation precisely: adjust until the carrier nulls, and you know the index exactly.
In practice the sidebands beyond a certain point are negligible, and Carson’s rule — bandwidth is roughly twice the sum of deviation and highest audio frequency — captures where to stop. For broadcast FM that gives about 180 kHz, close to the 200 kHz channel spacing actually allocated.
This is why AM stations sit 9 or 10 kHz apart and FM stations 200 kHz apart. The spacing is not a regulatory whim, it is Carson’s rule with a guard band.Bahan untuk langkah ini:
 Kertas Graf1 pad
Alatan diperlukan:
Penganalisis Spektrum / Perisian FFTPenjana IsyaratOsiloskopPenjana FungsiCermin Mata Keselamatan JernihBuild a limiter, and delete the noise
Build a limiter, and delete the noise
This stage is where the whole advantage is collected.
- Build a high-gain amplifier stage that clips hard at both extremes — deliberately overdriven, or a pair of back-to-back diodes across the signal.
- Feed it an FM signal with amplitude noise added.
- Look at the output on the scope.
- Measure the residual amplitude variation before and after.
The output is a constant-amplitude square-ish wave; every trace of the amplitude noise has gone, and the frequency information is completely untouched. That is the trick in one sentence — deliberately destroy the dimension the noise lives in, because you are not using it.
An AM receiver cannot do this, because the amplitude IS the message. FM can, because amplitude carries nothing.
The effect is not gradual. Above a certain signal level the noise essentially disappears and reception is clean; below it, reception collapses abruptly into hiss. That threshold is why FM either sounds perfect or sounds terrible with little in between, while AM degrades smoothly — and it is why FM coverage maps have much sharper edges than AM ones.Bahan untuk langkah ini:
 Diod germanium (1N34A)4 keping
 Pelbagai transistor1 kitKit Perintang1 kitKit Kapasitor1 kit
Alatan diperlukan:
OsiloskopPenjana IsyaratPenganalisis Spektrum / Perisian FFTMultimeter Digital Gred MakmalBekalan Kuasa Meja Boleh LarasStesen PematerianCermin Mata Keselamatan JernihDiscriminate frequency back into audio
Discriminate frequency back into audio
Turn frequency variation back into amplitude variation, which is the one thing a detector can handle.
- Build a tuned circuit and deliberately tune it OFF the carrier frequency, so the carrier sits on the sloping side of its response.
- Feed the limited FM signal into it and detect the output with a diode.
- Listen to the recovered audio and measure its distortion.
- Now build a balanced version — two circuits tuned either side of the carrier, their detected outputs subtracted.
The slope detector works and sounds poor; the balanced discriminator works and sounds good. A single slope is only straight over a short span, so large deviations run into its curvature and distort. Two slopes arranged back to back have their curvatures cancel around the centre, giving a long straight region and a null exactly at the carrier.
Notice the shape of the fix: when a transfer characteristic is nonlinear, using two of them in opposition can cancel the nonlinearity while doubling the wanted response. The same idea gives you the push-pull amplifier, the differential pair and the bridge circuit.
Later receivers use the ratio detector, which adds inherent limiting so a separate limiter stage is unnecessary, and modern ones use a phase-locked loop whose control voltage IS the demodulated audio. Three mechanisms, one job — and all three are still in use somewhere.Bahan untuk langkah ini:
Dawai Kuprum Bersalut Enamel10 m Teras ferit toroid2 kepingDiod germanium (1N34A)4 kepingKit Kapasitor1 kitKit Perintang1 kit
Alatan diperlukan:
OsiloskopPenjana IsyaratPenganalisis Spektrum / Perisian FFTMeter LCR mejaMultimeter Digital Gred MakmalStesen PematerianCermin Mata Keselamatan JernihBahan
10- Pemegang Tempat
- 1 kitPemegang Tempat
- Pemegang Tempat
- 1 reelPemegang Tempat
- 2 kepingPemegang Tempat
- Pemegang Tempat
- 1 padPemegang Tempat
- 4 kepingPemegang Tempat
- 1 kitPemegang Tempat
- 2 kepingPemegang Tempat
Alatan Diperlukan
9- Pemegang Tempat
- Pemegang Tempat
- Pemegang Tempat
- Pemegang Tempat
- Pemegang Tempat
- Pemegang Tempat
- Pemegang Tempat
- Pemegang Tempat
- Pemegang Tempat
Blueprint berkaitan
Blueprint ini berkongsi pengetahuan — teknik, bahan atau prinsip
CC0 Domain Awam
Blueprint ini dikeluarkan di bawah CC0. Anda bebas menyalin, mengubah, mengedar, dan menggunakan karya ini untuk sebarang tujuan, tanpa meminta kebenaran.
Sokong Pembuat dengan membeli produk melalui Blueprint mereka di mana mereka memperoleh Komisen Pembuat ditetapkan oleh Penjual, atau cipta iterasi baru Blueprint ini dan sertakan ia sebagai sambungan dalam Blueprint anda sendiri untuk berkongsi hasil.