Kerjasama
SENI
KECANTIKAN & KESEJAHTERAAN
KRAFTANGAN
BUDAYA & SEJARAH
HIBURAN
ALAM SEKITAR
MAKANAN & MINUMAN
KEJURUTERAAN TERBALIK
SAINS
SUKAN
TEKNOLOGI
BOLEH PAKAI
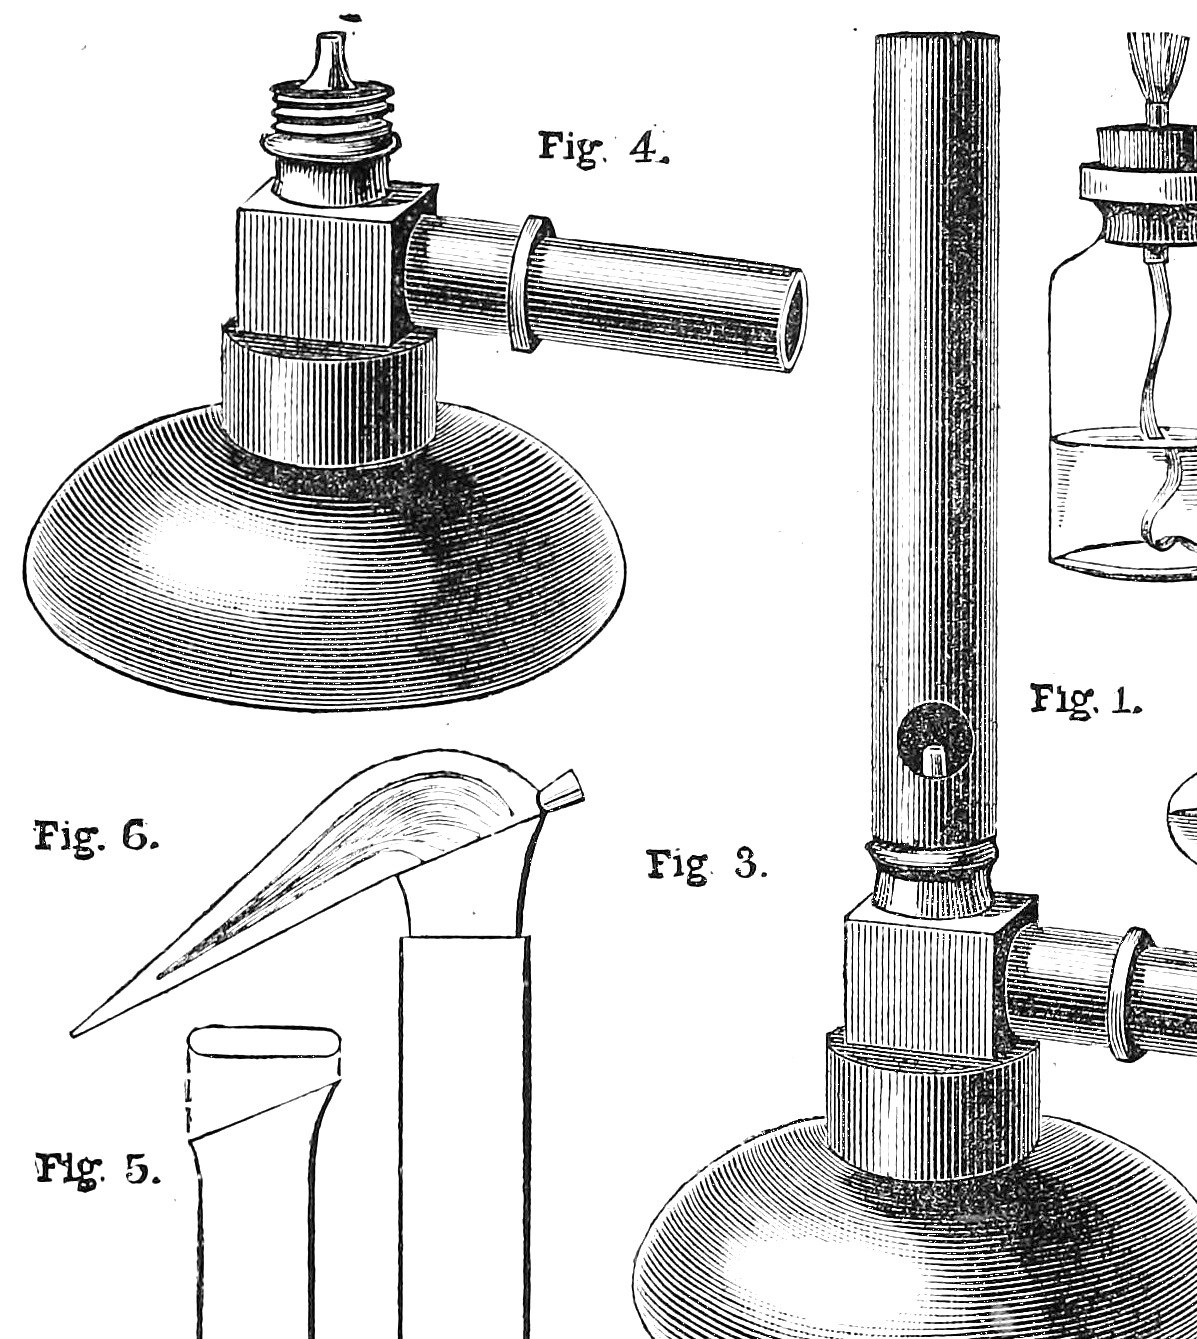


Gas Burner: a Home-Made Bunsen Burner from Brass Tube (Work, 1892)
A Bunsen burner: gas from a fine jet draws air in through two holes at the foot of an upright tube, and the mixture burns at the top with a hot blue flame that leaves no soot. H. B. Stocks (Work, 1892) makes one from a 3 1/2 in. brass tube 1/2 in. across, a short 3/8 in. tube for the gas, a brass boss and elbow from a gas bracket, and a bit of fine-bore tube from an old oil-can as the jet.
A sliding brass collar over the air-holes sets the flame.
Source: H. B. Stocks, How to Make a Cheap Spirit Lamp, Bunsen Burner, Blowpipes, etc., Work No. 167 (28 May 1892), p. 167. Picture: his Figs. 3-4.
Pertengahan
Unknown
Arahan
1
1
Read Stocks
Read Stocks
"To make a Bunsen burner the following materials will be necessary:—A piece of brass tube 3 1/2 in. long, 1/2 in. diameter (external); a piece of tube 3/8 in. in diameter, 1 1/2 in. long; a brass boss similar to those on an ordinary bracket, but without a tap; a brass elbow tube; also a piece of tubing with very fine bore (small bit of tube from an old oil-can will do)."
2
2
Solder the elbow on the boss
Solder the elbow on the boss
Solder the brass elbow-piece onto the brass boss, with the tube that has a screw cut for a gallery uppermost.
Bahan untuk langkah ini:
 Penyambung paip berbenang2 boss and elbow
 Pateri timah-plumbum1 joint
 Fluks1 joint
Alatan diperlukan:
 Alat pematerian
3
3
Fit the jet
Fit the jet
Cut the fine-bore tube 3/4 in. to 1 in. long and solder it inside the vertical tube of the elbow-piece so it projects about 1/2 in. If it is too small for the hole, plug round it with a little sheet lead, keeping it perfectly vertical and in the centre of the outer tube, then solder. The metal of the oil-can tube is not given (unknown).
Bahan untuk langkah ini:
 Logam tidak diketahui1 fine-bore tube
 Kepingan plumbum1 packingPateri timah-plumbum1 joint
Alatan diperlukan:
Alat pematerian Gunting kepingan logam
4
4
Make the burner tube
Make the burner tube
Take the brass tube 3 1/2 in. long, 1/2 in. across. If it is not of very thick brass it will be a little too large: turn a piece of very thin sheet brass 1/2 in. by 1 1/4 in. into a cylinder and solder it inside one end. Tap that end inside to screw onto the male thread of the elbow-piece. At the same end drill two holes about 3/8 in. across, exactly opposite each other, their centres 5/8 in. from the end: the air-holes.
Bahan untuk langkah ini:
 Tiub loyang garis pusat luar 1/2 inci1 3 1/2 in.
 Kepingan Loyang1 1/2 x 1 1/4 in.Pateri timah-plumbum1 joint
Alatan diperlukan:
Gunting kepingan logamAlat pematerian Set pemotong ulir
 Pemutar tap ulir
 Gerimit tangan
5
5
Assemble and test
Assemble and test
Screw the burner tube onto the elbow-piece and screw the 3/8 in. tube, 1 1/2 in. long, into the side opening. Push the india-rubber tube from the gas supply onto the side tube and light. A purplish-blue flame means air and gas are in the right proportion. A yellow tip means too much gas: plug the hole in the jet slightly.
Bahan untuk langkah ini:
 Tiub loyang diameter luar 9,5 mm1 1 1/2 in.
Alatan diperlukan:
 Tiub Getah
6
6
Fit the air collar
Fit the air collar
If the gas burns with a green flame and a hissing noise, the air-holes are too large. Cut sheet brass about 3/4 in. wide and 1 3/4 in. long and drill two holes 3/8 in. across, 1/2 in. from each end (their centres 3/16 in. further in). Turn it into a tube and push it onto the burner tube over the air-holes. Turn it until the two sets of holes do not quite match, so the right amount of air reaches the burner.
Bahan untuk langkah ini:
Kepingan Loyang1 3/4 x 1 3/4 in.Alatan diperlukan:
Gunting kepingan logamGerimit tanganBahan
8- 2 boss and elbowPemegang Tempat
- 3 jointPemegang Tempat
- 1 jointPemegang Tempat
- 1 fine-bore tubePemegang Tempat
- 1 packingPemegang Tempat
- 1 3 1/2 in.Pemegang Tempat
- 1 3/4 x 1 3/4 in.Pemegang Tempat
- 1 1 1/2 in.Pemegang Tempat
Alatan Diperlukan
6- 2 vendors sell this, none ship to you yetPemegang Tempat
- Pemegang Tempat
- Pemegang Tempat
- Pemegang Tempat
- Pemegang Tempat
- Pemegang Tempat
Blueprint ini membuat

CC0 Domain Awam
Blueprint ini dikeluarkan di bawah CC0. Anda bebas menyalin, mengubah, mengedar, dan menggunakan karya ini untuk sebarang tujuan, tanpa meminta kebenaran.
Sokong Pembuat dengan membeli produk melalui Blueprint mereka di mana mereka memperoleh Komisen Pembuat ditetapkan oleh Penjual, atau cipta iterasi baru Blueprint ini dan sertakan ia sebagai sambungan dalam Blueprint anda sendiri untuk berkongsi hasil.