Kerjasama
SENI
KECANTIKAN & KESEJAHTERAAN
KRAFTANGAN
BUDAYA & SEJARAH
HIBURAN
ALAM SEKITAR
MAKANAN & MINUMAN
KEJURUTERAAN TERBALIK
SAINS
SUKAN
TEKNOLOGI
BOLEH PAKAI
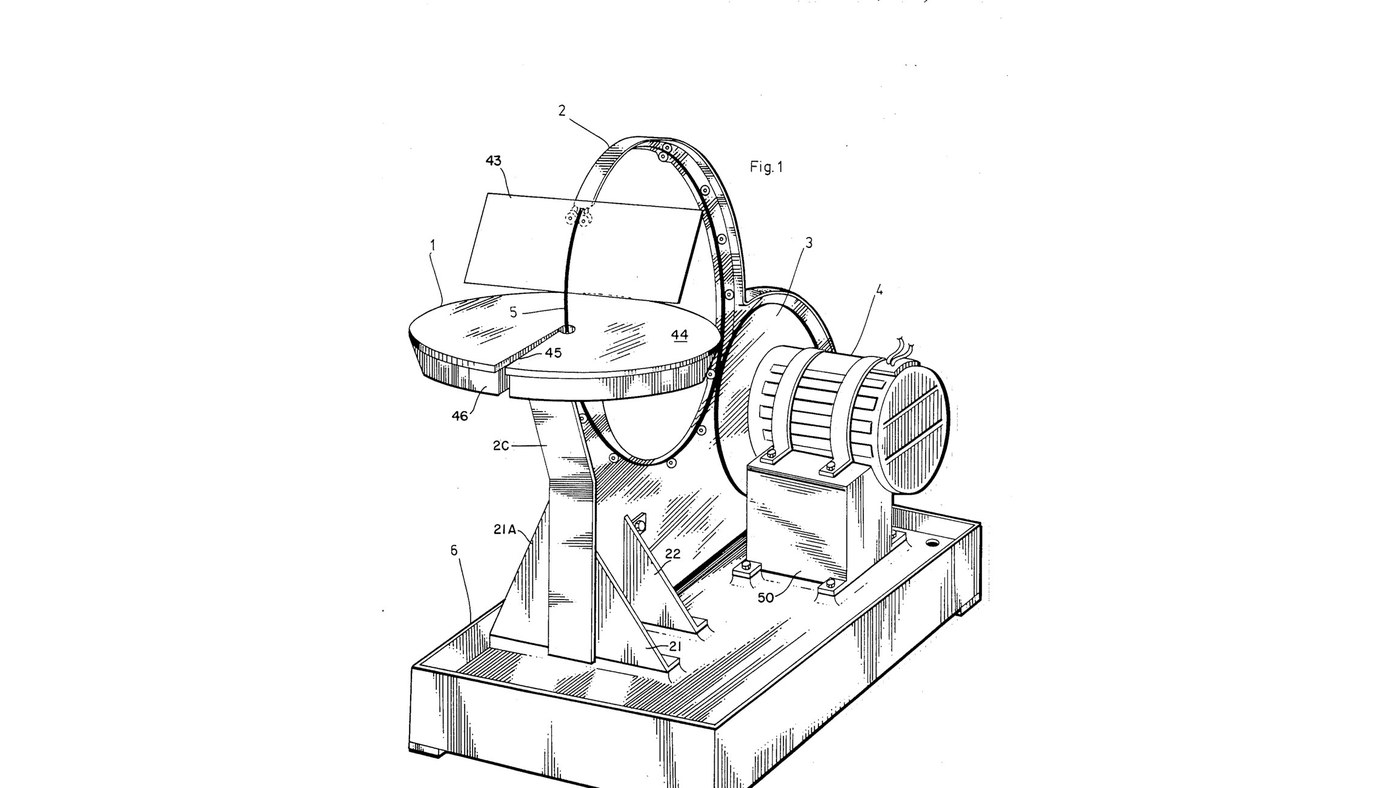


Glass Saw: Rigid Diamond Wire Ring Driven by Its Rim
Jesse Cogswell's ring saw (US 4,576,139, 1986) for glass, ceramics and stone. The blade is a rigid circle of wire coated with bonded diamond, standing upright through a cutting table. A rubber-tyred wheel on the motor drives it by friction round its own rim at 3000 ft/min or more, and twelve guide wheels on slots round an aluminium back-plate hold it true. Because it cuts with any part of its rim, the work can be turned freely for curves and inside shapes; a sponge in a water tray wets the wire.
The patent sizes the ring from the thickest work to be cut (8 in ring for 3/16 in); the notebook does the sums. The picture: the patent's Fig. 1.
Lanjutan
3 days
Arahan
1
1
Cut and brace the back-plate
Cut and brace the back-plate
Cut the back-plate (2A) from aluminium plate, its upper part curved as an arc to shield the saw, stiffened by an angle (2B) along the top and a flat splatter strip (2C) at the front. Bolt on two front struts (21, 21A) and two side struts (22) and bolt them to the base. Ours: drill press.
Bahan untuk langkah ini:
 Plat Aluminium1 keping
 Besi siku aluminium1 keping
 Bolt kepala enam segi - mutu 8.81 keping
Alatan diperlukan:
 Gerudi Tiang
 Sepana boleh laras
2
2
Cut the wheel-slider apertures
Cut the wheel-slider apertures
Cut slots (32) through the back-plate's arc at 0, 30, 60, 90, 120, 210, 240, 270, 300 and 330° round the ring's centre: two slots at 90° and 210° for the guide pairs, one at each of the others. The slots let each guide wheel slide to the ring.
Alatan diperlukan:
Gerudi Tiang3
3
Assemble the guide wheels
Assemble the guide wheels
For each of the twelve guide wheels, stretch two rubber O-rings (27) into the grooves of a bearing wheel (26) with sealed roller bearings, and mount it on a shoulder bolt (28) with a washer, lockwasher and nut.
Bahan untuk langkah ini:
 Penggelek pemandu12 keping
 O-ring24 keping
 Bolt bahu12 keping
 Sesendal Rata12 keping
 Spring Washer12 keping
 Nat Heksagon12 keping
Alatan diperlukan:
Sepana boleh laras4
4
Turn the drive wheel
Turn the drive wheel
Turn an aluminium disk with a hub, a bored axle hole and a deep groove round its rim, and seat a large rubber O-ring (23) in the groove as its driving tyre. Ours: lathe.
Bahan untuk langkah ini:
Plat Aluminium1 kepingO-ring1 kepingAlatan diperlukan:
 Mesin Pelarik Logam
5
5
Mount the motor and drive axle
Mount the motor and drive axle
Strap the electric motor (51) onto its pillow block (50) with fastening bands (52) and bolt the block to the base. Fix the drive wheel on the motor's axle (24) and carry the axle's end in an axle pillow block (24A, 24B).
Bahan untuk langkah ini:
 Motor elektrik1 keping
 Jalur pengikat motor2 keping
 Blok galas2 keping
 Aci keluli1 kepingBolt kepala enam segi - mutu 8.81 keping
Alatan diperlukan:
Sepana boleh laras6
6
Fit the ring and its guides
Fit the ring and its guides
Stand the ring saw on the drive wheel's tyre. Bolt the guide wheels through their slots: each pair with a tension spring between its two wheels, each single with a spring to the back-plate's lower rim, the one at 330° pressing the ring onto the drive wheel. Set them against the ring, then tighten the nuts. Fit two horizontal roller-guides (17) at 150°, sprung together, just before the cut.
Bahan untuk langkah ini:
 Bilah gergaji cincin berlian1 keping
 Spring tarik11 kepingPenggelek pemandu2 keping
Alatan diperlukan:
Sepana boleh laras7
7
Fit the table, tray and sponge
Fit the table, tray and sponge
Bolt the water tray (46) on four bracket supports (19, 20) by its four studs; put a ring-shaped sponge (47) in it and the cutting table (44) over it, the ring passing through centre holes reached by slots offset half an inch from a radius. Set the table top below the ring's centre line by the thickest work you will cut. Add water to the tray.
Bahan untuk langkah ini:
 Dulang1 keping
 Span1 kepingPlat Aluminium1 keping
 Air1 batch
Alatan diperlukan:
Sepana boleh laras8
8
Fit the face shield and drip pan
Fit the face shield and drip pan
Bolt the shield arm (41) to the back-plate and pivot a clear acrylic face shield (43) in its holder (42) on a locking screw. The base is a catchment for the coolant with a drain hole in one corner.
Bahan untuk langkah ini:
 Lembaran Akrilik1 kepingPlat Aluminium1 keping
 Dulang titisan1 keping
Alatan diperlukan:
Sepana boleh laras9
9
Ring size and drive speed
Ring size and drive speed
Memuatkan buku nota Jupyter…
Bahan
20- 1 kepingPemegang Tempat
- 1 kepingPemegang Tempat
- 2 kepingPemegang Tempat
- 12 kepingPemegang Tempat
- 25 kepingPemegang Tempat
- 12 kepingPemegang Tempat
- 12 kepingPemegang Tempat
- 12 kepingPemegang Tempat
- 12 kepingPemegang Tempat
- 1 kepingPemegang Tempat
- 2 kepingPemegang Tempat
- 2 kepingPemegang Tempat
- 1 kepingPemegang Tempat
- 1 kepingPemegang Tempat
- 11 kepingPemegang Tempat
- 1 kepingPemegang Tempat
- 1 kepingPemegang Tempat
- 1 batchPemegang Tempat
- 1 kepingPemegang Tempat
- 1 kepingPemegang Tempat
Blueprint ini membuat

CC0 Domain Awam
Blueprint ini dikeluarkan di bawah CC0. Anda bebas menyalin, mengubah, mengedar, dan menggunakan karya ini untuk sebarang tujuan, tanpa meminta kebenaran.
Sokong Pembuat dengan membeli produk melalui Blueprint mereka di mana mereka memperoleh Komisen Pembuat ditetapkan oleh Penjual, atau cipta iterasi baru Blueprint ini dan sertakan ia sebagai sambungan dalam Blueprint anda sendiri untuk berkongsi hasil.