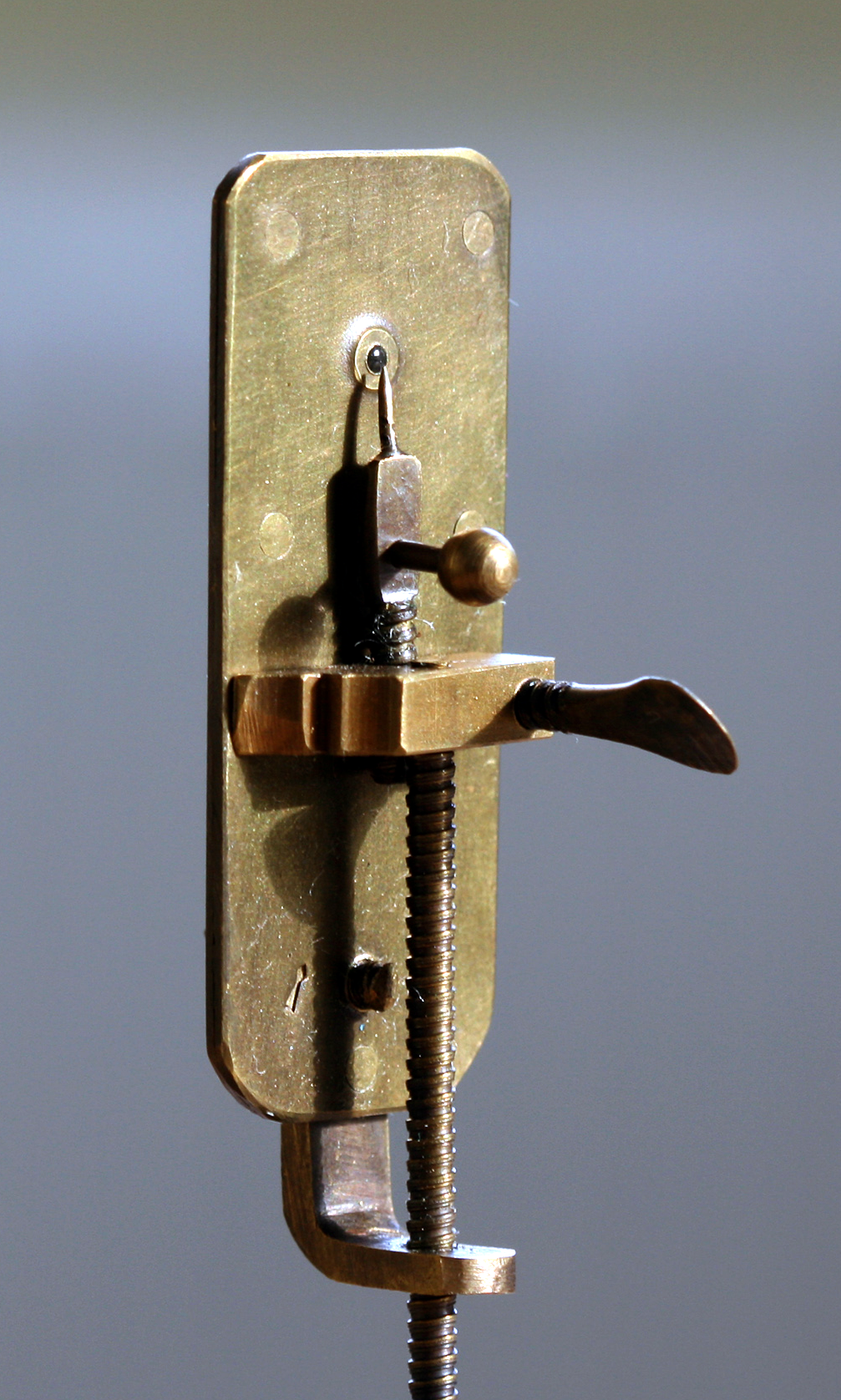


Leeuwenhoek Microscope
Everyone assumes the first person to see bacteria used an elaborate instrument. He did not. Antonie van Leeuwenhoek's microscopes were brass plates the size of a matchbox, holding a single tiny glass bead, with the specimen on a pin in front of it. You hold the whole thing up to your eye, almost touching your eyelash, and squint into the light.
The compound microscopes of his day were far more impressive and far worse. Two lenses multiplied magnification but multiplied the aberrations too, giving a big blurry image. One very small, very round lens gave a tiny, sharp, brilliantly bright one — and Leeuwenhoek's reached several hundred times.
A glass bead pulled in a flame will do the same thing today, for the cost of nothing.
Arahan
Tie hair back and work over a heatproof surface
Tie hair back and work over a heatproof surface
You will be melting glass in a flame. Hair tied back, sleeves clear, and a metal tray underneath — a dropped bead is a small molten pellet.
Draw a fine thread from glass rod
Draw a fine thread from glass rod
Heat the middle of a thin glass rod until it softens, then pull the ends apart to draw out a hair-fine thread. Let it cool and snap off a length.
Bahan untuk langkah ini:
 Rod kaca bentuk batang1 keping
Alatan diperlukan:
 Obor Propana
Melt the end of the thread into a bead
Melt the end of the thread into a bead
Hold the tip in the flame edge. Surface tension pulls the melted end into a sphere. Withdraw it the moment the bead forms.
Aim for a bead under 2 mm
Aim for a bead under 2 mm
Smaller is stronger: magnification rises as the bead gets smaller. A 1 mm bead outperforms a 3 mm one by a wide margin.
Alatan diperlukan:
 Pembaris
Make several and pick the best
Make several and pick the best
Make a dozen. Most will be slightly egg-shaped or full of bubbles and are useless; you are selecting, not manufacturing.
Inspect each bead against a bright background
Inspect each bead against a bright background
Look for perfect roundness and no internal bubbles. A bubble in the middle of the lens puts a permanent blind spot in the field of view.
Cut two small brass plates
Cut two small brass plates
Cut two rectangles of thin brass about 45 × 25 mm. These clamp the bead between them.
Bahan untuk langkah ini:
 Kepingan Loyang 260 Tebal 241 helaian
Drill a hole slightly smaller than the bead in each
Drill a hole slightly smaller than the bead in each
Drill matching holes near one end. The bead must sit in the holes without falling through, gripped between the two plates.
Clamp the bead between the plates and rivet
Clamp the bead between the plates and rivet
Seat the bead, align the plates and rivet them together. Nothing must be able to shift once assembled.
Bahan untuk langkah ini:
 Rivet keluli4 keping
Fit a specimen pin on an adjustable screw
Fit a specimen pin on an adjustable screw
Mount a pin on the back so it sits just in front of the bead, with a screw to move it toward and away. This is the focus, and it is the only adjustment there is.
Mount the specimen on the pin tip
Mount the specimen on the pin tip
Put a droplet of pond water, or a hair, on the pin point. It must be tiny and thin — this instrument has almost no working distance.
Hold the plate right against your eye
Hold the plate right against your eye
Bring the lens hole to your eye, almost touching your lashes, with a bright window or lamp beyond the specimen. Anyone standing back a normal distance sees nothing at all.
Focus with the screw, not your head
Focus with the screw, not your head
Keep the plate still against your eye and turn the screw slowly. The depth of field is minute; you will pass through focus without noticing if you rush.
Estimate the magnification
Estimate the magnification
Measure the bead diameter, then view a ruler's millimetre marks and judge how much wider they appear. Smaller beads give the higher figures — you can check the relationship yourself.
Compendium — why the simplest instrument won
Compendium — why the simplest instrument won
Simple beat compound for two centuries. Robert Hooke's Micrographia (1665) was made with a compound microscope and is rightly famous, but compound instruments of the period suffered badly from chromatic and spherical aberration, and stacking a second lens magnified the faults along with the image. Leeuwenhoek's single-lens instruments — he made hundreds, and around a dozen survive — outperformed them decisively. Only achromatic doublets in the nineteenth century made compound microscopes genuinely better.
The physics, in one line. A sphere's focal length falls with its radius, and magnification rises as focal length shrinks. So a smaller bead means a stronger lens — and also a shorter working distance and a dimmer, narrower field, which is why the specimen sits almost against the glass and the glass almost against your eye. Everything awkward about using one follows from the same equation that makes it powerful.
What he actually saw. From the 1670s Leeuwenhoek reported protozoa, then bacteria — his animalcules — in pond water, saliva and dental plaque, along with spermatozoa, red blood cells and muscle striations. The Royal Society was sceptical enough to send observers to verify it. He never sold or gave away his best instruments and never fully explained his lens-making, which is why it took a long time for anyone to reproduce his results.
The lesson worth keeping. He was a draper, not a scholar, and read no Latin. His advantage was not theory but craft: he could make a better lens than anyone else and he had the patience to look through it for hours. A glass bead in a brass plate opened a world that better-funded, better-educated men with grander instruments had missed.
Bahan
3- 1 kepingPemegang Tempat
- 1 helaianPemegang Tempat
- 4 kepingPemegang Tempat
Bahan Blueprint Bersambung

Blueprint ini membuat
Blueprint berkaitan
Blueprint ini berkongsi pengetahuan — teknik, bahan atau prinsip

CC0 Domain Awam
Blueprint ini dikeluarkan di bawah CC0. Anda bebas menyalin, mengubah, mengedar, dan menggunakan karya ini untuk sebarang tujuan, tanpa meminta kebenaran.
Sokong Pembuat dengan membeli produk melalui Blueprint mereka di mana mereka memperoleh Komisen Pembuat ditetapkan oleh Penjual, atau cipta iterasi baru Blueprint ini dan sertakan ia sebagai sambungan dalam Blueprint anda sendiri untuk berkongsi hasil.