Kerjasama
SENI
KECANTIKAN & KESEJAHTERAAN
KRAFTANGAN
BUDAYA & SEJARAH
HIBURAN
ALAM SEKITAR
MAKANAN & MINUMAN
KEJURUTERAAN TERBALIK
SAINS
SUKAN
TEKNOLOGI
BOLEH PAKAI
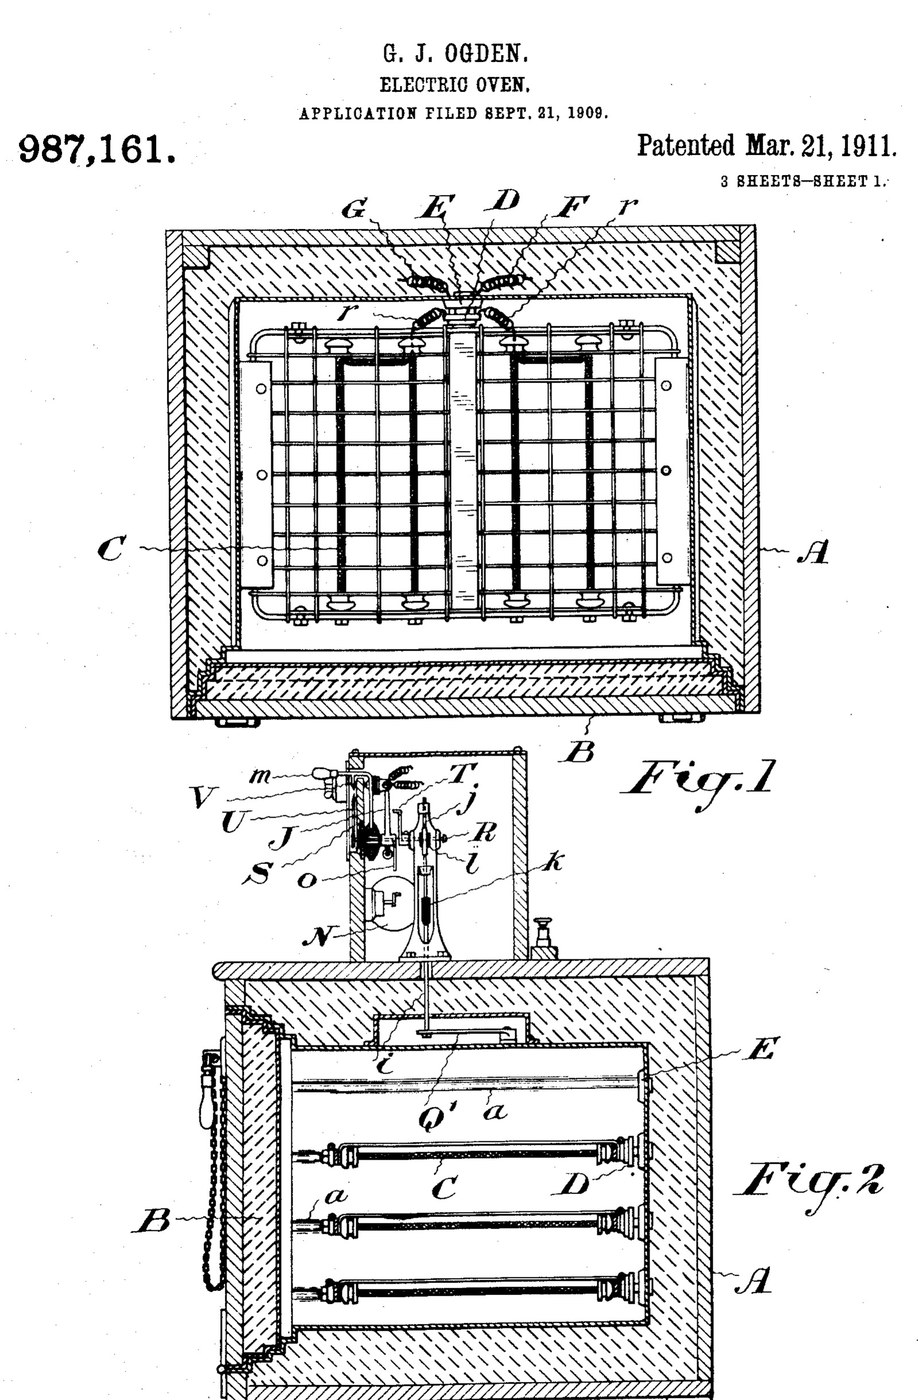


Oven: Insulated Electric Oven with Plug-In Grid Heaters and a Thermostat (Ogden, US 987,161, 1911)
An electric oven built to waste as little heat as possible: a double-walled, packed box with a packed door that seals like a strong-room door. Grid-shaped heating elements slide into grooves in the walls and plug into sockets at the back, and the food rests on them. A thermostat cuts the current when the set temperature is reached and switches it on again as the oven cools.
Result: an oven that bakes, roasts or dries at a set temperature with any number of heating grids.
Source: G. J. Ogden, US 987,161 (1911). Unknown: sizes, metals, packing and temperatures. Picture: the patent drawing.
Lanjutan
Unknown
Arahan
1
1
Build the insulated casing and door
Build the insulated casing and door
Make the oven chamber as a double-walled casing with packing between the walls, and grooves on the inner side walls to take the heating grids. Fit a door that closes like a fire-proof vault door, also packed, so the casing seals closely. Ours: mild steel sheet. Not given: sizes, the packing.
Bahan untuk langkah ini:
 Kepingan Keluli Lembut1 inner and outer walls, door
 Bahan penebat tidak diketahui1 packing
Alatan diperlukan:
 Gunting kepingan logam
 Gerudi Tiang
 Dimensi tidak diketahui
2
2
Make the plug-in heating grids
Make the plug-in heating grids
Make heating elements in the form of grids that slide into the grooves and on which the food can rest. Fix a porcelain plug to each, carrying spring fingers that push into a socket with matching spring fingers in the back wall. Wire the sockets so all the elements are in parallel; use as many as the temperature and amount of food need. Ours: nichrome wire. Not given: the element type.
Bahan untuk langkah ini:
 Dawai nikrom1 heating grids
 Bahan tidak diketahui1 porcelain plugs and sockets
 Dawai keluli spring1 spring fingers
 Wayar sambung1 circuit wiring
Alatan diperlukan:
 Alat pematerian
3
3
Fit the thermostat control
Fit the thermostat control
Put a thermostat that bends with heat inside the oven, working a contact finger that plays between two contacts a few degrees above and below the set temperature. A switch-changing device, a small rotary motor, throws the main switch off and on as the finger touches one contact or the other. Mount a setting arm with a pointer over a scale marked in degrees, and a second pointer driven by the thermostat. Add a hand switch to turn the current on or off independently, and a lamp with its own switch to light the oven. Ours: a bimetal strip, toggle switches. Not given: temperatures.
Bahan untuk langkah ini:
 Jalur dwilogam1 thermostat
 Motor elektrik1 switch-changing motor
 Suis togol3 main, hand and lamp switches
 Logam tidak diketahui1 contacts, arm, scaleBahan tidak diketahui1 incandescent oven lamp
Alatan diperlukan:
Alat pematerian Termometer
Bahan
10- 1 inner and outer walls, doorPemegang Tempat
- 1 packingPemegang Tempat
- 1 heating gridsPemegang Tempat
- 1 incandescent oven lampPemegang Tempat
- 1 spring fingersPemegang Tempat
- Pemegang Tempat
- 1 thermostatPemegang Tempat
- 1 switch-changing motorPemegang Tempat
- Pemegang Tempat
- 1 contacts, arm, scalePemegang Tempat
Alatan Diperlukan
5- Pemegang Tempat
- Pemegang Tempat
- Pemegang Tempat
- 2 vendors sell this, none ship to you yetPemegang Tempat
- Pemegang Tempat
Bahan Blueprint Bersambung

Blueprint ini membuat

CC0 Domain Awam
Blueprint ini dikeluarkan di bawah CC0. Anda bebas menyalin, mengubah, mengedar, dan menggunakan karya ini untuk sebarang tujuan, tanpa meminta kebenaran.
Sokong Pembuat dengan membeli produk melalui Blueprint mereka di mana mereka memperoleh Komisen Pembuat ditetapkan oleh Penjual, atau cipta iterasi baru Blueprint ini dan sertakan ia sebagai sambungan dalam Blueprint anda sendiri untuk berkongsi hasil.