Kerjasama
SENI
KECANTIKAN & KESEJAHTERAAN
KRAFTANGAN
BUDAYA & SEJARAH
HIBURAN
ALAM SEKITAR
MAKANAN & MINUMAN
KEJURUTERAAN TERBALIK
SAINS
SUKAN
TEKNOLOGI
BOLEH PAKAI
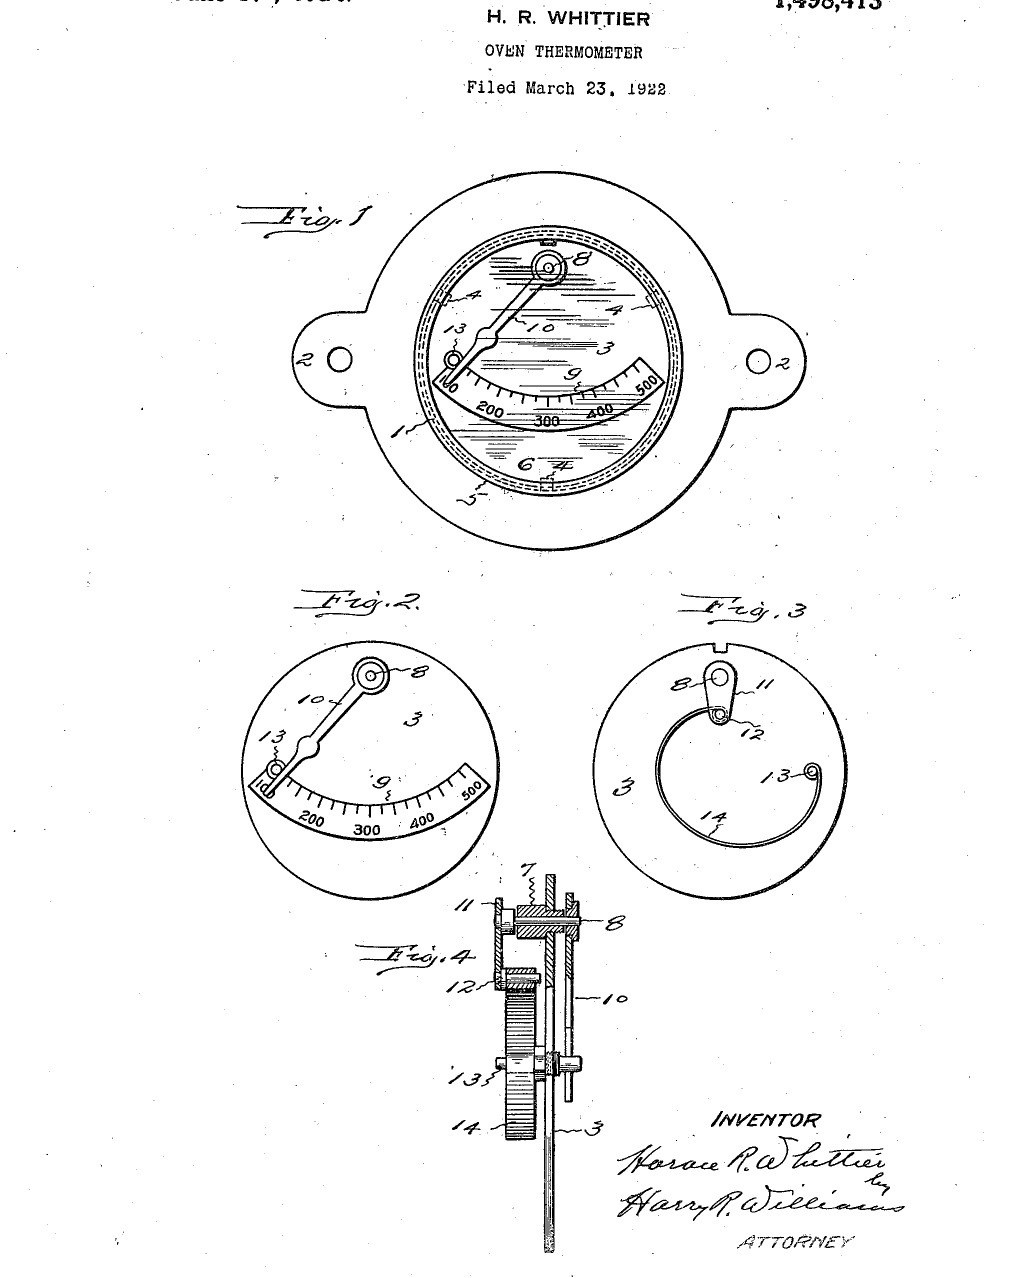


Oven Thermometer: Door-Mounted Dial with a Curved Bimetal Strip (Whittier, US 1,498,413, 1924)
A dial thermometer that fits in an oven door or wall. Behind an enamelled dial plate, a curved bimetal strip runs from a fixed stud to a little arm on a spindle; as the oven heats, the strip bends, turns the spindle and swings the pointer across the scale on the front. Everything is mounted on the dial plate as one unit and dropped into a shallow stamped case with a glass cap.
Result: a compact oven thermometer, easy to calibrate and adjust.
Source: H. R. Whittier, US 1,498,413 (1924). Unknown: metals, sizes and the scale unit. Picture: the patent drawing.
Pertengahan
Unknown
Arahan
1
1
Make the dial unit
Make the dial unit
Cut a metal disk for the dial plate, enamel its front and mark the scale (the patent's drawing reads 200 to 500). Thread a sleeve through the plate near one edge and pass a spindle loosely through it, with a pointer fixed on its front end and a short arm on its back end. Set a stud through the plate: in front it stops the pointer, behind it anchors one end of a curved bimetal strip whose other end is pinned to the arm. Not given: metals, sizes, the scale unit.
Bahan untuk langkah ini:
 Logam tidak diketahui1 dial plate, sleeve, spindle, pointer, arm, stud
 Bahan tidak diketahui1 enamel and scale
 Jalur dwilogam1 curved strip
Alatan diperlukan:
 Set pemotong ulir
 Playar hujung bulat
 Dimensi tidak diketahui
2
2
Make the case
Make the case
Stamp a shallow case from thin sheet metal, closed at the back, with perforated ears for fixing it in the oven door or wall, and press lugs in from its wall for the dial plate to sit on. Make a cap with a glass to close the open front. Ours: steel sheet and a watch glass.
Bahan untuk langkah ini:
 Kepingan Keluli Lembut1 case and cap
 Kaca jam1 window
Alatan diperlukan:
 Gunting kepingan logamDimensi tidak diketahui
3
3
Assemble, calibrate and fit
Assemble, calibrate and fit
Calibrate the strip and set the pointer while the unit is out of the case, then drop the dial unit onto the lugs and fit the cap, which holds the plate in place. Fasten the case through its ears in the oven door or wall. As the oven heats, the strip bends and the pointer swings across the scale. Not given: how it is calibrated.
Alatan diperlukan:
 KetuharPlayar hujung bulat
Bahan
5- 1 dial plate, sleeve, spindle, pointer, arm, studPemegang Tempat
- 1 enamel and scalePemegang Tempat
- 1 curved stripPemegang Tempat
- 1 case and capPemegang Tempat
- 1 windowPemegang Tempat
Alatan Diperlukan
5- Pemegang Tempat
- Pemegang Tempat
- Pemegang Tempat
- Pemegang Tempat
- Pemegang Tempat
Blueprint ini membuat

Blueprint berkaitan
Blueprint ini berkongsi pengetahuan — teknik, bahan atau prinsip
CC0 Domain Awam
Blueprint ini dikeluarkan di bawah CC0. Anda bebas menyalin, mengubah, mengedar, dan menggunakan karya ini untuk sebarang tujuan, tanpa meminta kebenaran.
Sokong Pembuat dengan membeli produk melalui Blueprint mereka di mana mereka memperoleh Komisen Pembuat ditetapkan oleh Penjual, atau cipta iterasi baru Blueprint ini dan sertakan ia sebagai sambungan dalam Blueprint anda sendiri untuk berkongsi hasil.