Carving a Portable Roman Sundial — Hemispherical Scaphe
Arahan
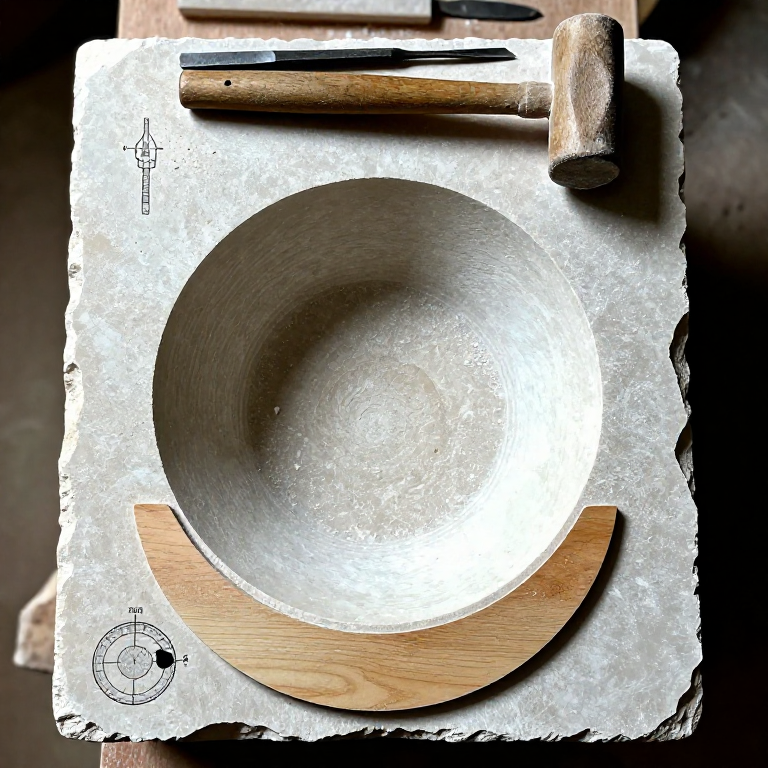
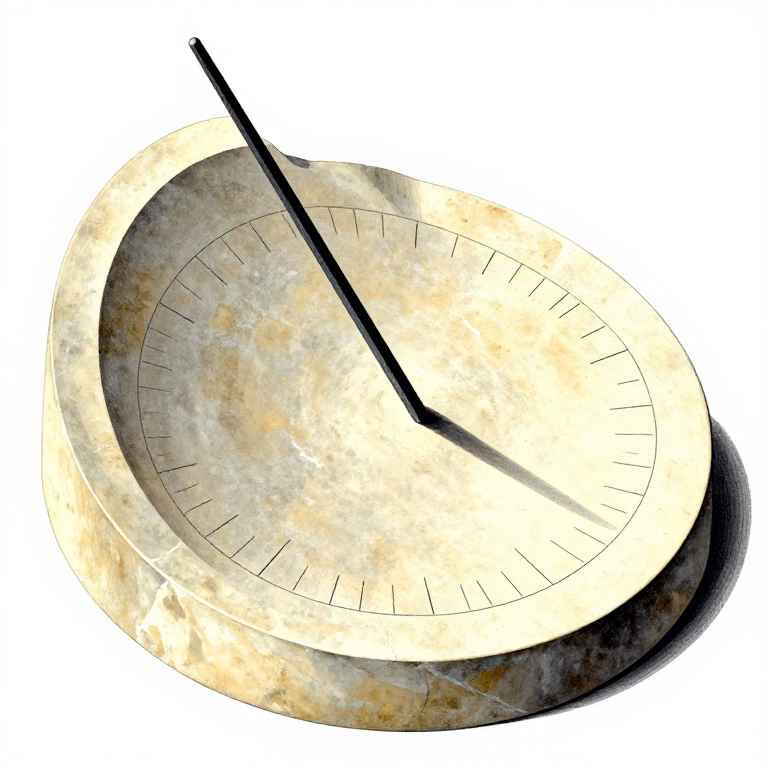
Carve the Hemispherical Cavity
Carve the Hemispherical Cavity
Square up the limestone or marble block to approximately 20 x 20 x 15 cm. Mark the centre of the top face and scribe a circle of the desired dial radius (approximately 7 to 8 cm). Using a point chisel and mallet, rough out a hemispherical cavity within this circle to a depth equal to the radius. Work in concentric rings from the outside inward, removing material in thin layers to control the shape. The cavity must be a true hemisphere — an irregular surface will produce inaccurate time readings. Smooth the interior with progressively finer abrasive stones until the surface is even and uniform. Check the hemispherical shape by rotating a template (a semicircular piece of thin wood cut to the exact radius) inside the cavity — it should contact the stone surface at all points throughout its rotation.
Bahan untuk langkah ini:
 Limestone Block1 block keping
Alatan diperlukan:
 Carving Mallet (Lignum Vitae)
 Compass
 Protractor
 Masonry Drill Bit Set (7-Piece)
 Sandstone (Abrasive)
Calculate and Mark the Hour Lines
Calculate and Mark the Hour Lines
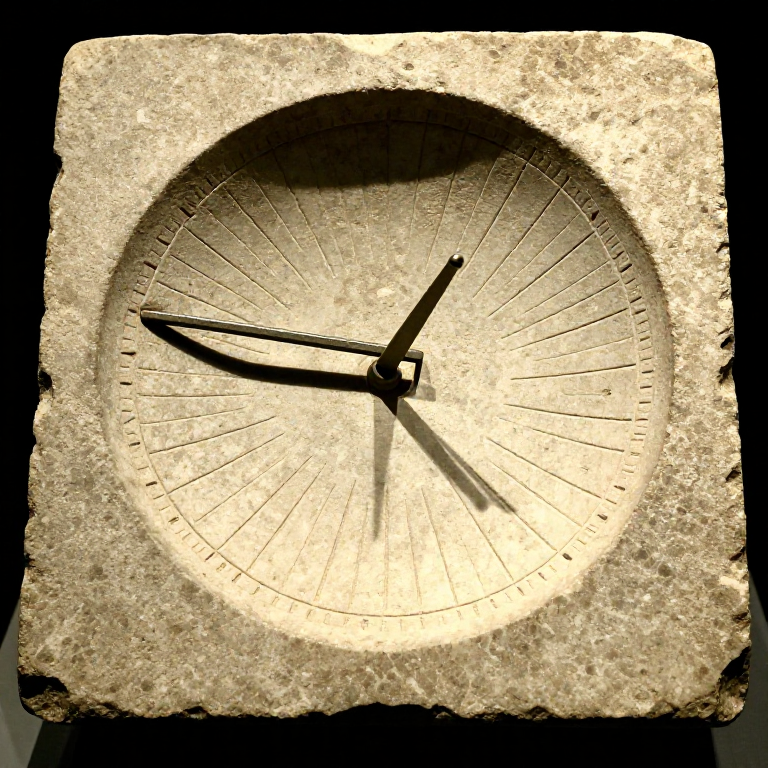
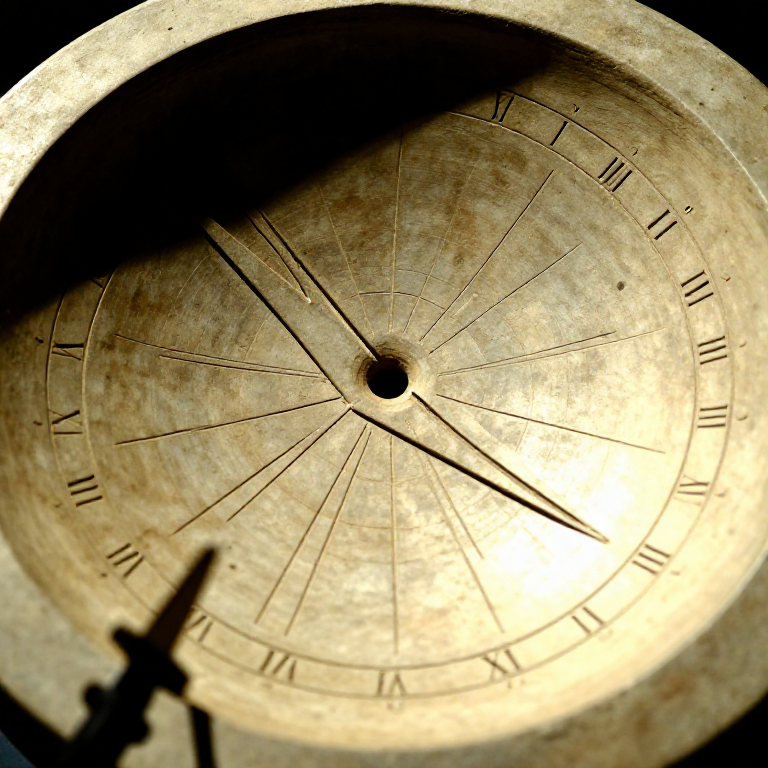
The hour lines on a scaphe sundial depend on the latitude of the location where it will be used. The gnomon tip is positioned at the centre of the hemisphere, and its shadow falls on different points of the concave surface as the sun traverses the sky. For each seasonal hour, the shadow position must be calculated using the sun's altitude and azimuth at that hour for the given latitude. In practice, the simplest method is empirical: on the equinoxes (when daylight and night are equal and hours are uniform), mark the shadow position of the gnomon tip every equal time interval throughout the day. Connect these marks with incised lines extending from the summer solstice arc to the winter solstice arc. Three key seasonal arcs should also be marked: the equinox line (a straight line at the latitude's co-latitude angle), and the solstice arcs (curves representing the extreme summer and winter sun paths).
Incise the Hour Lines and Seasonal Arcs
Incise the Hour Lines and Seasonal Arcs
Using a fine V-chisel or a sharp point, carefully incise the calculated hour lines into the smooth hemispherical surface. There are eleven hour lines dividing the daylight into twelve seasonal hours (the first and twelfth hours are bounded by the horizon). Also incise the three seasonal arcs — the winter solstice arc (highest in the bowl, since the winter sun is low and the gnomon shadow is long), the equinox line (a straight line across the middle), and the summer solstice arc (lowest in the bowl, since the high summer sun produces a short shadow). Roman numerals or Greek letters can be carved beside each hour line for identification. The incised lines should be approximately 1 to 2 mm deep and wide, filled with red or black pigment for visibility if desired.
Install the Gnomon
Install the Gnomon
Drill a hole approximately 4 mm in diameter and 15 mm deep into the rim of the hemisphere at the north point (for Northern Hemisphere use). The hole should be angled so that the gnomon rod, when inserted, projects horizontally inward with its tip positioned exactly at the geometric centre of the hemisphere. This positioning is critical — if the gnomon tip is off-centre, all time readings will be wrong. Insert the bronze or iron gnomon rod into the hole and fix it with lead solder or a friction fit. The rod should be thin enough that its shadow is a fine line, not a broad band. The projecting length of the gnomon from the rim to its tip should equal the radius of the hemisphere. Verify the installation by checking that the gnomon tip's shadow falls on the centre of the equinox line at solar noon on an equinox day.
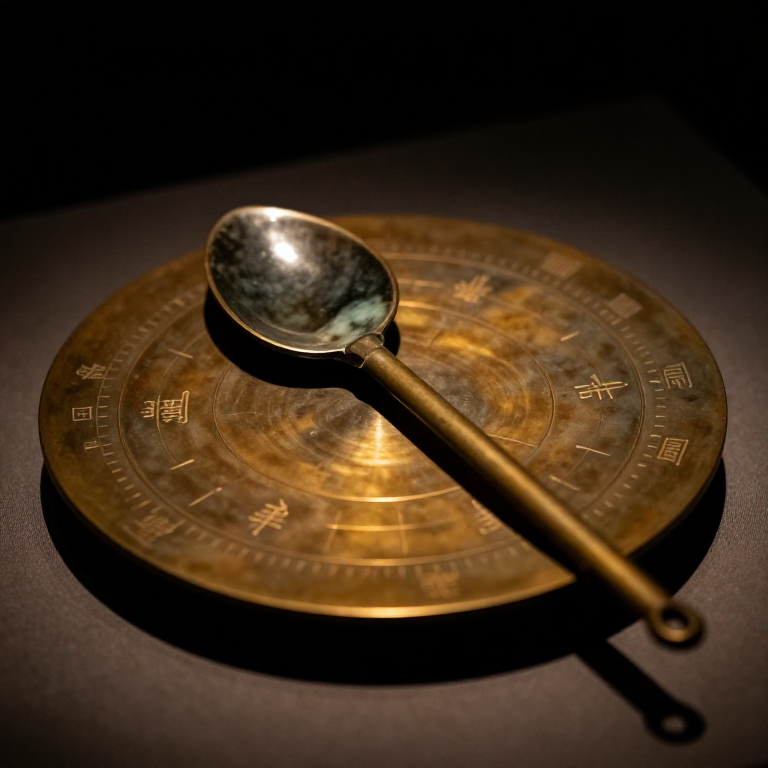
Align and Test the Sundial
Align and Test the Sundial
Position the sundial on a level surface with the gnomon pointing true north (in the Northern Hemisphere). True north can be determined by observing the shortest shadow cast by a vertical stick at solar noon, or by finding Polaris at night. The dial must be perfectly level — use a plumb line or water level to verify. Once aligned, test the dial by comparing its reading against a water clock or mechanical clock at several times throughout the day. The shadow of the gnomon tip should track along the appropriate seasonal arc and cross each hour line at the correct time. Remember that Roman seasonal hours are unequal — in mid-winter at Rome's latitude (41.9 degrees N), one daylight hour lasted approximately 45 modern minutes, while in mid-summer one daylight hour lasted approximately 75 modern minutes. Over 300 Roman sundials have been found across the former empire, confirming that this was a well-understood and standardised technology.
Bahan
2- 1 piece kepingPemegang Tempat
- 1 piece kepingPemegang Tempat
Alatan Diperlukan
6- Pemegang Tempat
- Pemegang Tempat
- Pemegang Tempat
- Pemegang Tempat
- Pemegang Tempat
Related blueprints
Other builds that share materials, tools, or techniques with this one.
CC0 Domain Awam
Blueprint ini dikeluarkan di bawah CC0. Anda bebas menyalin, mengubah, mengedar, dan menggunakan karya ini untuk sebarang tujuan, tanpa meminta kebenaran.
Sokong Pembuat dengan membeli produk melalui Blueprint mereka di mana mereka memperoleh Komisen Pembuat ditetapkan oleh Penjual, atau cipta iterasi baru Blueprint ini dan sertakan ia sebagai sambungan dalam Blueprint anda sendiri untuk berkongsi hasil.