Kerjasama
SENI
KECANTIKAN & KESEJAHTERAAN
KRAFTANGAN
BUDAYA & SEJARAH
HIBURAN
ALAM SEKITAR
MAKANAN & MINUMAN
KEJURUTERAAN TERBALIK
SAINS
SUKAN
TEKNOLOGI
BOLEH PAKAI
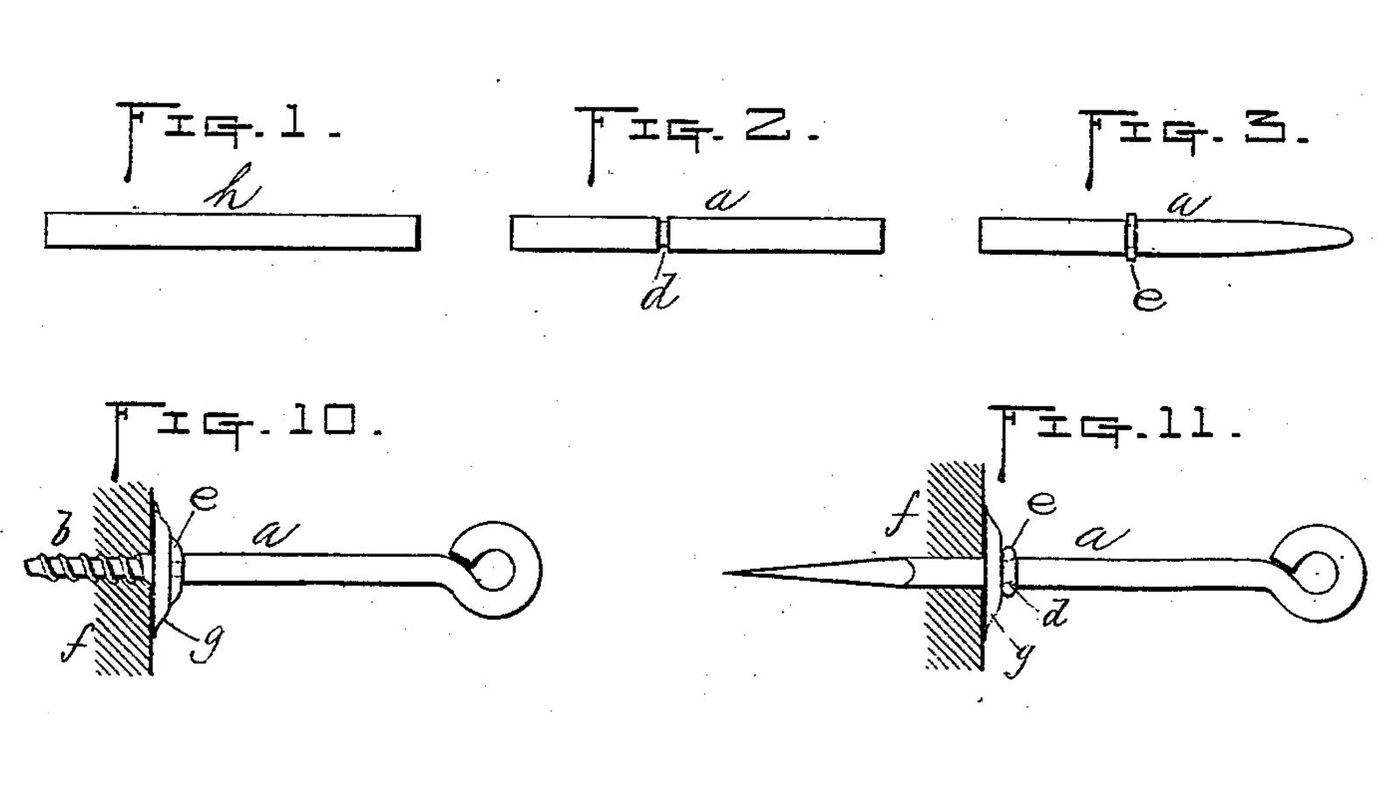


Screw Eye: Parmelee's One-Piece Wire Eye with a Stop-Ring
A screw eye bent from one piece of wire, by Arthur W. Parmelee of Worcester, Massachusetts (US 350,209, 1886). One end is threaded to turn into wood, the other bent into a closed eye. His addition is a ring closed into a groove around the shank: it stops the screw at the right depth, looks neat, and is left a little loose so the eye can turn without marking the wood under it.
The patent gives no metal or sizes. Iron wire, the 3 mm size, the pliers and the die are ours. The picture: Figs. 1-3 and 10-11 of the patent.
Pemula
30 minutes
Arahan
1
1
Cut a piece of wire
Cut a piece of wire
Cut a straight piece of iron wire about 3 mm thick (ours), long enough for the screw, the shank and the eye (Fig. 1).
Bahan untuk langkah ini:
 Dawai besi1 keping
Alatan diperlukan:
 Pembaris
 Playar pemotong sisi
2
2
Cut the groove
Cut the groove
File a narrow groove right round the wire, a screw length from one end (Fig. 2). Parmelee cuts it or presses it in.
Alatan diperlukan:
 Set Kikir Jarum
 Ragum Bangku
3
3
Point the screw end
Point the screw end
File that end to a tapering point (Fig. 3).
Alatan diperlukan:
 Kikir LogamRagum Bangku
4
4
Thread the screw end
Thread the screw end
Cut a screw thread on the pointed end "in the usual way". Ours: a die in a die stock, run on as far as the point allows.
Alatan diperlukan:
 Pemegang die ulirRagum Bangku
5
5
Bend the eye
Bend the eye
Bend the other end into a closed round eye, the end turned in against the shank (Fig. 10).
Alatan diperlukan:
 Playar hujung bulat
 Playar Muncung Rata
6
6
Make the split ring
Make the split ring
Bend a short piece of the same wire round into an open ring that just slips over the shank (Figs. 9 and 11).
Bahan untuk langkah ini:
Dawai besi1 kepingAlatan diperlukan:
Playar pemotong sisiPlayar hujung bulat7
7
Close the ring into the groove
Close the ring into the groove
Slide the ring onto the groove and squeeze it until its two ends meet in a continuous band. Leave it a little loose, so the eye turns while the ring stays still against the wood.
Alatan diperlukan:
Playar Muncung Rata8
8
Turn it into the wood
Turn it into the wood
Turn the screw into the wood by the eye until the ring meets the surface: the ring is the depth stop. Parmelee also allows washers under the ring; we leave them out.
Bahan
1- 2 kepingPemegang Tempat
Alatan Diperlukan
8- Pemegang Tempat
- Pemegang Tempat
- Pemegang Tempat
- Pemegang Tempat
- Pemegang Tempat
- Pemegang Tempat
- Pemegang Tempat
- Pemegang Tempat
Blueprint ini membuat

Blueprint berkaitan
Blueprint ini berkongsi pengetahuan — teknik, bahan atau prinsip
CC0 Domain Awam
Blueprint ini dikeluarkan di bawah CC0. Anda bebas menyalin, mengubah, mengedar, dan menggunakan karya ini untuk sebarang tujuan, tanpa meminta kebenaran.
Sokong Pembuat dengan membeli produk melalui Blueprint mereka di mana mereka memperoleh Komisen Pembuat ditetapkan oleh Penjual, atau cipta iterasi baru Blueprint ini dan sertakan ia sebagai sambungan dalam Blueprint anda sendiri untuk berkongsi hasil.