Kerjasama
SENI
KECANTIKAN & KESEJAHTERAAN
KRAFTANGAN
BUDAYA & SEJARAH
HIBURAN
ALAM SEKITAR
MAKANAN & MINUMAN
KEJURUTERAAN TERBALIK
SAINS
SUKAN
TEKNOLOGI
BOLEH PAKAI
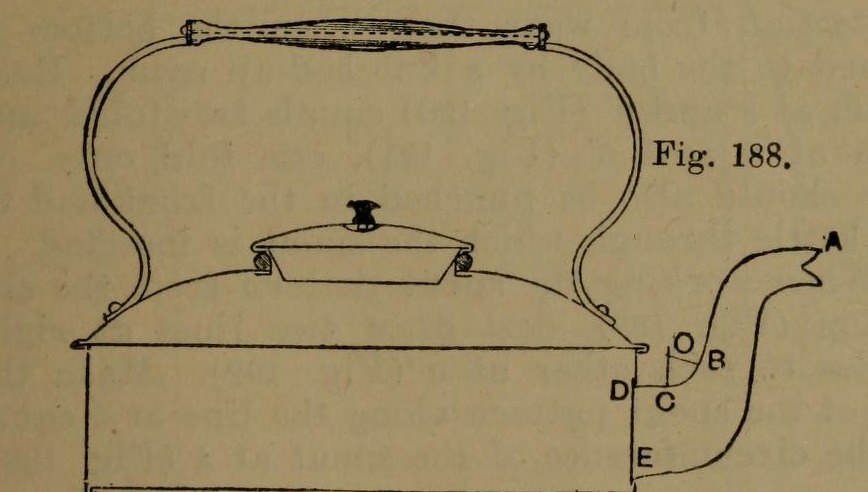


Stovetop Kettle: a Square Copper Kettle (Hasluck, 1907)
A tinsmith's square kettle in sheet copper, 9 x 9 in and 3 5/8 in deep: a box body with folded corner seams, a hollowed top pened on, a brazed and bent spout, a small cover, and a wooden handle on brass uprights.
Hasluck prefers copper; tinplate also works and is a separate route.
Source: Paul N. Hasluck, Tinplate Work (1907), pp. 91-98. Unknown: copper gauge, solder. Picture: Figs. 188-189 of the book.
Lanjutan
Unknown
Arahan
1
1
Cut the patterns
Cut the patterns
For a body 9 x 9 x 3 5/8 in, cut two ends 9 1/2 x 4 in and two sides 9 1/4 x 4 in, notched for box seams at the corners (Figs. 190-191), with allowances to fold at top and bottom. Punch the spout hole in the front. Cut the bottom 9 1/2 in square, notched for a 1/4 in edge. Set out the top as a 10 1/2 in square with curved allowances for hollowing and a 4 in circle for the cover hole (Fig. 193); set out the spout from the elevation (Fig. 192), the cover and its cone-shaped rim (Figs. 194-195).
Bahan untuk langkah ini:
 Kepingan Tembaga1 body, bottom, top, spout, cover
Alatan diperlukan:
 Jangka lukis
 Penyurat
 Gunting kepingan logam
2
2
Braze and shape the spout
Braze and shape the spout
Thin the long edges by hammering. Set in the throat with a stretching hammer on a beak iron, bend the spout round until the edges overlap, bind it with wire, lay spelter and borax along the inside of the seam and braze it; then close and braze the under seam. Fill it with lead and bend the neck with a round-faced hammer on the hollowing block; file off spare spelter and smooth it. Run out the lead, throw off a seating round the large end, trim the top with snips and tin the inside.
Bahan untuk langkah ini:
 Logam tidak diketahui1 spelter
 Timah1 tinning
Alatan diperlukan:
 Tukul perata
 Pancang
 Dawai besi
 Serbuk boraks
 Penyuluh pateri keras
 Plumbum
 Penyenduk berlubang
 Blok Kayu Keras
 Kikir LogamGunting kepingan logam
3
3
Fold and seam the body
Fold and seam the body
Fold the top edges square, the front and back outwards and the sides likewise; fold the bottom edges right over inwards to take the bottom (Fig. 188). Hook each side's end over the front's and work the corner seam on a straight-edged tool (Figs. 198-199). Turn up the bottom's 1/4 in edge, push it edge-down into the bottom folds, and solder the bottom and seams.
Bahan untuk langkah ini:
 Pateri timah-plumbum1 keping
Alatan diperlukan:
 Tukul KayuPancang
 Besi Pateri Elektrik
 Fluks
4
4
Hollow the top and make the cover
Hollow the top and make the cover
Hollow the top on the block: sink the four sides a little, hollow the corners with a bullet-faced hammer, flatten each side along the block edge, even the shoulder and smooth it all over. Pare the edges, mark the flange with an edging machine, set it down square with a hatchet stake and mallet, and take up an edge to fit over the body. Cut the cover hole with circular snips and fit a narrow wired rim, worked over inside. Make the cover: solder its cone rim to fit the wired rim, throw off a flange, hollow the cover disc and seam it on, and fix the knob.
Bahan untuk langkah ini:
Dawai besi1 rimPateri timah-plumbum1 kepingLogam tidak diketahui1 cover knobAlatan diperlukan:
Tukul perataBlok Kayu KerasPancangTukul KayuGunting kepingan logamBesi Pateri ElektrikFluks5
5
Handle, top and spout
Handle, top and spout
Cut two handle uprights from stout brass or copper band (Fig. 196), drill them for rivets and for the spindle that carries the wooden handle, and bend them to shape. Rivet them to the top and solder over the rivet heads inside. Pene the top down onto the body and solder along each edge. Push the spout through its hole from inside until its large end butts against the front, and solder it strongly from inside.
Bahan untuk langkah ini:
 Kepingan Loyang1 handle uprights
 Bar Loyang1 spindle
 Hulu1 wood
 Rivet tembaga1 number not givenPateri timah-plumbum1 keping
Alatan diperlukan:
 Gerimit tangan
 Tukul rivetTukul KayuBesi Pateri ElektrikFluks
Bahan
9- 1 body, bottom, top, spout, coverPemegang Tempat
- 1 cover knobPemegang Tempat
- 1 tinningPemegang Tempat
- 3 kepingPemegang Tempat
- 1 rimPemegang Tempat
- 1 handle uprightsPemegang Tempat
- 1 spindlePemegang Tempat
- 1 woodPemegang Tempat
- 1 number not givenPemegang Tempat
Alatan Diperlukan
17- Pemegang Tempat
- Pemegang Tempat
- Pemegang Tempat
- Pemegang Tempat
- Pemegang Tempat
- Pemegang Tempat
- Pemegang Tempat
- Pemegang Tempat
- Pemegang Tempat
- Pemegang Tempat
- Pemegang Tempat
- Pemegang Tempat
- Pemegang Tempat
- Pemegang Tempat
- Pemegang Tempat
- Pemegang Tempat
- Pemegang Tempat
Bahan Blueprint Bersambung


Blueprint ini membuat

CC0 Domain Awam
Blueprint ini dikeluarkan di bawah CC0. Anda bebas menyalin, mengubah, mengedar, dan menggunakan karya ini untuk sebarang tujuan, tanpa meminta kebenaran.
Sokong Pembuat dengan membeli produk melalui Blueprint mereka di mana mereka memperoleh Komisen Pembuat ditetapkan oleh Penjual, atau cipta iterasi baru Blueprint ini dan sertakan ia sebagai sambungan dalam Blueprint anda sendiri untuk berkongsi hasil.