SENI
KECANTIKAN & KESEJAHTERAAN
KRAFTANGAN
BUDAYA & SEJARAH
HIBURAN
ALAM SEKITAR
MAKANAN & MINUMAN
KEJURUTERAAN TERBALIK
SAINS
SUKAN
TEKNOLOGI
BOLEH PAKAI
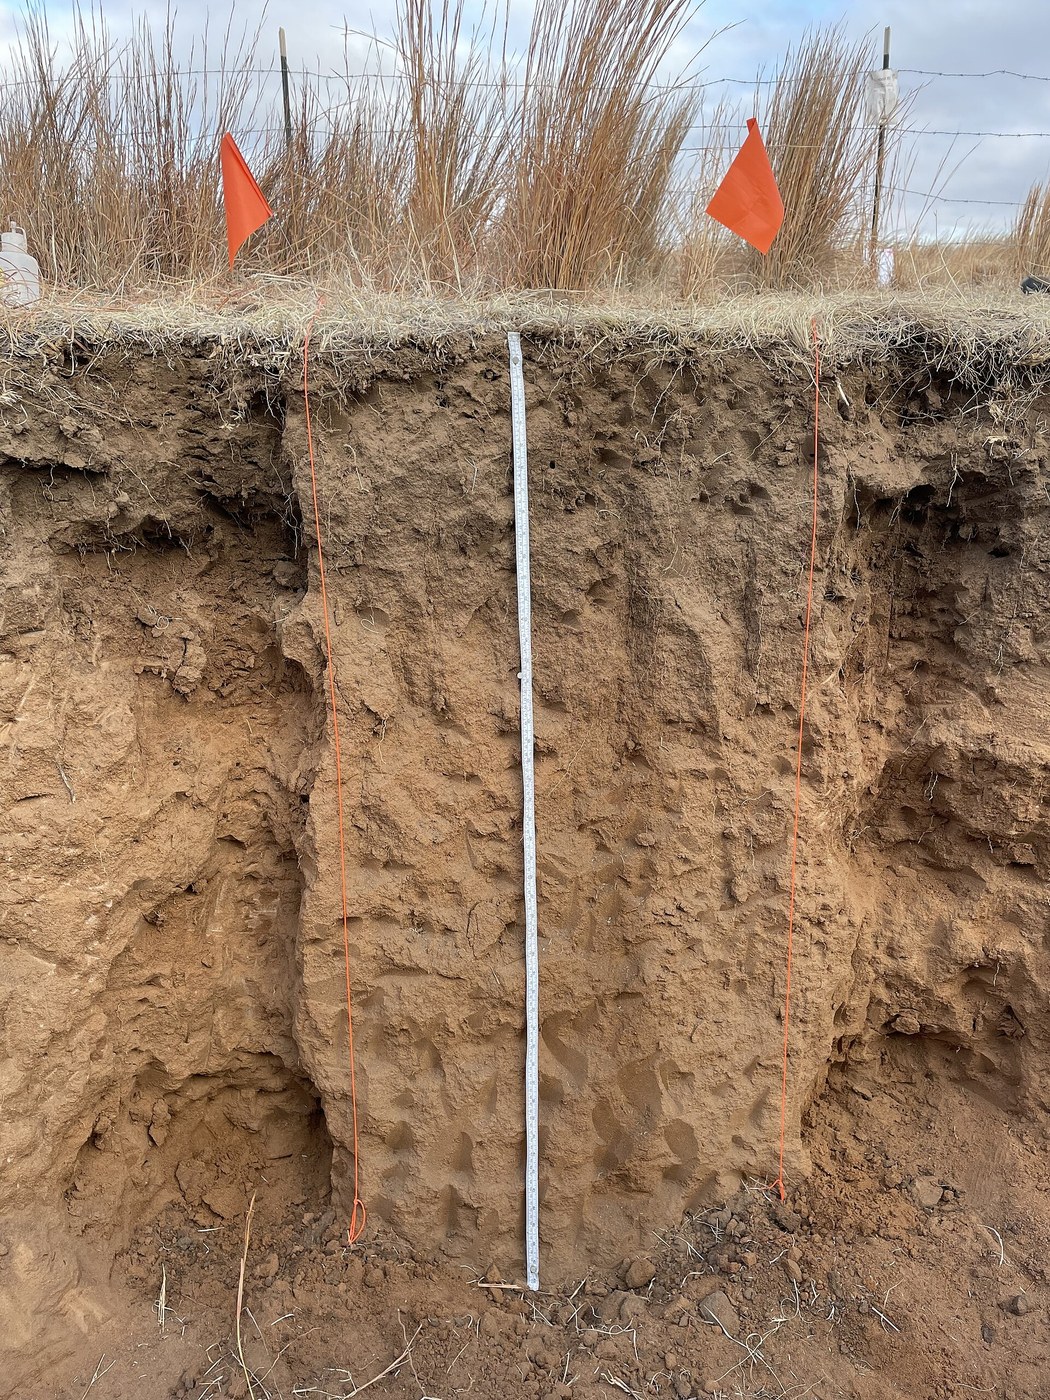


The Soil Pit: Texture, Structure and What It Will Grow
A soil test, already published here, tells you the chemistry of a scoop of earth. It cannot tell you that there is a compacted pan at 25 centimetres stopping every root, or that the water table rises into the rooting zone each winter — and those decide far more than pH does.
The answer is to dig a hole and look at the side of it. A soil profile shows the layers, their colours, where the roots stop and why, and how the structure crumbles in your hand. Every one of those is read by eye and finger, with no equipment beyond a spade.
It is the cheapest diagnostic in land management and the most consistently skipped. An hour with a spade routinely explains a problem that three seasons of fertiliser did not.
Pemula
1 day
Arahan
1
1
Dig a pit with one clean vertical face
Dig a pit with one clean vertical face
Dig down to at least 60 cm — deeper if you can — keeping ONE face vertical, clean and undisturbed, and stack the soil from each depth separately so you can put it back in order.
Work in the shade of your own body and face the light. Never dig a pit deeper than waist height without battering the sides back, and never work in a deep narrow hole alone: soil collapses without warning and a pit is heavy. For most questions 60 cm answers them.
Alatan diperlukan:
 Penyodok
 Sarung Tangan Nitril
2
2
Find the horizons by colour and feel
Find the horizons by colour and feel
Scrape the face lightly with a trowel and look for changes in colour and texture. Mark each boundary with a nail and measure its depth.
Typically you will see dark topsoil rich in organic matter over paler subsoil, over weathered parent material. Record the depth of each boundary and whether it is sharp or gradual. A sharp, flat boundary at a spade's depth is usually a PLOUGH PAN — man-made, not natural — and it is often the whole answer to a drainage or rooting problem.
Bahan untuk langkah ini:
 Paku bersalut zink10 keping
Alatan diperlukan:
 Sudip kebun
 Pita Ukur
 Buku Nota Lapangan
3
3
Determine texture by hand, the standard way
Determine texture by hand, the standard way
Take a walnut-sized lump from each horizon, moisten it to a putty, and work it: does it stain the fingers, does it feel gritty or silky, will it roll into a thread, will the thread bend into a ring without cracking?
Gritty and will not roll is SAND. Silky and rolls a little is SILT. Sticky, polishes when rubbed and rolls into a ring is CLAY. This hand texturing is the field standard worldwide and an experienced hand matches laboratory results closely — the notebook gives the full decision sequence.
Bahan untuk langkah ini:
 Air Suling1 liter
Alatan diperlukan:
Buku Nota Lapangan4
4
Read the roots, and the colours they sit in
Read the roots, and the colours they sit in
Note the depth roots reach, whether they turn sideways at a layer, and whether they are fine and branched or few and thick.
Roots turning abruptly horizontal mark a barrier. Grey or blue-grey soil with orange mottles means water sits there for long periods and the iron has been chemically reduced — a record of waterlogging that persists even in a dry summer. The plants have already surveyed the soil for you; the pit lets you read their answer.
Alatan diperlukan:
 Kanta PembesarBuku Nota Lapangan
5
5
Texture, water and what will actually grow
Texture, water and what will actually grow
Memuatkan buku nota Jupyter…
Bahan untuk langkah ini:
 Balang Kaca2 keping
 Silinder penyukat1 keping
Alatan diperlukan:
 Pembaris
6
6
Fill it back in, in order
Fill it back in, in order
Return the soil in the reverse order you removed it — subsoil first, topsoil last — and tread it back firmly in layers.
Tipping the heap back mixed puts subsoil on the surface and buries the biologically active topsoil, and that patch will be visibly different for years. Photograph the clean face before you fill, with a tape in shot for scale: the photograph is the permanent record, and the hole is not.
Alatan diperlukan:
PenyodokPita UkurBahan
4- 10 kepingPemegang Tempat
- 1 literPemegang Tempat
- 2 kepingPemegang Tempat
- 1 kepingPemegang Tempat
Blueprint berkaitan
Blueprint ini berkongsi pengetahuan — teknik, bahan atau prinsip

CC0 Domain Awam
Blueprint ini dikeluarkan di bawah CC0. Anda bebas menyalin, mengubah, mengedar, dan menggunakan karya ini untuk sebarang tujuan, tanpa meminta kebenaran.
Sokong Pembuat dengan membeli produk melalui Blueprint mereka di mana mereka memperoleh Komisen Pembuat ditetapkan oleh Penjual, atau cipta iterasi baru Blueprint ini dan sertakan ia sebagai sambungan dalam Blueprint anda sendiri untuk berkongsi hasil.