Kerjasama
SENI
KECANTIKAN & KESEJAHTERAAN
KRAFTANGAN
BUDAYA & SEJARAH
HIBURAN
ALAM SEKITAR
MAKANAN & MINUMAN
KEJURUTERAAN TERBALIK
SAINS
SUKAN
TEKNOLOGI
BOLEH PAKAI
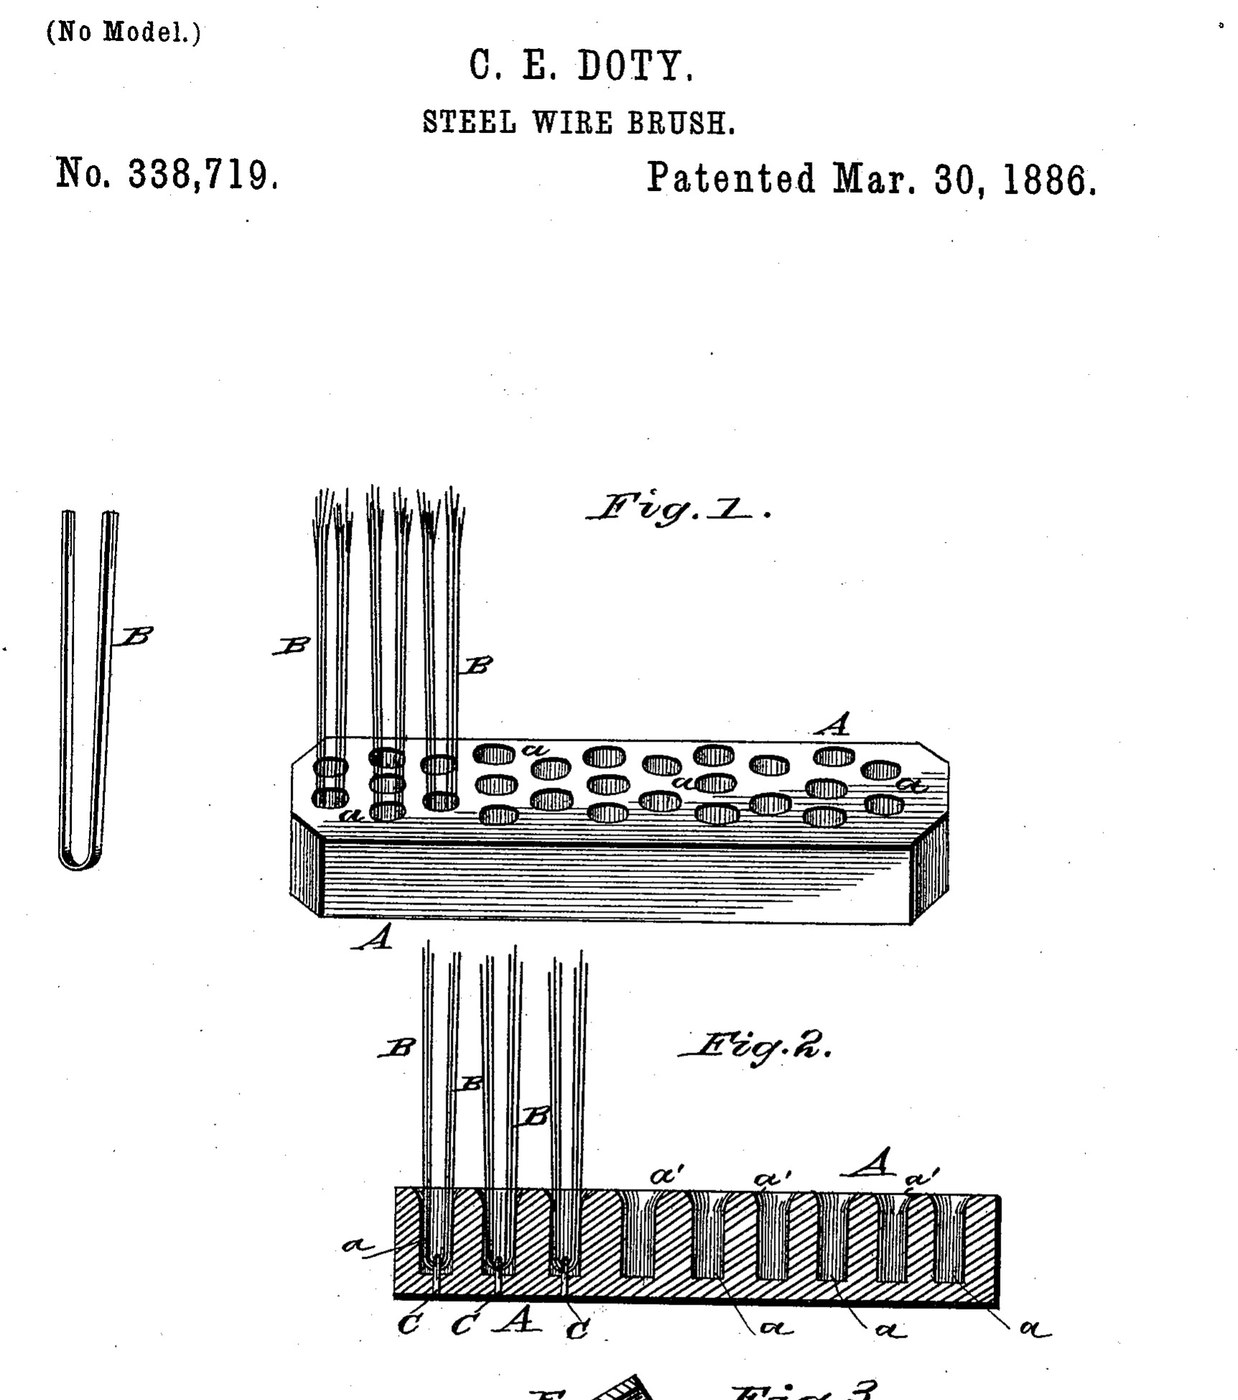


Wire Brush: Flat Steel Wire Tufts Stapled into a One-Piece Back (Doty, US 338,719, 1886)
A heavy steel wire brush whose back stays in one piece: flat steel wires are folded in bunches into blind holes and held by small staples driven right through the back and clinched on the other side. The holes flare at the mouth so the wires bend in a curve rather than snapping at the edge. All the wires lie the same way, so they flex alike and share the work.
Result: a steel wire brush for heavy scrubbing that holds its wires, with a smooth back.
Source: C. E. Doty, US 338,719 (1886). Unknown: the back material, sizes and wire gauge. Picture: the patent drawing.
Pemula
Unknown
Arahan
1
1
Bore the back
Bore the back
Make the back in one piece and bore rows of holes into its face that do not go right through. Shape the mouth of each hole with a rounded, flaring wall so the wires bend in a curve there. Ours: a hardwood block. Not given: the back material, sizes.
Bahan untuk langkah ini:
 Blok Kayu Keras1 brush back
Alatan diperlukan:
 Gerudi Tiang
 Dimensi tidak diketahui
2
2
Flatten the wires
Flatten the wires
Use flat steel wires, so they flex most across their thin side. Cut them to twice the bristle length so each bunch folds in the middle. Ours: spring steel wire flattened on the anvil. Not given: the wire gauge.
Bahan untuk langkah ini:
 Dawai keluli spring1 bristle wires
Alatan diperlukan:
 Andas
 Tukul
3
3
Staple in the tufts
Staple in the tufts
Lay the back, holes up, on a hard, smooth metal surface. Lay a bunch of wires across a hole, flat sides horizontal and lying the way the brush will be used. Set a short staple astride the middle of the bunch with its points in the hole. Bring a plunger down into the hole: it drives the folded bunch to the bottom and the staple's points right through the back. The points hit the metal surface and are bent over and clinched smoothly on the back. Tilt the back a little for the outer rows so their wires spread slightly outward.
Bahan untuk langkah ini:
 Logam tidak diketahui1 staples
Alatan diperlukan:
 Penekan arborAndas
Bahan
3- 1 brush backPemegang Tempat
- 1 bristle wiresPemegang Tempat
- 1 staplesPemegang Tempat
Bahan Blueprint Bersambung
Blueprint ini membuat

CC0 Domain Awam
Blueprint ini dikeluarkan di bawah CC0. Anda bebas menyalin, mengubah, mengedar, dan menggunakan karya ini untuk sebarang tujuan, tanpa meminta kebenaran.
Sokong Pembuat dengan membeli produk melalui Blueprint mereka di mana mereka memperoleh Komisen Pembuat ditetapkan oleh Penjual, atau cipta iterasi baru Blueprint ini dan sertakan ia sebagai sambungan dalam Blueprint anda sendiri untuk berkongsi hasil.