Kerjasama
SENI
KECANTIKAN & KESEJAHTERAAN
KRAFTANGAN
BUDAYA & SEJARAH
HIBURAN
ALAM SEKITAR
MAKANAN & MINUMAN
KEJURUTERAAN TERBALIK
SAINS
SUKAN
TEKNOLOGI
BOLEH PAKAI
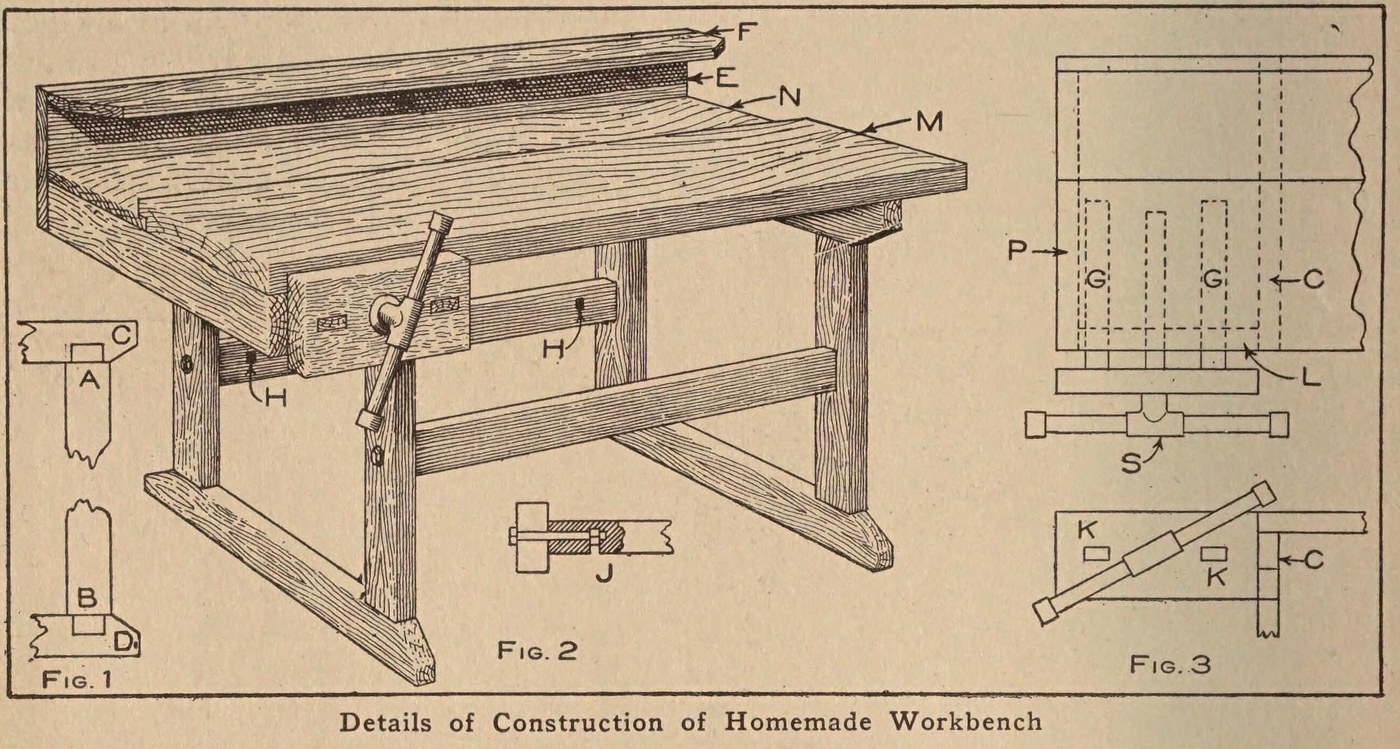


Workbench: a Pine Bench with a Plank Top and Vise (Boy Mechanic, 1913)
A boy's first workshop bench: two mortised pine leg frames bolted to braces, a 3 1/2 ft top of one 2 x 12 in plank with a back board, a tool rack behind, and a wooden vise on an iron bench screw.
Source: C. E. McKinney, Jr., 'Homemade Workbench', The Boy Mechanic, Book 1 (1913), pp. 442-443. Picture: Figs. 1-3 of the book.
Pertengahan
Unknown
Arahan
1
1
Make the two leg frames
Make the two leg frames
Cut four 2 x 4 in pine legs 23 in long with a tenon on each end 1/2 in thick, 3 1/2 in wide and 1 1/2 in long (Fig. 1, A and B). Cut four crosspieces of the same stock 20 in long, mortised in the narrow edge 1 1/4 in from each end, and slope their corners from the leg out to the middle. Fit each pair of legs to a pair of crosspieces to make the two supports.
Bahan untuk langkah ini:
 Kayu pain1 2 x 4 in: legs, crosspieces
Alatan diperlukan:
 Gergaji Tangan
 Pahat lubang tanggam
 Tukul
2
2
Brace them together
Brace them together
Join the supports with two 2 x 4 in braces 24 in long, ends sawn square. Bore through each leg and 4 in into the centre of each brace end, bore an intersecting hole on the back of each brace for the nut, and draw each joint tight with a 3/8 x 6 in bolt (Fig. 2, J). A cross brace on the back stops rocking when planing.
Bahan untuk langkah ini:
Kayu pain1 2 x 4 in: braces Bolt kepala bulat leher segi empat4 3/8 x 6 in
Alatan diperlukan:
Gergaji Tangan Gerimit engkol dan mata
 Sepana boleh laras
3
3
Fit the plank top
Fit the plank top
Make the main top M from one 2 x 12 in plank 3 1/2 ft long. Rabbet its back edge 1/2 in to take a back board N of the same length, 8 1/2 in wide and 7/8 in thick. Screw the top to the top crosspieces with long screws.
Bahan untuk langkah ini:
 Papan kayu keras1 2 x 12 in, 3 1/2 ft
 Papan pain1 back board
 Skru kayu1 long
Alatan diperlukan:
Gergaji Tangan Ketam blok
 Pemutar skru rata
4
4
Add the tool rack
Add the tool rack
Nail a board E 10 in wide to the back of the bench and fasten a 2 1/2 in board F on top of it at right angles; both 7/8 in thick and 3 1/2 ft long. Bore holes or cut notches in F to hold tools.
Bahan untuk langkah ini:
Papan pain2 7/8 in, 3 1/2 ft Paku1 keping
Alatan diperlukan:
Gerimit engkol dan mataGergaji TanganTukul5
5
Fit the vise
Fit the vise
Fasten an iron bench screw in a 2 x 6 in block 12 in long. Mortise two guide rails 7/8 x 1 1/2 in and 20 in long into the block; they slide in mortises in a 2 x 4 piece L bolted under the top, which holds the bench-screw nut between the two mortises. Nail L to a top crosspiece and to a 2 x 4 piece P bolted under the top at the end (Fig. 3).
Bahan untuk langkah ini:
Kayu pain1 2 x 6 block, 2 x 4 pieces, guide rails Skru bangku untuk ukiran kayu1 kepingBolt kepala bulat leher segi empat1 for L and PPaku1 keping
Alatan diperlukan:
Gergaji TanganPahat lubang tanggamGerimit engkol dan mataSepana boleh larasTukulBahan
7- 1 2 x 6 block, 2 x 4 pieces, guide railsPemegang Tempat
- 1 for L and PPemegang Tempat
- 1 2 x 12 in, 3 1/2 ftPemegang Tempat
- 2 7/8 in, 3 1/2 ftPemegang Tempat
- 1 longPemegang Tempat
- 2 kepingPemegang Tempat
- 1 kepingPemegang Tempat
Blueprint ini membuat

CC0 Domain Awam
Blueprint ini dikeluarkan di bawah CC0. Anda bebas menyalin, mengubah, mengedar, dan menggunakan karya ini untuk sebarang tujuan, tanpa meminta kebenaran.
Sokong Pembuat dengan membeli produk melalui Blueprint mereka di mana mereka memperoleh Komisen Pembuat ditetapkan oleh Penjual, atau cipta iterasi baru Blueprint ini dan sertakan ia sebagai sambungan dalam Blueprint anda sendiri untuk berkongsi hasil.