IṢẸ́ ỌNÀ
ẸWÀ ÀTI ÌLERA
IṢẸ́ ỌWỌ́
ÀṢÀ ÀTI ÌTÀN
ÌṢERÉ
ÀYÍKÁ
OÚNJẸ ÀTI OHUN MÍMU
REVERSE ENGINEERING
SÁYẸ́ǸSÌ
ERÉ ÌDÁRAYÁ
ÌMỌ̀-Ẹ̀RỌ
ÀWỌN OHUN WÍWỌ̀
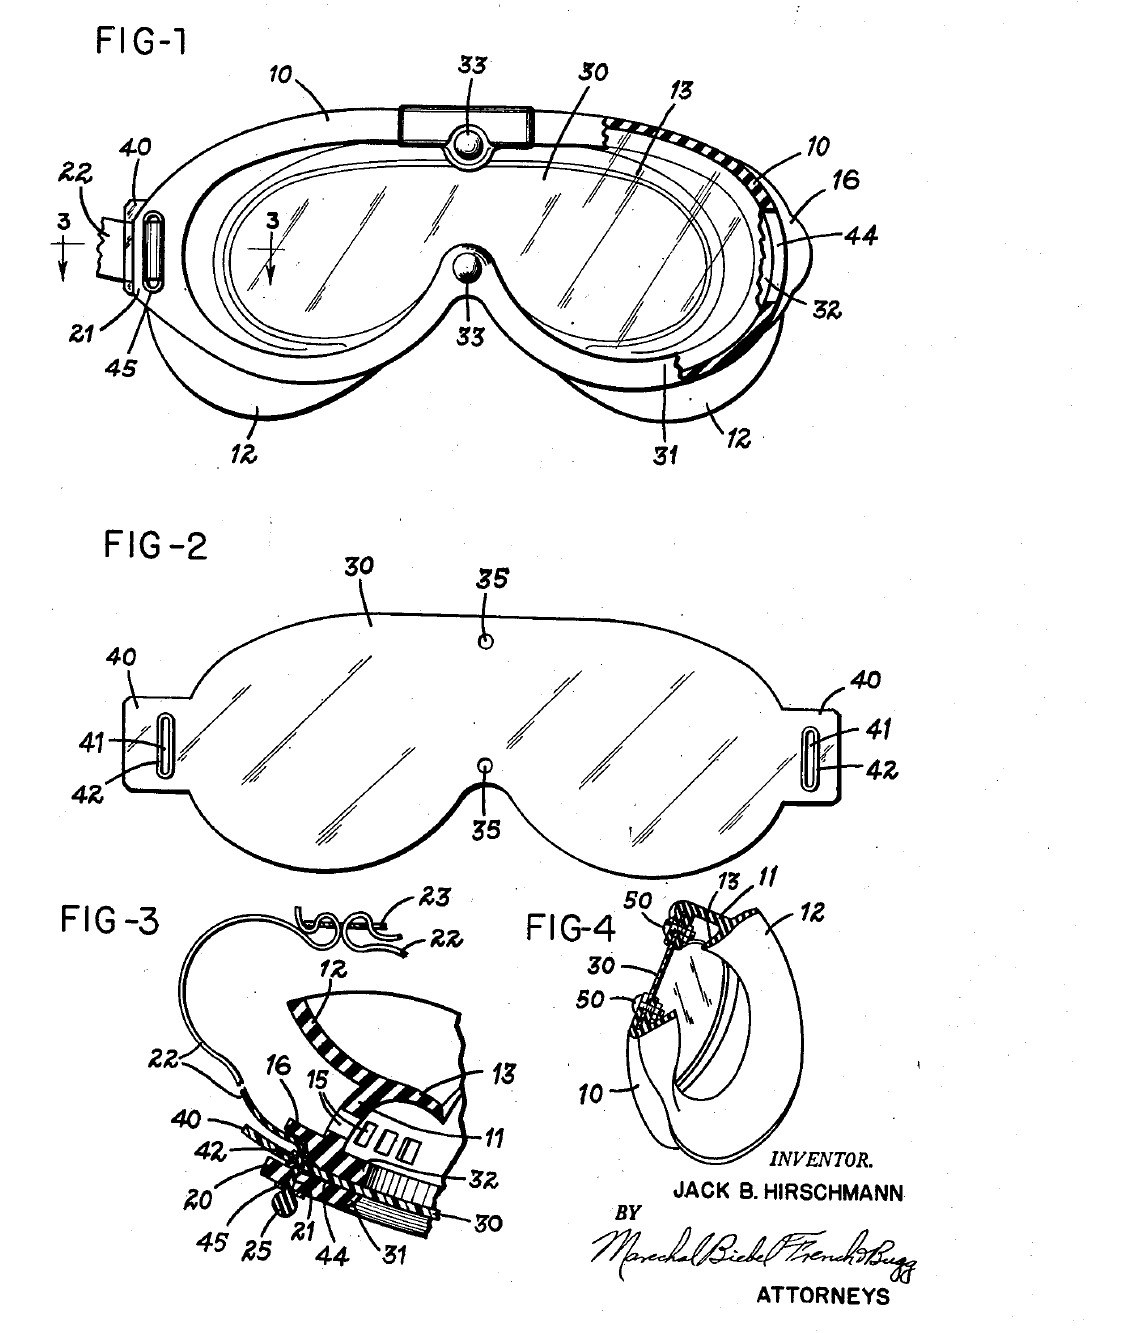


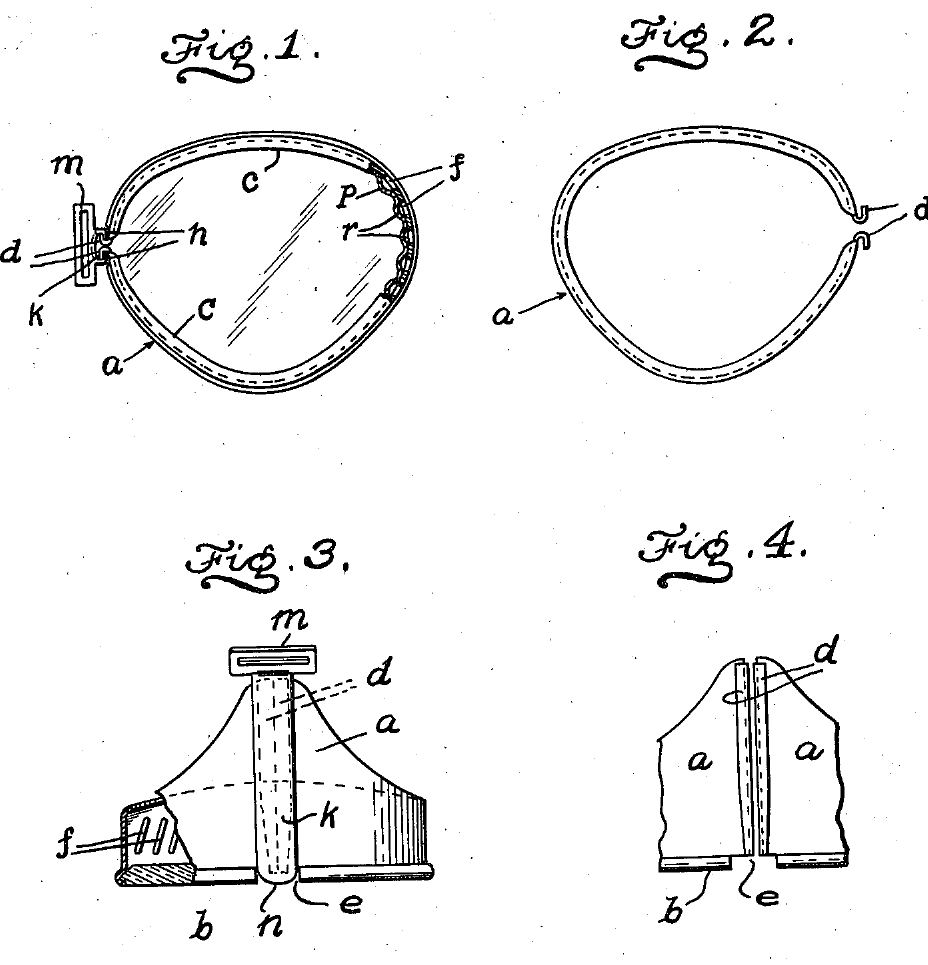
Chemical Splash Goggles: One Sealed Lens in a Moulded Rubber Frame (Hirschmann, 1954)
Goggles for work with corrosive liquids. One clear plastic lens covers both eyes and sits sealed all round in a soft moulded rubber frame that seals against the face. The version for gas and corrosive liquids has no vent holes at all, and the strap passes through tabs outside the lens, so nothing can leak through or around the part you look through.
Result: chemical splash goggles with a lens you can pull out and replace, and a strap pull shared evenly between lens and frame, so neither warps.
Source: J. B. Hirschmann, US Patent 2,680,846 (1954), Fig. 4 version. Unknown: sizes, the rubber compound, the strap material and how the frame is moulded. Ours: the mould; the patent tested a cellulose acetate lens. Picture: patent drawing.
Àárín
2 days
Ìlànà
1
1
Mould the rubber frame
Mould the rubber frame
Mould the frame in one piece from rubber. The front rim has one opening shaped for both eyes, narrower above the nose. Behind it, a wall forms the eye chamber and ends in a double flange that seals against the face. Inside the rim, form a channel between an outer and an inner flange to hold the lens edge. At each end, mould a lug with a strap slot and a slit through the channel for the lens tab. For corrosive liquids, leave out all vent holes. Ours: a compression mould.
Àwọn ohun èlò fún ìgbésẹ̀ yìí:
 Àdàlù rọ́bà1 frame
Àwọn irinṣẹ́ tí a nílò:
 Àwòṣe ìtẹ̀mọ́lẹ̀
 Ìwọ̀n tí a kò mọ̀
2
2
Cut the lens
Cut the lens
Cut one lens from flexible clear plastic, shaped to match the rim. The patent tested cellulose acetate. Leave a tab at each end, outside the area you look through. Cut a closed slot in each tab and line it with a grommet. Make two holes at the centre for the bolts. Leave no other holes in the viewing area.
Àwọn ohun èlò fún ìgbésẹ̀ yìí:
 Pẹpẹ pilasítíìkì tí ó mọ́1 lens
 Ihò rívẹ́ẹ̀tì2 tab grommets
Àwọn irinṣẹ́ tí a nílò:
 Ìlàǹkàn irin
 Igi Àmì Àárín
3
3
Seal the lens in the frame
Seal the lens in the frame
Spring the lens edge into the channel all the way round, pushing each tab out through its slit so it lies under the lug, slot over slot. Fasten the centre with two stainless-steel bolts and nuts. (The vented version uses snap fasteners here.)
Àwọn ohun èlò fún ìgbésẹ̀ yìí:
 Skurú ẹ̀rọ2 stainless steel
 Nọ́ọ̀tì Onígun Mẹ́fà2 stainless steel
Àwọn irinṣẹ́ tí a nílò:
 Ìṣù àwọn ohun ìyí skurú
4
4
Fit the head strap
Fit the head strap
Use a strap in two halves, joined at the back by a buckle, each half with a thickened end. Slide a slotted plate of metal or plastic onto each half, then thread it from the front through the lug slot and the lens-tab slot. The thick end stops against the plate and lug. The pull of the strap now goes into both lens and frame, holds the lens in, and stays outside the field of view.
Àwọn ohun èlò fún ìgbésẹ̀ yìí:
 Ìdè orí gíláàsì ààbò1 two halves
 Buckle idẹ pẹ̀lú ahọ́n1 ẹyọ
 Ohun èlò tí a kò mọ̀1 two slotted plates
Àwọn irinṣẹ́ tí a nílò:
Ìwọ̀n tí a kò mọ̀Àwọn ohun-èlò
8- 1 frameÀyè
- Àyè
- 2 tab grommetsÀyè
- 2 stainless steelÀyè
- 2 stainless steelÀyè
- 1 two halvesÀyè
- Àyè
- 1 two slotted platesÀyè
Àwọn irinṣẹ́ tó nílò
5- Àyè
Àwọn Ohun Èlò Ìtọ́nisọ́nà Tí A So Pọ̀
Ìtọ́nisọ́nà yìí ń ṣe

Blueprint tó jọra
Àwọn blueprint wọ̀nyí pín ìmọ̀ — ọ̀nà, ohun-èlò tàbí ìlànà

CC0 Àgbègbè Gbogbogbò
Blueprint yìí ti jáde lábẹ́ CC0. O lè ṣe àdàkọ, yí padà, pín, àti lò láìsí ìyọ̀ǹda.
Ṣàtìlẹ́yìn Olùṣẹ́dá nípa rírà àwọn ọjà nipasẹ̀ Blueprint wọn Ẹ̀san Olùṣẹ́dá tí àwọn Olùtajà gbé kalẹ̀, tàbí ṣẹ̀dá àtúnṣe tuntun ti Blueprint yìí kí o sì fi sínú Blueprint rẹ gẹ́gẹ́ bí ìsopọ̀ láti pín owó-wíwọlé.