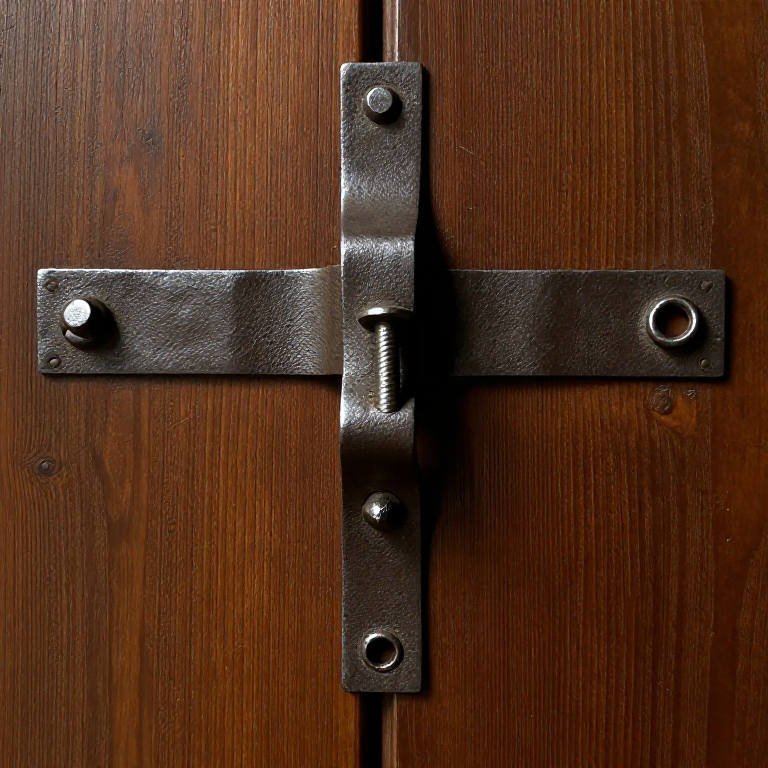
Forging an Iron Strap Hinge — The Joint That Opens Every Door
Before the iron hinge, doors were hung on leather straps or wooden pivots that wore out in months. The iron strap hinge — two flat straps joined by a pin through rolled eyes — solved this problem permanently. A well-made iron hinge lasts centuries, as demonstrated by medieval church doors still swinging on their original hinges after 800 years.
A strap hinge is forged from two flat iron bars. Each bar has one end curled into a tube (the eye) around a mandrel. A pin passes through both eyes to create the pivot. One strap is nailed to the door and the other to the frame. The hinge works because the eyes wrap around the pin with just enough clearance to rotate freely but not wobble.
This blueprint teaches three essential smithing operations: drawing flat bar, scrolling (curling metal around a mandrel), and punching nail holes. These same operations appear in gates, latches, brackets, and every other piece of architectural ironwork.
Ìlànà
Cut the strap blanks
Cut the strap blanks
Forge the eye on the door strap
Forge the eye on the door strap
Materials for this step:
 Charcoal3 kg
Tools needed:
 Forge Hammer (Cross-Peen)
 Forge Tongs
 Hearth (Forge Fire)
Forge the eye on the frame strap
Forge the eye on the frame strap
Punch the nail holes
Punch the nail holes
Decorative taper (optional)
Decorative taper (optional)
Make the hinge pin
Make the hinge pin
Assemble and test the hinge
Assemble and test the hinge
Àwọn irinṣẹ́ tó nílò
3- Placeholder
- Placeholder
- Placeholder
Connected Blueprint Materials


Blueprint tó jọra
Àwọn blueprint wọ̀nyí pín ìmọ̀ — ọ̀nà, ohun-èlò tàbí ìlànà


CC0 Àgbègbè Gbogbogbò
Blueprint yìí ti jáde lábẹ́ CC0. O lè ṣe àdàkọ, yí padà, pín, àti lò láìsí ìyọ̀ǹda.
Ṣàtìlẹ́yìn Olùṣẹ́dá nípa rírà àwọn ọjà nipasẹ̀ Blueprint wọn Ẹ̀san Olùṣẹ́dá tí àwọn Olùtajà gbé kalẹ̀, tàbí ṣẹ̀dá àtúnṣe tuntun ti Blueprint yìí kí o sì fi sínú Blueprint rẹ gẹ́gẹ́ bí ìsopọ̀ láti pín owó-wíwọlé.