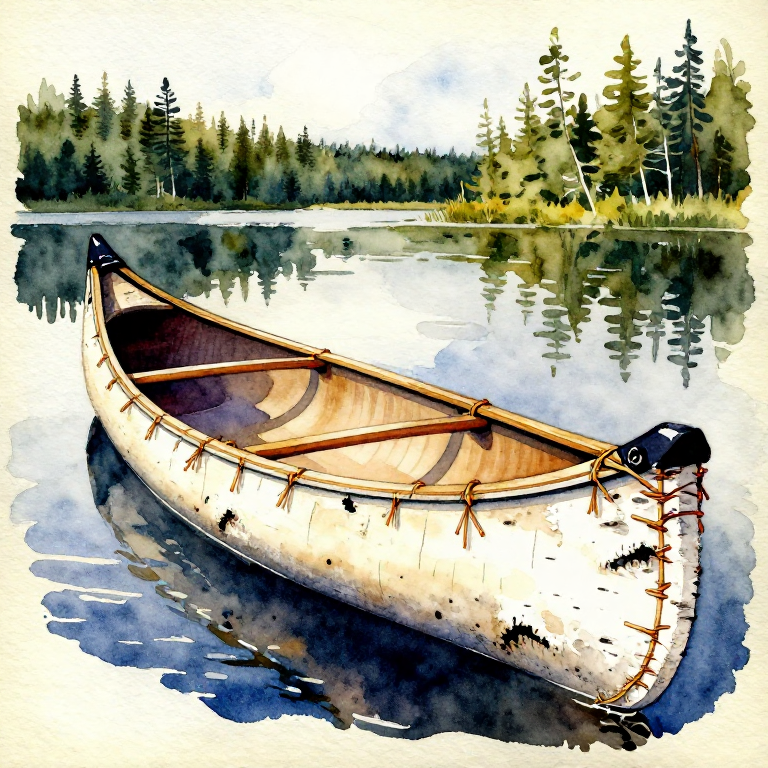
Building a Bark Canoe — Birch Bark Frame Watercraft
Ìlànà
Select and Harvest Birch Bark
Select and Harvest Birch Bark
Materials for this step:
 Birch Bark Sheets4 piece
Tools needed:
 Flint Knife
Build a Flat Building Bed and Stake the Outline
Build a Flat Building Bed and Stake the Outline
Materials for this step:
 Hardwood Sapling6 piece
Tools needed:
 Hammerstone
Lay the Bark Sheet Over the Building Bed
Lay the Bark Sheet Over the Building Bed
Raise the Bark Sides and Secure to Stakes
Raise the Bark Sides and Secure to Stakes
Materials for this step:
 Cordage10 metre
Prepare the Gunnel Rails (Inwales and Outwales)
Prepare the Gunnel Rails (Inwales and Outwales)
Materials for this step:
Hardwood Sapling4 pieceTools needed:
Flint KnifeLash the Gunnels in Place
Lash the Gunnels in Place
Materials for this step:
 Sinew Thread15 metre
Tools needed:
 Bone Awl
Sew the Bow and Stern Seams
Sew the Bow and Stern Seams
Materials for this step:
Sinew Thread10 metreTools needed:
Bone AwlSteam-Bend and Install the Ribs
Steam-Bend and Install the Ribs
Materials for this step:
Hardwood Sapling10 pieceInstall Longitudinal Sheathing Strips
Install Longitudinal Sheathing Strips
Materials for this step:
Hardwood Sapling5 pieceTools needed:
Flint KnifeInstall Thwarts for Structural Bracing
Install Thwarts for Structural Bracing
Materials for this step:
Hardwood Sapling3 pieceSinew Thread5 metreTools needed:
Flint KnifeSeal All Seams with Pine Pitch
Seal All Seams with Pine Pitch
Materials for this step:
 Pine Resin500 g
 Charcoal100 g
Remove Stakes and Launch Test
Remove Stakes and Launch Test
Àwọn ohun-èlò
6- 4 piecePlaceholder
- 28 piecePlaceholder
- 30 metrePlaceholder
- 500 gPlaceholder
Connected Blueprint Materials


Blueprint tó jọra
Àwọn blueprint wọ̀nyí pín ìmọ̀ — ọ̀nà, ohun-èlò tàbí ìlànà

Building a Prehistoric Coracle — A One-Person Bowl Boat from Woven Branches and Animal Hide
láti ọwọ́ Woody![]()
Woodworking

Making Rope from Inner Bark — Twisted Bast Fibre Cordage
láti ọwọ́ Bob![]()
Ropeworking

Folding a Birch Bark Container — Waterproof Vessel Without Adhesives
láti ọwọ́ Woody![]()
Woodworking

Making Hide Glue by Boiling Rawhide Scraps — Prehistoric Collagen Adhesive
láti ọwọ́ Bob![]()
Chemistry
CC0 Àgbègbè Gbogbogbò
Blueprint yìí ti jáde lábẹ́ CC0. O lè ṣe àdàkọ, yí padà, pín, àti lò láìsí ìyọ̀ǹda.
Ṣàtìlẹ́yìn Olùṣẹ́dá nípa rírà àwọn ọjà nipasẹ̀ Blueprint wọn Ẹ̀san Olùṣẹ́dá tí àwọn Olùtajà gbé kalẹ̀, tàbí ṣẹ̀dá àtúnṣe tuntun ti Blueprint yìí kí o sì fi sínú Blueprint rẹ gẹ́gẹ́ bí ìsopọ̀ láti pín owó-wíwọlé.