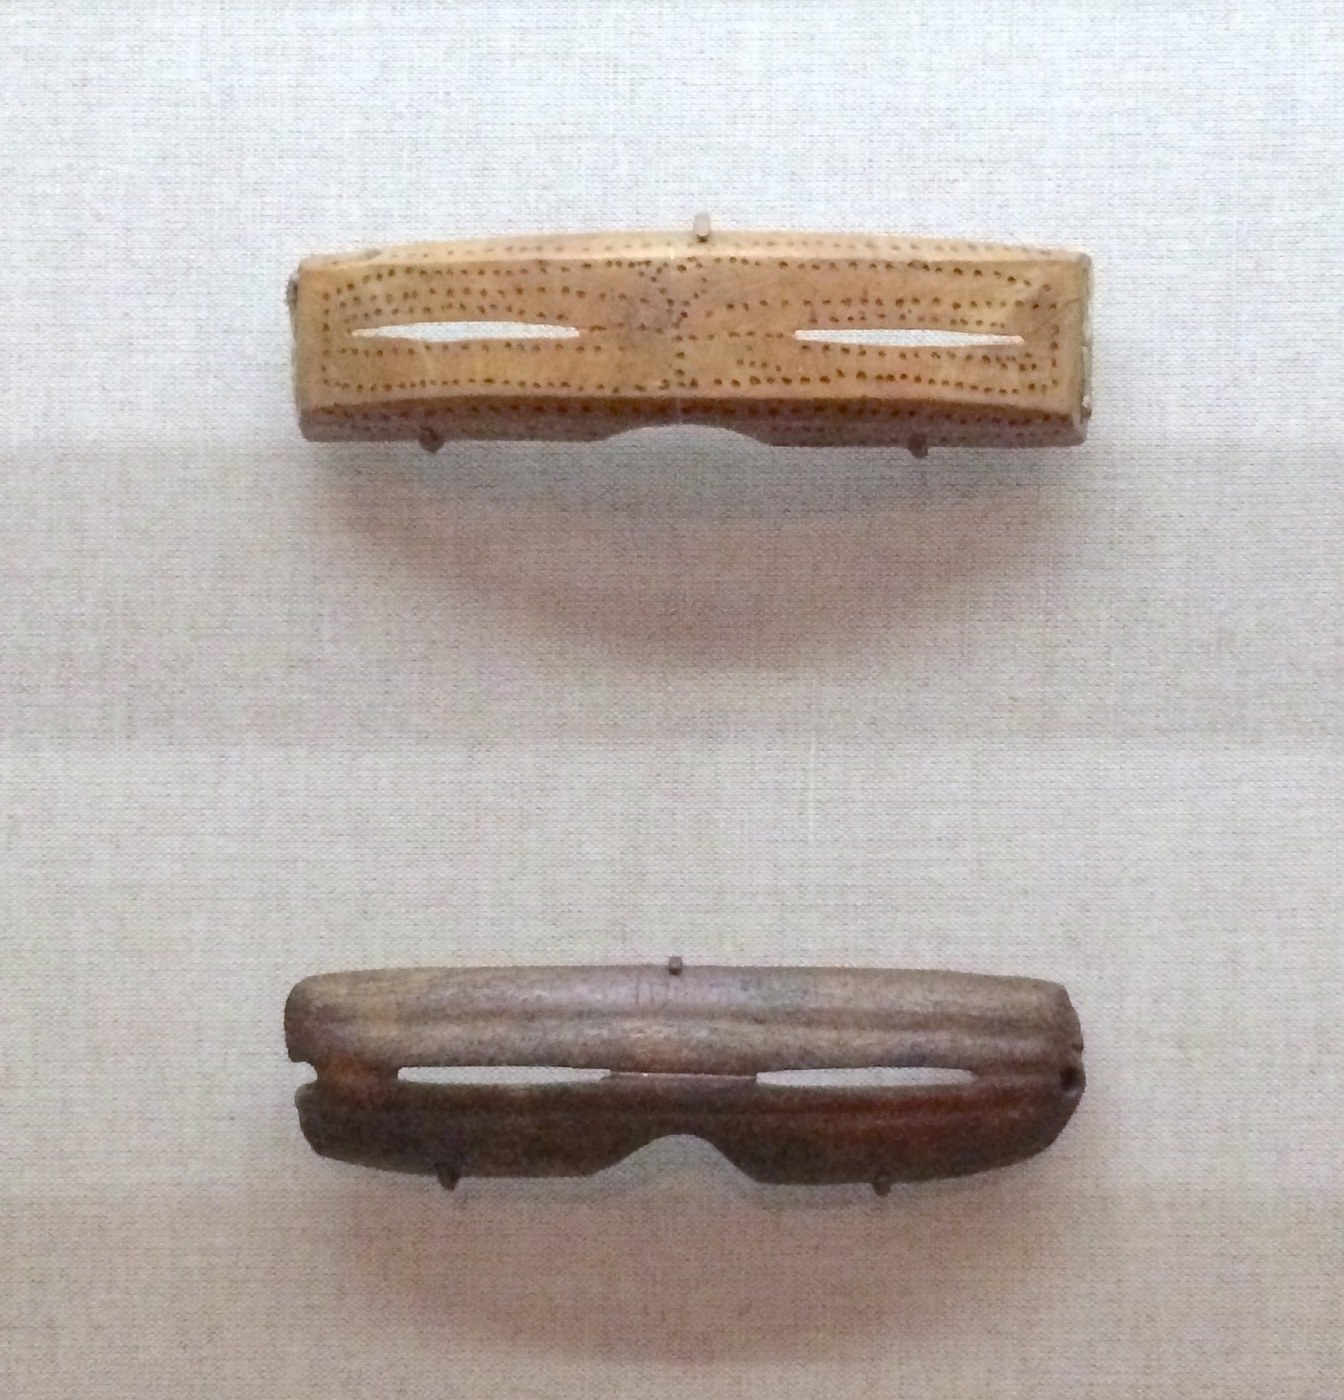


Snow Goggles
Snow reflects most of the light that hits it. A day on open ice delivers enough ultraviolet to burn the cornea, and the result — snow blindness — is painful, temporarily disabling, and in a hunting society potentially fatal.
The Inuit and Yupik answer is a carved shield worn against the face with a slit cut through it. It blocks the overwhelming majority of the reflected light, and it does something more: the narrow slit acts like a pinhole and sharpens vision, increasing depth of field exactly as a small aperture does in a camera. It cuts the glare and improves acuity at the same time.
Wood, antler or bone, a knife, and a fit taken from your own face. These are the oldest eye protection we have, and the optics behind them were not described in Europe for thousands of years afterwards.
Ìlànà
Take three measurements from the face
Take three measurements from the face
Measure the distance between pupil centres, the width across the temples, and the height from brow to cheekbone. The goggles are fitted to one face; a generic pair leaks light at the edges.
Àwọn irinṣẹ́ tí a nílò:
 Ìdíwọ̀n
Choose the blank
Choose the blank
Take a piece of close-grained wood, antler or bone about 140 x 45 x 20 mm. Traditional makers used driftwood, antler, bone and ivory — whatever the region gave them.
Àwọn ohun èlò fún ìgbésẹ̀ yìí:
 Bulọ́ọ̀kù igi linden fún gbígbẹ́1 ẹyọ
Shape the outside to a shallow curve
Shape the outside to a shallow curve
Carve the front into a gentle curve following the line of the face. This is the shape that lets the ends sit against the temples with no gap.
Àwọn irinṣẹ́ tí a nílò:
 Ìṣètò ìgbá ìgbẹ́ igi
Hollow the back to fit your face
Hollow the back to fit your face
Hollow the inside to clear the eye sockets and bridge the nose, testing repeatedly against your own face. The hollow is what makes them wearable — a flat back presses on the brow and is unusable within minutes.
Cut a nose notch
Cut a nose notch
Cut a notch in the lower centre so the goggles straddle the bridge of the nose. This one cut carries most of the weight and sets how the whole piece sits.
Mark the slits at your pupil spacing
Mark the slits at your pupil spacing
Mark two horizontal slits centred on your measured pupil positions. Off-centre slits force the eyes to work at an angle and cause headaches within the hour.
Cut them narrow — 1 to 2 mm
Cut them narrow — 1 to 2 mm
Cut each slit about 1-2 mm high and 25-30 mm long. Narrow is the entire design: a thin slit blocks the overwhelming majority of reflected light while still giving a usable field of view.
Àwọn irinṣẹ́ tí a nílò:
 Ọ̀bẹ Iṣẹ́ Ọwọ́
Bevel the slits outward
Bevel the slits outward
Widen each slit toward the outside so the opening is narrow at the eye and flared at the front. This keeps the light-blocking of a narrow slit while widening what you can see through it.
Blacken the inside
Blacken the inside
Rub soot or charcoal into the hollowed back. Traditional goggles were sooted for exactly this reason: it stops the light that does get in from bouncing around inside and washing out the view.
Drill for a cord and fit it
Drill for a cord and fit it
Drill a hole at each end and fit a sinew or leather cord that holds the goggles firmly against the face. Loose goggles admit light around the edges and defeat the whole object.
Àwọn ohun èlò fún ìgbésẹ̀ yìí:
 Òwú Ìrán1 mítà
Test the field of view
Test the field of view
Wear them and check what you can see: the horizontal band should be usable, the vertical view will be very restricted. Note how much you have to move your head — that head movement is how they are actually used.
Test the pinhole sharpening
Test the pinhole sharpening
If you are short-sighted, look at distant text without your glasses, then again through the slit. It gets sharper. That is the small-aperture effect increasing depth of field — the same physics as a pinhole camera, worn on the face.
Test them in real glare
Test them in real glare
Try them on snow or bright water — never by looking at the sun. Compare with and without: the difference is not subtle, and it is the whole reason the object exists.
Oil the wood
Oil the wood
Finish with oil or fat so the wood does not take up moisture and warp. A pair that warps stops sitting flat and starts leaking light at the temples.
Àwọn ohun èlò fún ìgbésẹ̀ yìí:
 Òróró Ọ̀gbọ̀ Tí A Sè20 ml
History & Context
History & Context
Thousands of years old. Inuit and Yupik people of Alaska and northern Canada carved snow goggles from ivory, antler, bone and wood, hollowed to fit an individual face and cut with very narrow slits. They are among the oldest surviving eye protection anywhere, and they were made for a specific medical problem: photokeratitis, snow blindness, caused by ultraviolet light reflected off snow and ice burning the surface of the eye.
Two effects, one slit. Narrowing the aperture cuts the light reaching the eye dramatically — a thin slit blocks the great majority of reflected light. It also reduces the size of the blur circle on the retina and increases depth of field, so vision through the slit is sharper than without. The maker gets glare protection and improved acuity from a single design decision, which is unusually elegant for any piece of equipment.
Sooting the inside. Blackening the hollow is not decoration. Any light entering the slit that then reflects off a pale interior surface reaches the eye from the wrong direction and reduces contrast. Modern optical instruments blacken their interiors for precisely the same reason.
What they gave up. Field of view. These goggles restrict vision to a narrow horizontal band, and the wearer scans by moving their head. That is a deliberate trade — on open ice the alternative is being unable to see at all within a day — and it is a good example of a design that is only optimal once you know the environment it was made for.
Not a curiosity. Glacier travellers and mountaineers used slit goggles well into the modern era, and the pinhole-aperture effect is still used in optometry: the pinhole occluder held in front of an eye during a sight test works on exactly the same principle. The object is ancient; the optics are current.
Àwọn ohun-èlò
3- Àyè
- 1 mítàÀyè
- 20 mlÀyè
Àwọn irinṣẹ́ tó nílò
3- Àyè
Ìtọ́nisọ́nà yìí ń ṣe

Blueprint tó jọra
Àwọn blueprint wọ̀nyí pín ìmọ̀ — ọ̀nà, ohun-èlò tàbí ìlànà

CC0 Àgbègbè Gbogbogbò
Blueprint yìí ti jáde lábẹ́ CC0. O lè ṣe àdàkọ, yí padà, pín, àti lò láìsí ìyọ̀ǹda.
Ṣàtìlẹ́yìn Olùṣẹ́dá nípa rírà àwọn ọjà nipasẹ̀ Blueprint wọn Ẹ̀san Olùṣẹ́dá tí àwọn Olùtajà gbé kalẹ̀, tàbí ṣẹ̀dá àtúnṣe tuntun ti Blueprint yìí kí o sì fi sínú Blueprint rẹ gẹ́gẹ́ bí ìsopọ̀ láti pín owó-wíwọlé.