

Combination Square
Laying out a piece of work needs a square for right angles, a mitre square for 45°, a rule for length, a level for horizontal, a scriber for marking and something to gauge depth. Six tools, six things to lose, and six separate objects that must agree with each other — because a square that disagrees with your rule will happily let you cut everything wrong and consistently.
Starrett's answer is to make the stock slide. Free the head to move along a graduated rule and lock anywhere, and one tool does all of it: square, mitre, rule, depth gauge, and with a vial fitted, a level as well. The reference edge and the measuring scale are now the same piece of steel, so they cannot disagree.
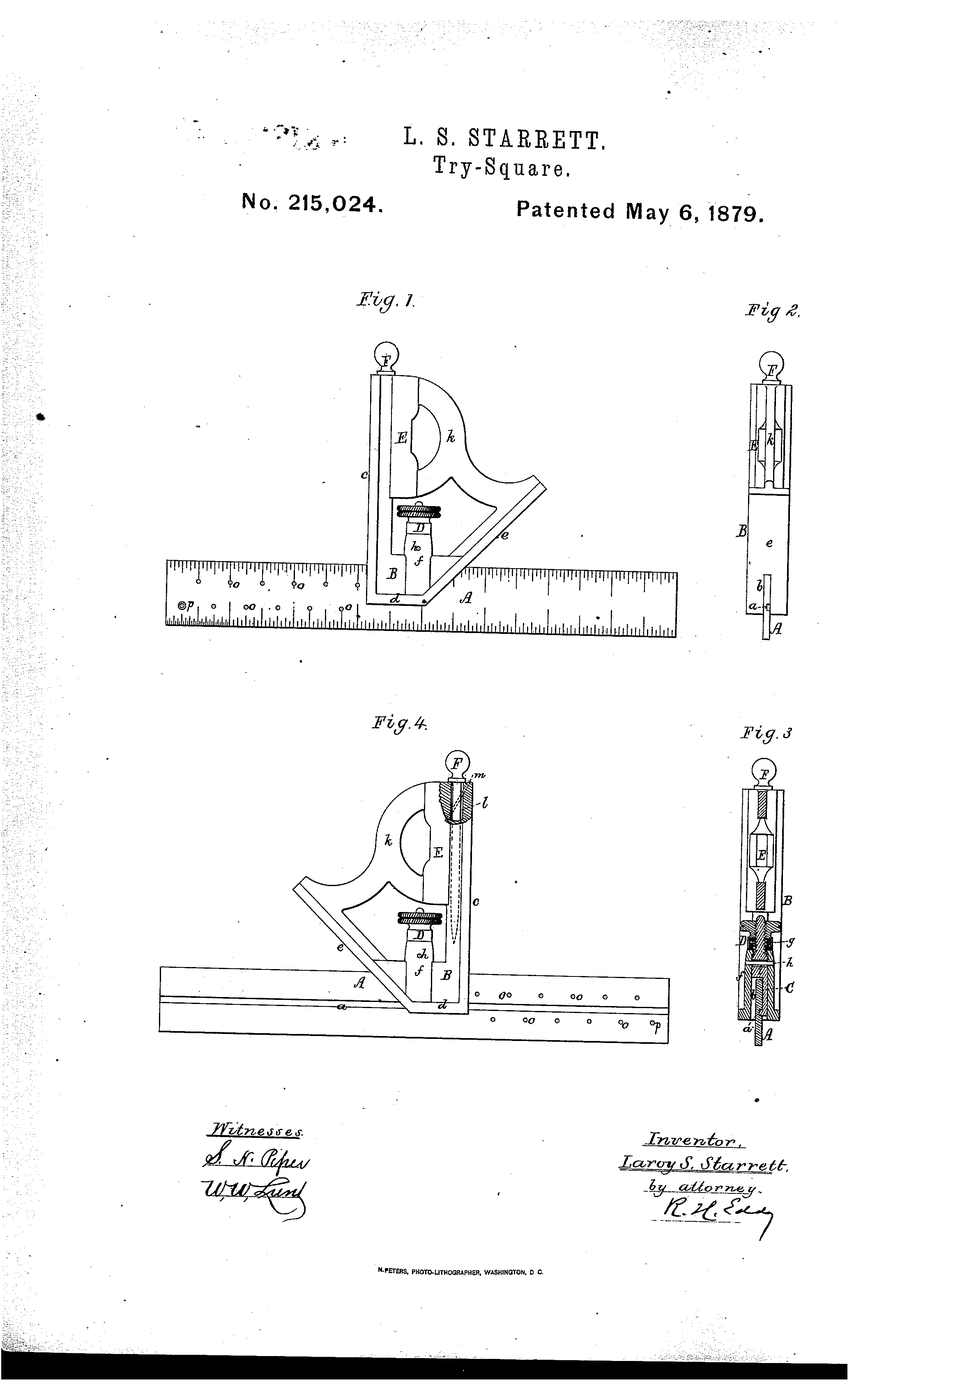
US Patent 215,024, "Improvement in try-squares", filed 26 February 1879 and granted 6 May 1879 to Laroy S. Starrett of Athol, Massachusetts. He claims a graduated bar sliding in a stock with a spring-loaded clamp that both holds position and excludes dust, plus a spirit level under an arch guard and a socket for a scriber.
Ìlànà
Read US 215,024 and note what the spring is for
Read US 215,024 and note what the spring is for
Starrett's clamp uses a counterbored nut and helical spring both to stop the bar shifting and to exclude dust and debris. A layout tool lives in a workshop full of chips.
Test a fixed square against itself
Test a fixed square against itself
Scribe a line across a board with a try square, flip the square over and scribe again from the same point. Two lines mean the square is not square — and the error is half the gap.
Cut and true the blade
Cut and true the blade
Prepare a straight steel rule about 300 mm long with parallel edges. Everything the tool claims depends on this bar being straight and its edges parallel.
Mill a central groove down the blade
Mill a central groove down the blade
Cut a slot along the blade's centre line for the clamp to run in. Off-centre and the head will sit skewed at every position.
Àwọn irinṣẹ́ tí a nílò:
 Àkójọ Ìfá Kékeré
Graduate the blade
Graduate the blade
Mark millimetre divisions along one edge, starting from the very end of the bar. The zero must be the physical end or every depth reading is offset.
Cut the head with 90° and 45° faces
Cut the head with 90° and 45° faces
Make a stock with one face square to the blade slot and one at exactly 45°. Check both against a known reference before going further.
Àwọn ohun èlò fún ìgbésẹ̀ yìí:
 Pìláwọ́ọ̀dù Bíṣì Baltiki1 ewé
Fit the clamp hook and spring
Fit the clamp hook and spring
Make a hook that engages the blade groove, drawn up by a nut against a spring. The spring keeps the hook loaded so the blade cannot creep between settings.
Àwọn ohun èlò fún ìgbésẹ̀ yìí:
 Àkójọ Ìsúnkì Ìtẹ̀1 ìtò
Check the blade slides and locks
Check the blade slides and locks
Loosen, slide the blade its full length, lock, and try to move it by hand. Any movement under hand pressure is movement under a mallet too.
Repeat the flip test on your own square
Repeat the flip test on your own square
Scribe, flip and scribe again as in step 2. Adjust the head face until the two lines coincide. This is the acceptance test for the whole tool.
Use it as a mitre square
Use it as a mitre square
Turn to the 45° face and mark a mitre. Verify by marking two mitres against each other — together they must form a right angle.
Use it as a depth gauge
Use it as a depth gauge
Sit the head on a workpiece, drop the blade into a recess and lock. Read the depth directly off the graduations — one setting, no transfer, no second tool.
Use it as a marking gauge
Use it as a marking gauge
Set a fixed projection, hold the head against the edge and run a pencil at the blade end while sliding along. You have scribed a line parallel to the edge.
Fit a spirit vial under a guard
Fit a spirit vial under a guard
Set a small level into the head with a raised arch over it. Starrett guards it because an exposed glass vial in a toolbox is a broken vial.
Count the tools you have replaced
Count the tools you have replaced
List what the one object now does: square, mitre, rule, depth gauge, marking gauge, level. Note that they cannot disagree, because they share one edge and one scale.
History & Context — the tool that made a toolmaker
History & Context — the tool that made a toolmaker
The patent. US 215,024, "Improvement in try-squares", filed 26 February 1879 and granted 6 May 1879 to Laroy S. Starrett. ⚠ Secondary sources frequently give 26 February as the grant date; it is the filing date. The grant is 6 May.
Sliding the stock is a smaller change than it sounds and a bigger one than it looks. A try square's head is fixed at one point on the blade, so the tool has exactly one function and one reference length. Letting the head clamp anywhere turns the same two pieces into a family of tools, because what a layout tool is depends entirely on where its reference face sits relative to its scale. That is why step 14 is the payoff: nothing was added except a slot and a clamp, and six tools came out.
The dust clause is the mark of someone who used tools. Starrett was a farmer and inventor before he was a toolmaker — his earlier patent was for a meat chopper — and the patent's insistence that the clamp exclude dust and debris is not the language of a designer working from drawings. A layout tool spends its life in sawdust and swarf, and a clamp mechanism that packs with chips loses its setting silently, which is the worst way for a measuring tool to fail. Guarding the spirit vial under an arch is the same instinct.
Why the flip test matters more than the tool. Steps 2 and 9 teach the single most useful habit in layout work: a square can only be checked against itself. Scribe, flip, scribe again — if the lines diverge, the error is half the divergence, and no amount of care in cutting will rescue work laid out with a square that is 0.5° off. This is also the reason a combination square is the tool a machinist checks first and replaces without hesitation when dropped.
What it became. Starrett founded the L. S. Starrett Company in Athol on the strength of this and subsequent tools, and the combination square is still made to essentially this design, with interchangeable heads — protractor and centre-finder heads slide onto the same blade, extending the same idea further. The tool in a modern workshop drawer is a direct descendant, and a maker who understands why the head slides understands most of what precision layout is about.
Àwọn ohun-èlò
2- Àyè
- 1 ìtòÀyè
Àwọn irinṣẹ́ tó nílò
1Ìtọ́nisọ́nà yìí ń ṣe
CC0 Àgbègbè Gbogbogbò
Blueprint yìí ti jáde lábẹ́ CC0. O lè ṣe àdàkọ, yí padà, pín, àti lò láìsí ìyọ̀ǹda.
Ṣàtìlẹ́yìn Olùṣẹ́dá nípa rírà àwọn ọjà nipasẹ̀ Blueprint wọn Ẹ̀san Olùṣẹ́dá tí àwọn Olùtajà gbé kalẹ̀, tàbí ṣẹ̀dá àtúnṣe tuntun ti Blueprint yìí kí o sì fi sínú Blueprint rẹ gẹ́gẹ́ bí ìsopọ̀ láti pín owó-wíwọlé.