Silkworm Cocoon Harvesting and Silk Reeling Preparation — From Sericulture to Raw Silk Material
Detailed explanation of the harvesting process of silkworm (Bombyx mori) cocoons: identifying mature cocoons, timely cocoon collection, pupae killing treatment, and drying and storage. This is the first step in the silk production chain — from live cocoons to dried cocoon raw materials ready for silk reeling. China is the birthplace of sericulture, with a history of silkworm farming exceeding 5,000 years.
Instructions
Understanding the Life Cycle of Silkworms
Understanding the Life Cycle of Silkworms
The life cycle of silkworms (Bombyx mori) is: egg → larva (silkworm) → pupa → adult (moth). The larval stage lasts approximately 25-30 days and is divided into five instars. At the end of the fifth instar, the silkworm body becomes transparent and shiny (mature silkworm) and begins to spin silk and form cocoons. From the start of silk spinning to cocoon completion takes approximately 2-3 days.
Identify mature silkworm characteristics
Identify mature silkworm characteristics
Mature silkworms ready to spin cocoons display the following characteristics: the body shortens, becomes semi-translucent, the thorax rises slightly, they stop eating, and they crawl around searching for a cocoon-spinning location. The body color changes from milky white to slightly yellowish. When these signs appear, the mounting frames (cocoon-spinning frames) need to be prepared.
Prepare the mounting frames
Prepare the mounting frames
Mounting frames are the structures on which silkworms spin their cocoons. The traditional method uses straw bundles called grass dragons, while the modern method uses plastic grid frames. Each cell in the grid frame is approximately 4x3 cm, accommodating one silkworm per cell. Place the frames upright and maintain good ventilation.
Materials for this step:
 Cocooning Frame (Plastic Grid)5 pieces
Placing on mountages (transferring mature silkworms to mountages)
Placing on mountages (transferring mature silkworms to mountages)
Gently place mature silkworms one by one onto the mountages with your hand. Place one silkworm in each compartment. The silkworm will automatically crawl into the compartment and begin spinning silk. Be careful not to place them too densely—two silkworms in the same compartment will produce a double cocoon, which has poor quality and is not suitable for silk reeling.
Tools needed:
 Soft Tweezers or Chopsticks
Maintain the cocoon-spinning environment
Maintain the cocoon-spinning environment
During the cocoon-spinning period, maintain room temperature at 24-26 degrees Celsius and relative humidity at 60-70%. Ensure good ventilation but avoid direct drafts. Keep lighting even and slightly dim. Excessively high temperature or humidity causes irregular cocoon shapes and poor silk quality. The cocoon-spinning process lasts 2-3 days.
Tools needed:
 Thermometer
 Hygrometer
Determine cocoon completion
Determine cocoon completion
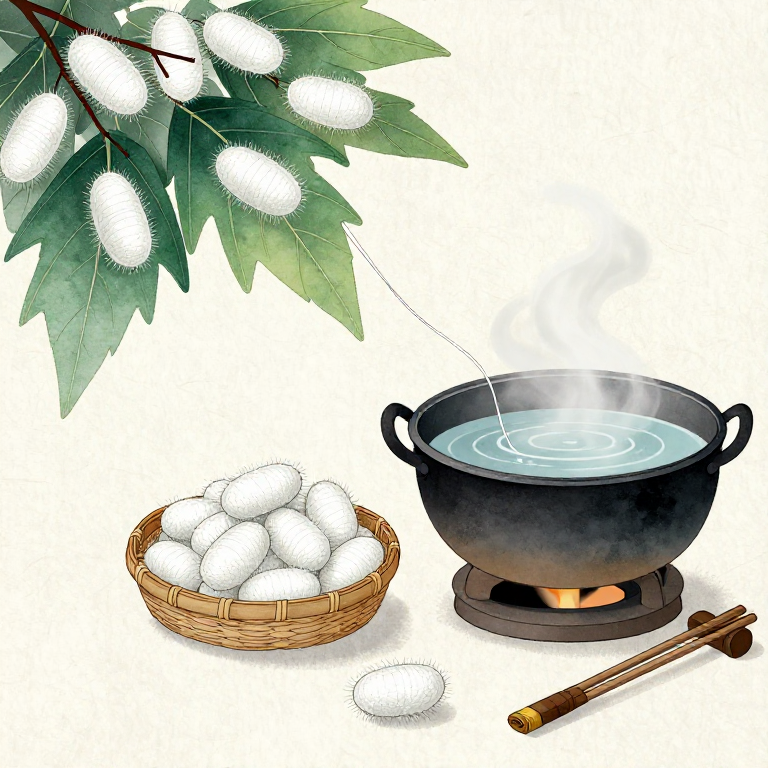
On the 6th-7th day after cocoon formation (counted from the time of mounting), gently shake the cocoon. If you hear a rustling sound of the pupa rolling inside, it indicates that the pupa has formed and the cocoon can be harvested. If no sound is heard, wait another 1-2 days. Harvesting cocoons too early will damage the pupa that has not completely transformed.
Harvest the cocoons
Harvest the cocoons
Cocoon grading and selection
Cocoon grading and selection
Cocoons are classified by quality into first-grade cocoons, second-grade cocoons, and third-grade cocoons. First-grade cocoons: regular elliptical shape, thick cocoon layer, uniform color (white or light yellow), no stains. Second-grade cocoons: slightly irregular shape or minor stains. Third-grade cocoons: double cocoons, thin-shell cocoons, yellow-spotted cocoons——these are not suitable for silk reeling but can be used for silk floss.
Tools needed:
 Sorting Tray
The necessity of stifling the pupae
The necessity of stifling the pupae
Sun-drying stifling method
Sun-drying stifling method
Tools needed:
 Bamboo Drying Tray
Oven-drying method (alternative)
Oven-drying method (alternative)
Tools needed:
 Drying Oven or Drying Room
Verify stifling success
Verify stifling success
Tools needed:
 Scissors
Weighing Record
Weighing Record
Weigh the total weight of dried cocoons. After drying fresh cocoons, the weight decreases by approximately 50-55% (mainly due to moisture loss from pupae). Record data such as variety, yield, and cocoon rate to provide reference for the next batch of sericulture. One sheet of silkworm seed (approximately 25,000 silkworms) can produce approximately 40-50 kg of fresh cocoons.
Tools needed:
 Kitchen Scale
Store the dried cocoons
Store the dried cocoons
Materials for this step:
 Breathable Cloth Bag5 pieces
 Camphor Balls10 pieces
Store cocoons for breeding separately
Store cocoons for breeding separately
Select the finest cocoons as breeding cocoons — allowing pupae to complete normal eclosion into moths for mating and egg-laying. Breeding cocoon selection standards: most regular cocoon shape, thickest cocoon layer, no defects of any kind. Breeding cocoons are not killed; they are stored separately in a well-ventilated environment with suitable temperature (25°C) awaiting eclosion.
Clean the silkworm equipment
Clean the silkworm equipment
Materials for this step:
 Lime Water or Bleach Solution5 liters
Tools needed:
 Scrub Brush
Materials
4- 5 piecesPlaceholder
- 5 piecesPlaceholder
- 10 piecesPlaceholder
- 5 litersPlaceholder
Tools Required
9- Placeholder
- Placeholder
- Placeholder
- Placeholder
- Placeholder
- Placeholder
- Placeholder
- Placeholder
CC0 Public Domain
This blueprint is released under CC0. You are free to copy, modify, distribute, and use this work for any purpose, without asking permission.
Support the Maker by purchasing products through their Blueprint where they earn a Maker Commission set by Vendors, or create a new iteration of this Blueprint and include it as a connection in your own Blueprint to share revenue.