ART
BEAUTY & WELLNESS
CRAFT
CULTURE & HISTORY
ENTERTAINMENT
ENVIRONMENT
FOOD & DRINKS
GREEN FUTURE
REVERSE ENGINEERING
SCIENCES
SPORTS
TECHNOLOGY
WEARABLES
Turmeric Harvesting and Processing — Making Dried Turmeric from Raw Turmeric
English
BhaiPrasad

Created by

BhaiPrasad

23. April 2026IN
0
0
0
0
0

Turmeric Harvesting and Processing — Making Dried Turmeric from Raw Turmeric

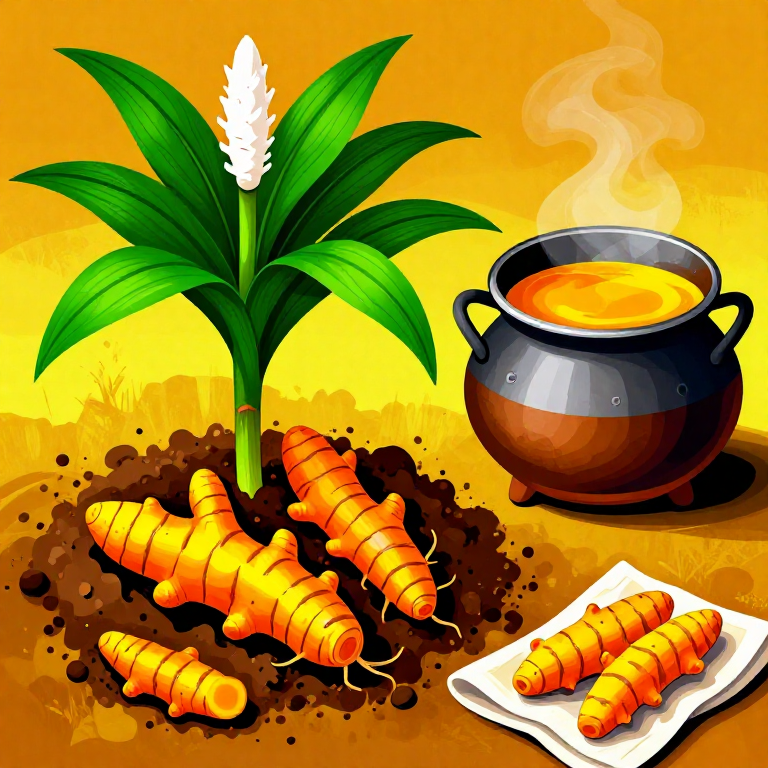
Detailed process of turmeric (Curcuma longa) harvesting, curing (boiling), drying, and polishing in India. India produces approximately 80% of the world's turmeric, with the city of Erode in Tamil Nadu being a major center of turmeric trade. Turmeric is planted in April-May and harvested 7-9 months later when the leaves turn yellow and dry. This blueprint includes all stages of turmeric processing: identification, harvesting indicators, rhizome extraction, cleaning, separation of mother rhizomes and fingers, boiling (curing), drying, polishing, grading, and storage.

Beginner
3-5 days (including curing)

Instructions

1

Understanding the Turmeric Plant

Turmeric (Curcuma longa) is a perennial plant in the ginger family (Zingiberaceae). It grows 60-100 cm tall with broad, deep green leaves. Underground are the rhizomes — this is the main useful part of the turmeric plant. Rhizomes are of two types: the mother rhizome, which is round and heavy, and the fingers, which are thin branches extending from the mother rhizome. Fresh turmeric contains 6-9% curcumin, its primary active compound and the source of its yellow color. India produces approximately 80% of the world's turmeric.
2

Recognizing the Signs for Digging

Turmeric is ready 7-9 months after planting — a crop planted in April-May is ready for digging in January-March. Signs to identify: leaves begin to turn yellow, start drying, and fall to the ground. When 70-80% of the leaves have dried, it is the right time for digging. Digging should be done before the leaves dry completely — waiting too long can cause rhizomes to rot in the ground or attract pests.
3

Digging the Turmeric

Lightly irrigate the field before digging to soften the soil so rhizomes come out easily. Loosen the soil with a spade or hoe 15-20 cm away from the plant on all sides. Carefully extract the rhizomes so they are not cut or broken — cut rhizomes are susceptible to fungal infection. A good crop yields 20-25 tons of fresh turmeric per hectare. It is better to dig in the morning when the sun is not intense.

Tools needed:

Spade (फावड़ा)Spade (फावड़ा)
Hoe (कुदाल)Hoe (कुदाल)
4

Cleaning the Rhizomes

After digging, remove the soil clinging to the rhizomes. Clean by hand or with a gentle stream of water. Break off roots and thin rootlets by hand. Sort out and remove rotten, pest-infested, or damaged rhizomes — do not mix these into the processing batch. After cleaning, keep rhizomes in shade — fresh rhizomes can shrink quickly if exposed to direct sunlight.

Materials for this step:

Clean WaterClean Water50 liters
5

Separating the Mother Rhizome and Fingers

Separate the clean rhizomes into two groups: mother rhizome (bulb) and fingers. The mother rhizome is round and heavy — a portion is kept as seed for the next crop. Fingers are the thin, elongated branches that are processed for spice use. Fingers can be broken off from the mother rhizome by hand. Mother rhizomes kept for seed should be healthy, pest-free, and weigh at least 30-40 grams.
6

Curing — Boiling the Rhizomes

Curing is the most important step in turmeric processing. Boil water in a large vessel or cauldron and put the rhizomes in — the water should be 5-7 cm above the rhizomes. Boil for 45-60 minutes. To check doneness: push a nail or spike into the rhizome — if it goes in easily, the rhizome is cooked. Boiling gelatinizes the starch, distributes curcumin uniformly throughout the rhizome, and reduces drying time. Over-boiling makes rhizomes too soft and they may break.

Materials for this step:

WaterWater100 liters

Tools needed:

Large Metal Cauldron (कड़ाही)Large Metal Cauldron (कड़ाही)
Firewood StoveFirewood Stove
7

Removing and Cooling the Boiled Rhizomes

After boiling, remove the rhizomes from the water using a strainer or mesh. Do not touch extremely hot rhizomes directly with bare hands. Spread the rhizomes on a bamboo basket or mesh surface to allow steam to escape and water to drain. Let cool for 1-2 hours. Boiled rhizomes turn a deep yellow-orange color. Do not discard the boiling water — it contains dissolved curcumin and can be used as a natural dye.

Tools needed:

Wire Mesh StrainerWire Mesh Strainer
Bamboo BasketBamboo Basket
8

Sun Drying

Spread the cooled rhizomes in a single layer on a clean bamboo mat, concrete floor, or tarpaulin in direct sunlight. The layer of rhizomes should not be more than 5-7 cm thick. Turn the rhizomes 2-3 times a day for even drying. Drying takes 10-15 days. Cover the rhizomes at night and during rain. Rhizomes are considered dry when moisture content drops below 10% — a dry rhizome makes a crackling sound when broken and shows a deep yellow-orange color inside.

Tools needed:

Bamboo Drying MatBamboo Drying Mat
Tarpaulin CoverTarpaulin Cover
9

Checking the Drying

Check drying by several methods. First: break the rhizome with your fingers — if it snaps hard with a crackling sound, it is dry. Second: press with a fingernail — if no mark is left, it is correct. Third: the weight of the rhizome is approximately 20-25% of its fresh weight — meaning 1 kg of fresh turmeric yields approximately 200-250 grams of dried turmeric. Moisture content should not exceed 8-10% — higher moisture poses a risk of fungal growth.
10

Polishing

The surface of dried rhizomes is rough with remnants of rootlets still attached. Polishing makes the surface smooth and attractive. Traditional method: dried rhizomes are placed in a bamboo basket or drum and rubbed against each other. At larger scale, a drum polisher is used — a rotating drum in which rhizomes rub against each other and become glossy. Polishing removes rootlet remnants, rough skin, and excess soil. In some regions, turmeric powder is sprinkled after polishing to make the color uniform.

Tools needed:

Hand-Operated Polishing DrumHand-Operated Polishing Drum
11

Grading

Polished rhizomes are sorted based on size, color, and quality. Fingers and mother rhizomes (bulbs) are kept separately. Fingers are more valuable because they contain higher curcumin content. Quality standards: color (deep yellow-orange is best), aroma (strong earthy scent), curcumin percentage (over 3% for commercial quality), and rhizome size. The Erode turmeric market in Tamil Nadu is the largest turmeric trading center in Asia.

Tools needed:

Sorting TableSorting Table
12

Storage

Store dried turmeric in a dry, cool, and dark place — protect from direct sunlight and moisture. Pack in jute sacks and place on wooden pallets to prevent ground moisture from reaching them. Keep sacks 30-45 cm away from walls to allow air circulation. Storage temperature should be below 25 degrees Celsius and relative humidity below 65%. Properly stored dried turmeric retains its quality for 1-2 years. Regularly check for pests and fungal growth. Neem leaves placed between sacks act as a natural pest repellent.

Materials for this step:

Jute Storage SackJute Storage Sack5 pieces
Wooden Storage PalletWooden Storage Pallet2 pieces
Dried Neem LeavesDried Neem Leaves1 bundle

Tools needed:

Weighing ScaleWeighing Scale

Materials

5

Tools Required

11

CC0 Public Domain

This blueprint is released under CC0. You are free to copy, modify, distribute, and use this work for any purpose, without asking permission.

Support the Maker by purchasing products through their Blueprint where they earn a Maker Commission set by Vendors, or create a new iteration of this Blueprint and include it as a connection in your own Blueprint to share revenue.

Discussion

(0)

Log in to join the discussion

Loading comments...