ART
BEAUTY & WELLNESS
CRAFT
CULTURE & HISTORY
ENTERTAINMENT
ENVIRONMENT
FOOD & DRINKS
GREEN FUTURE
REVERSE ENGINEERING
SCIENCES
SPORTS
TECHNOLOGY
WEARABLES
English
Acacia Gum Collection — Harvesting Resin from Acacia Trees
Detailed guide to traditional acacia gum (Acacia nilotica) collection in Tamil Nadu. Covers tree identification, bark incision, collecting gum tear drops, cleaning, drying and quality grading. Acacia gum is a natural resin used as an alternative to gum arabic in food, pharmaceutical and industrial applications.
Beginner
2-3 hours + 5-10 days collection
Instructions
1
1
Identifying the Acacia Nilotica Tree
Identifying the Acacia Nilotica Tree
Acacia nilotica (karuvelam in Tamil) is a thorny tree that grows 5-15 meters tall. Identifying features: long white paired thorns (2-8 cm), bipinnate leaves, yellow spherical flower clusters, and curled seed pods. The bark is dark gray with fissures. It is very commonly found in the dry and semi-arid regions of Tamil Nadu.
2
2
Selecting the Right Season
Selecting the Right Season
The best season for gum collection is summer (April to June), as heat and drought stimulate the tree's gum production. During the rainy season (October-December), the gum will be moist and fungal infection may occur. Select healthy trees over 5 years old with a trunk diameter greater than 15 cm.
3
3
Preparing the Tapping Tools
Preparing the Tapping Tools
A sharp small knife or specialized bark tapping knife is needed for making incisions in the bark. The tool must be kept clean — dirty tools can cause infection in the tree. The knife tip should be sharp enough to make cuts 2-3 cm in length and 3-4 mm in depth.
Tools needed:
 Bark Tapping Knife
 Sharpening Stone
4
4
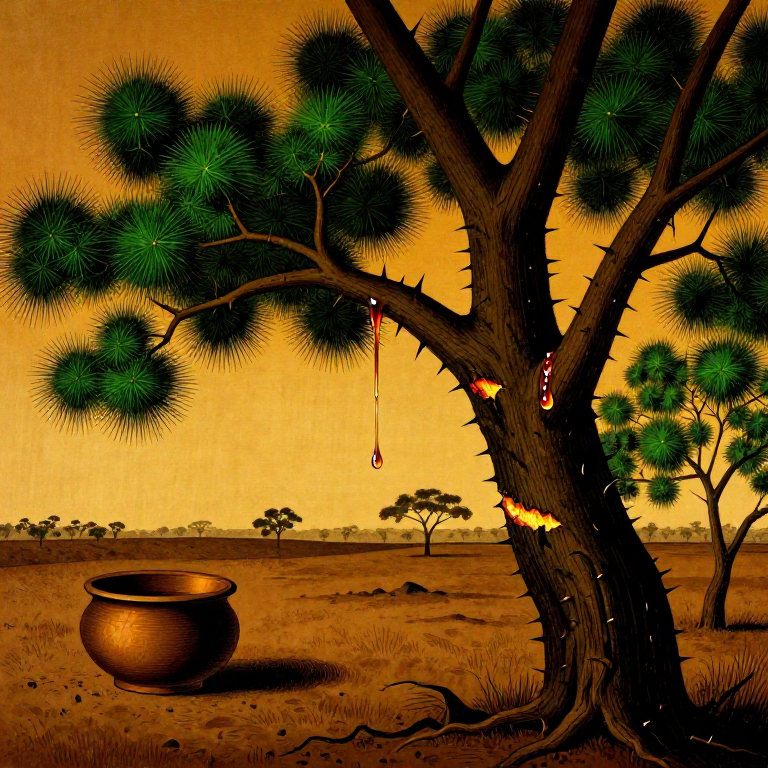
Making Incisions in the Bark
Making Incisions in the Bark
Make incisions on the trunk at a height of 30-100 cm from the ground. Each incision should be 3-5 cm in length and 3-4 mm in depth — cut only to the inner bark (cambium), not deep enough to reach the wood (xylem). 3-5 incisions per tree are sufficient. Incisions should be spaced at least 10 cm apart. Make incisions only on one side of the trunk circumference, not all the way around.
Tools needed:
Bark Tapping KnifeThick Leather Gloves (Thorn Protection)
5
5
Waiting for the Gum to Exude
Waiting for the Gum to Exude
After making incisions, the tree exudes gum to heal the wound. The first gum drops become visible within 24-48 hours. Full gum tears take 5-10 days to form. On hot days (above 35 degrees Celsius), gum exudes faster.
6
6
Collecting the Gum Tears
Collecting the Gum Tears
When gum tears have naturally dried and hardened in the air, gently pry them off by hand or with a blunt knife. Collect only after the gum is fully dried — half-dried gum will be sticky and lower in quality. While collecting, avoid mixing bark fragments and dirt with the gum. A healthy tree can yield 100-300 grams of gum per season.
Tools needed:
 Blunt Collection Knife
 Cotton Cloth Collection Bag
7
7
First Stage Cleaning — Removing Bark and Wood Particles
First Stage Cleaning — Removing Bark and Wood Particles
Spread the collected gum tears on a clean surface and manually remove bark fragments, soil, insects, and other contaminants. Inspect each tear individually. Reject tears with fungal infection (black spots or mold).
Tools needed:
 Clean Sorting Tray
8
8
Dissolving Gum in Water and Filtering (Optional)
Dissolving Gum in Water and Filtering (Optional)
For higher purity, soak gum tears in clean water (1 part gum to 2 parts water). After soaking for 12-24 hours, the gum dissolves in water (Acacia nilotica gum is water-soluble). Filter the solution through fine cloth to remove soil and insoluble contaminants. Then dry the filtered solution again.
Materials for this step:
 Clean Water2 liters
Tools needed:
 Muslin Straining Cloth
 Glass Bowl
9
9
Sun Drying
Sun Drying
Spread the cleaned gum tears (or filtered solution) on a clean cloth or tray and dry in sunlight. Dry in direct sunlight for 2-3 days. Turn twice daily. Bring indoors at night or cover to protect from moisture. Dried gum is hard and brittle.
Tools needed:
 Flat Drying Tray
 Drying Rack
10
10
Grading the Gum by Size and Color
Grading the Gum by Size and Color
Classify the dried gum into three grades. Grade 1 (highest): large, pale yellow to amber colored, clear tears, over 1 cm in diameter. Grade 2 (medium): smaller tears, slightly darker color. Grade 3 (standard): particles, mixed color, small fragments. Grade 1 gum is suitable for food and medicinal use, Grade 3 is appropriate for industrial use.
11
11
Crushing the Gum (Optional)
Crushing the Gum (Optional)
For industrial or food use, crush or grind the large gum tears. Crush in a mortar and pestle (mechanical grinding is not necessary). Crush into uniform 2-5 mm particles. Do not grind into very fine powder — it absorbs moisture and clumps together.
Tools needed:
 Mortar and Pestle
12
12
Storage and Preservation
Storage and Preservation
Store dried gum in a clean, dry, airtight container (glass jar or woven bag). Do not store in plastic bags — moisture can accumulate and mold may grow. Store in a cool, dry place away from direct sunlight. If properly dried and stored, Acacia nilotica gum can maintain its quality for 2-3 years.
Materials for this step:
 Glass Storage Jar with Lid3 pieces
13
13
Protecting the Tree — Preparing for the Next Season
Protecting the Tree — Preparing for the Next Season
After collection is complete, observe the incision sites. A healthy tree heals the wounds on its own within 2-3 months. In the next season, make incisions at a different spot on the same tree — do not incise at the same spot again. Use a tree only once per year. This ensures the health of the tree and long-term gum production.
Materials
2- 2 litersPlaceholder
- 3 piecesPlaceholder
Tools Required
11- Placeholder
- Placeholder
- Placeholder
- Placeholder
- Placeholder
- Placeholder
- Placeholder
- Placeholder
- Placeholder
- Placeholder
CC0 Public Domain
This blueprint is released under CC0. You are free to copy, modify, distribute, and use this work for any purpose, without asking permission.
Support the Maker by purchasing products through their Blueprint where they earn a Maker Commission set by Vendors, or create a new iteration of this Blueprint and include it as a connection in your own Blueprint to share revenue.