Collaboration
ART
BEAUTY & WELLNESS
CRAFT
CULTURE & HISTORY
ENTERTAINMENT
ENVIRONMENT
FOOD & DRINKS
REVERSE ENGINEERING
SCIENCES
SPORTS
TECHNOLOGY
WEARABLES
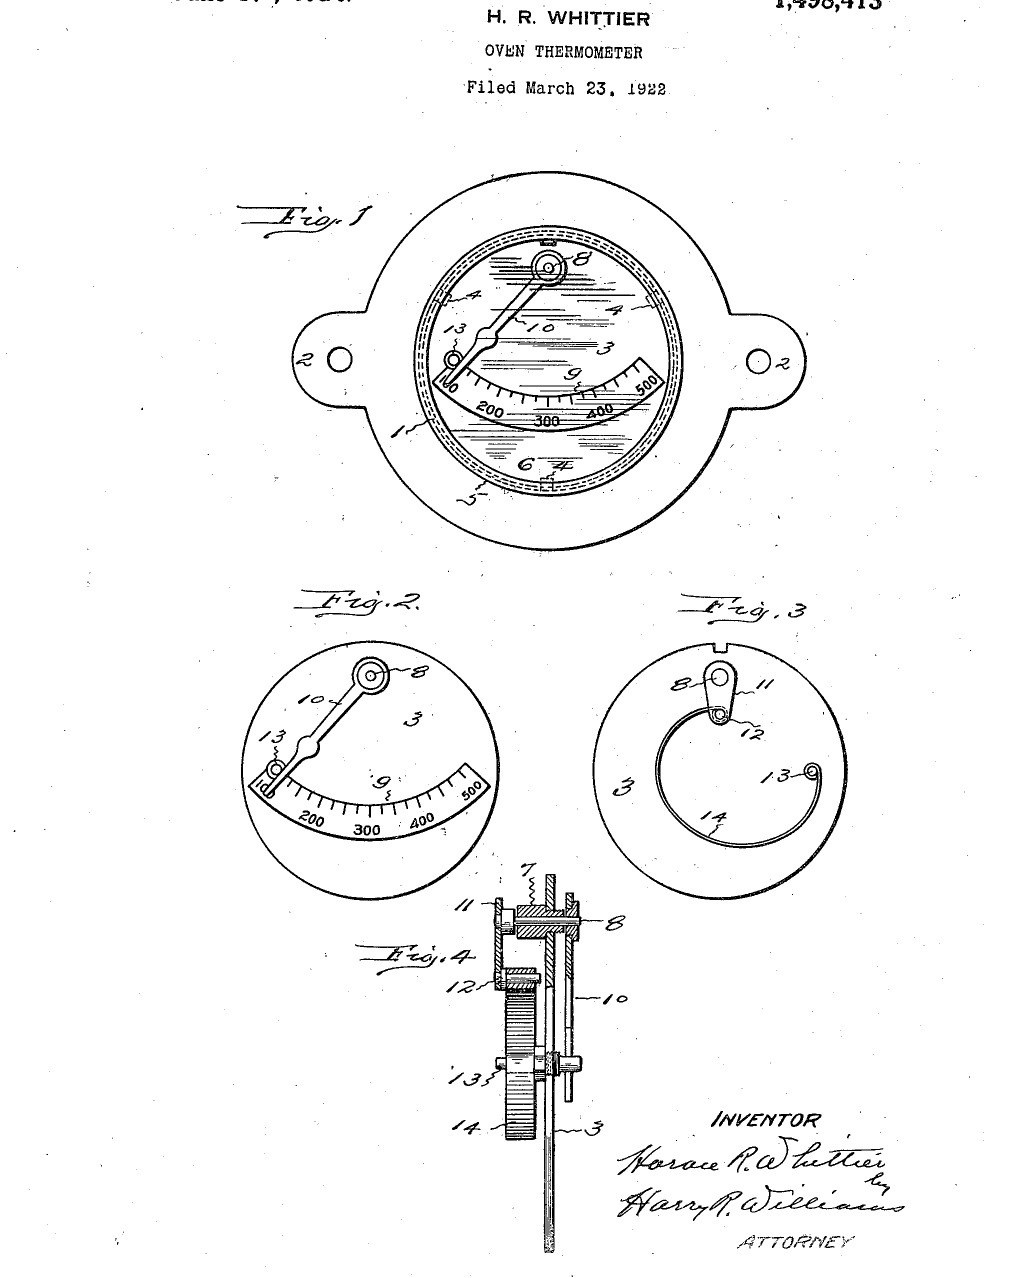


Oven Thermometer: Door-Mounted Dial with a Curved Bimetal Strip (Whittier, US 1,498,413, 1924)
A dial thermometer that fits in an oven door or wall. Behind an enamelled dial plate, a curved bimetal strip runs from a fixed stud to a little arm on a spindle; as the oven heats, the strip bends, turns the spindle and swings the pointer across the scale on the front. Everything is mounted on the dial plate as one unit and dropped into a shallow stamped case with a glass cap.
Result: a compact oven thermometer, easy to calibrate and adjust.
Source: H. R. Whittier, US 1,498,413 (1924). Unknown: metals, sizes and the scale unit. Picture: the patent drawing.
Intermediate
Unknown
Instructions
1
1
Make the dial unit
Make the dial unit
Cut a metal disk for the dial plate, enamel its front and mark the scale (the patent's drawing reads 200 to 500). Thread a sleeve through the plate near one edge and pass a spindle loosely through it, with a pointer fixed on its front end and a short arm on its back end. Set a stud through the plate: in front it stops the pointer, behind it anchors one end of a curved bimetal strip whose other end is pinned to the arm. Not given: metals, sizes, the scale unit.
Materials for this step:
 Unknown Metal1 dial plate, sleeve, spindle, pointer, arm, stud
 Unknown Material1 enamel and scale
 Bimetallic Strip1 curved strip
Tools needed:
 Tap and Die Set
 Round-nose Pliers
 Unknown Dimensions
2
2
Make the case
Make the case
Stamp a shallow case from thin sheet metal, closed at the back, with perforated ears for fixing it in the oven door or wall, and press lugs in from its wall for the dial plate to sit on. Make a cap with a glass to close the open front. Ours: steel sheet and a watch glass.
Materials for this step:
 Mild Steel Sheet1 case and cap
 Watch Glass1 window
Tools needed:
 Tin SnipsUnknown Dimensions
3
3
Assemble, calibrate and fit
Assemble, calibrate and fit
Calibrate the strip and set the pointer while the unit is out of the case, then drop the dial unit onto the lugs and fit the cap, which holds the plate in place. Fasten the case through its ears in the oven door or wall. As the oven heats, the strip bends and the pointer swings across the scale. Not given: how it is calibrated.
Tools needed:
 OvenRound-nose Pliers
Materials
5- 1 dial plate, sleeve, spindle, pointer, arm, studPlaceholder
- 1 enamel and scalePlaceholder
- 1 curved stripPlaceholder
- 1 case and capPlaceholder
- 1 windowPlaceholder
This blueprint makes

Related Blueprints
These blueprints share knowledge with this one — techniques, materials, or principles that connect them in the learning graph.
CC0 Public Domain
This blueprint is released under CC0. You are free to copy, modify, distribute, and use this work for any purpose, without asking permission.
Support the Maker by purchasing products through their Blueprint where they earn a Maker Commission set by Vendors, or create a new iteration of this Blueprint and include it as a connection in your own Blueprint to share revenue.