ART
BEAUTY & WELLNESS
CRAFT
CULTURE & HISTORY
ENTERTAINMENT
ENVIRONMENT
FOOD & DRINKS
GREEN FUTURE
REVERSE ENGINEERING
SCIENCES
SPORTS
TECHNOLOGY
WEARABLES
Shea Fruit Processing — From Shea Fruit Collection to Oil Extraction
English
BabaMola

Created by

BabaMola

22. April 2026NG
1
0
0
0
0

Shea Fruit Processing — From Shea Fruit Collection to Oil Extraction

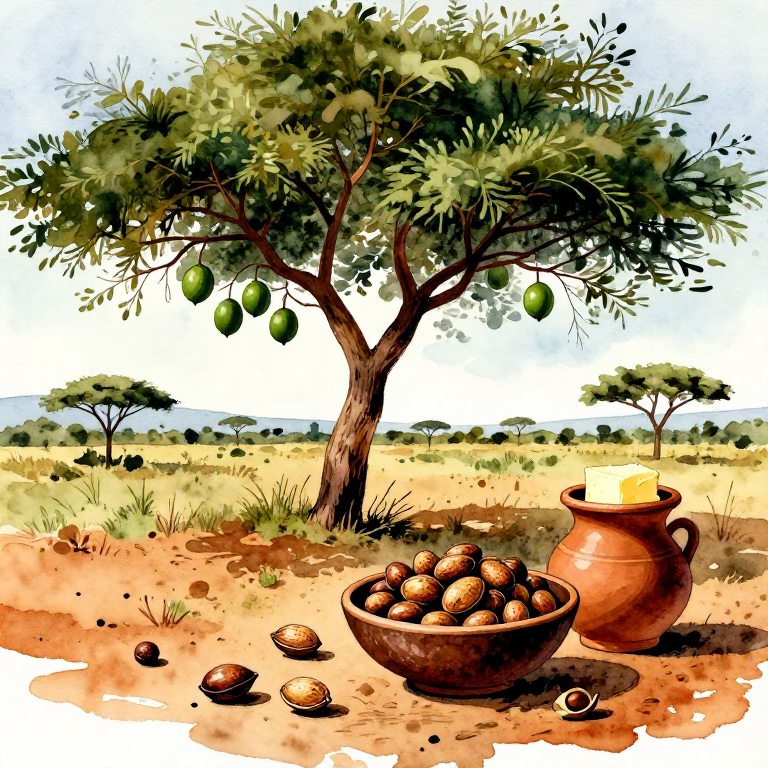
A guide for collecting shea fruit in southern Nigeria. The shea tree (Vitellaria paradoxa) is a valuable tree that produces fruit for twenty to twenty-five years. This book explains how to select ripe fruits, how to process them, and how to extract shea butter for cosmetic use.

Beginner
2-3 days

Instructions

1

Understanding the Shea Tree

The shea tree (Vitellaria paradoxa) grows 10-15 meters tall with large, sturdy leaves, thriving in the savanna zone. Its fruit resembles a small coconut with dark green skin. A single tree can bear fruit for 200 years.
2

Waiting for the Fruiting Season

Shea fruits ripen between June and September (Okudu-Owewe) in southern Nigeria. Ripe fruit will fall from the tree on its own. Do not pick fruit from the tree — only fallen fruit is properly ripe.
3

Collecting Fallen Fruit

Early in the morning, follow the fallen fruit under shea trees. Collect them into baskets or bags. A single tree can yield 15-20 kg of fruit per year.

Materials for this step:

Fallen Shea FruitFallen Shea Fruit5 kilogram

Tools needed:

Woven Collection BasketWoven Collection Basket
4

Removing the Fruit Pulp

Shea fruit has a green outer skin and sweet pulp inside. Remove the pulp from the shea nut. The shea fruit pulp is edible — it is sweet and contains vitamin C. Children often eat it.

Tools needed:

Small KnifeSmall Knife
5

Washing the Shea Nuts

Wash the shea nuts thoroughly in cool, clean water to remove remaining pulp and dirt. Clean water is important for preventing microbial contamination.

Materials for this step:

Clean WaterClean Water10 liters

Tools needed:

Washing BasinWashing Basin
6

Boiling the Shea Nuts

Place the shea nuts in boiling water for 20-30 minutes. Boiling kills organisms that could cause the nuts to sprout, and softens the shell for cracking.

Materials for this step:

Water for BoilingWater for Boiling15 liters

Tools needed:

Large Cooking PotLarge Cooking Pot
FirewoodFirewood
7

Cooling the Boiled Nuts

Remove the nuts from the boiling water and spread them on a mat or rack where air can circulate. Allow them to cool for 1-2 hours.

Tools needed:

Drying MatDrying Mat
8

Cracking the Nut Shells

The shea nut shell is hard. Use a stone or mallet to crack the shells one by one. Be careful not to crush the kernel inside — the kernel is what we need. Work carefully and methodically.

Tools needed:

Flat Cracking StoneFlat Cracking Stone
Hammer Stone
9

Extracting the Kernels from the Shells

Remove the white-to-brown kernel from the cracked shell. A single shea kernel weighs approximately 5-8 grams. Set the shells aside — they can be used as fuel for cooking.
10

Inspecting Kernels for Quality

A good kernel has a white-cream to light brown color. Kernels that are black or have a bad smell are spoiled — discard them. Cut a kernel in half — the inside should be cream-colored.

Tools needed:

Small KnifeSmall Knife
11

Spreading Kernels in the Sun to Dry

Spread kernels on a mat or rack in the sun. Do not pile them on top of each other. Turn them two to three times daily to ensure even drying on all sides.

Tools needed:

Drying MatDrying Mat
Drying RackDrying Rack
12

Drying for 5-7 Days

Kernels need 5-7 days to dry properly in the sun. At night or during rain, collect them into a dry space. Properly dried kernels should have no more than 7% moisture content.
13

Testing the Dried Kernels

Properly dried kernels are hard and make a sound when they hit the ground. If you break one open, the inside should be dry and firm — not moist or soft. Their weight will have reduced by approximately three-quarters.
14

Packing the Dried Kernels into Bags

Place dried kernels into breathable burlap or jute bags. Do not use plastic bags — they trap moisture and cause kernels to spoil. Label each bag with contents and drying date.

Materials for this step:

Burlap Storage SackBurlap Storage Sack2 pieces
15

Storing Kernels in a Dry Place

Place bags in a dry, cool, well-ventilated storage area. Elevate bags off the ground on pallets or raised platforms. Properly dried shea kernels can last up to 12 months without spoiling.

Tools needed:

Wooden PalletWooden Pallet

Materials

4

Tools Required

10

CC0 Public Domain

This blueprint is released under CC0. You are free to copy, modify, distribute, and use this work for any purpose, without asking permission.

Support the Maker by purchasing products through their Blueprint where they earn a Maker Commission set by Vendors, or create a new iteration of this Blueprint and include it as a connection in your own Blueprint to share revenue.

Discussion

(0)

Log in to join the discussion

Loading comments...