Collaboration
ART
BEAUTY & WELLNESS
CRAFT
CULTURE & HISTORY
ENTERTAINMENT
ENVIRONMENT
FOOD & DRINKS
REVERSE ENGINEERING
SCIENCES
SPORTS
TECHNOLOGY
WEARABLES
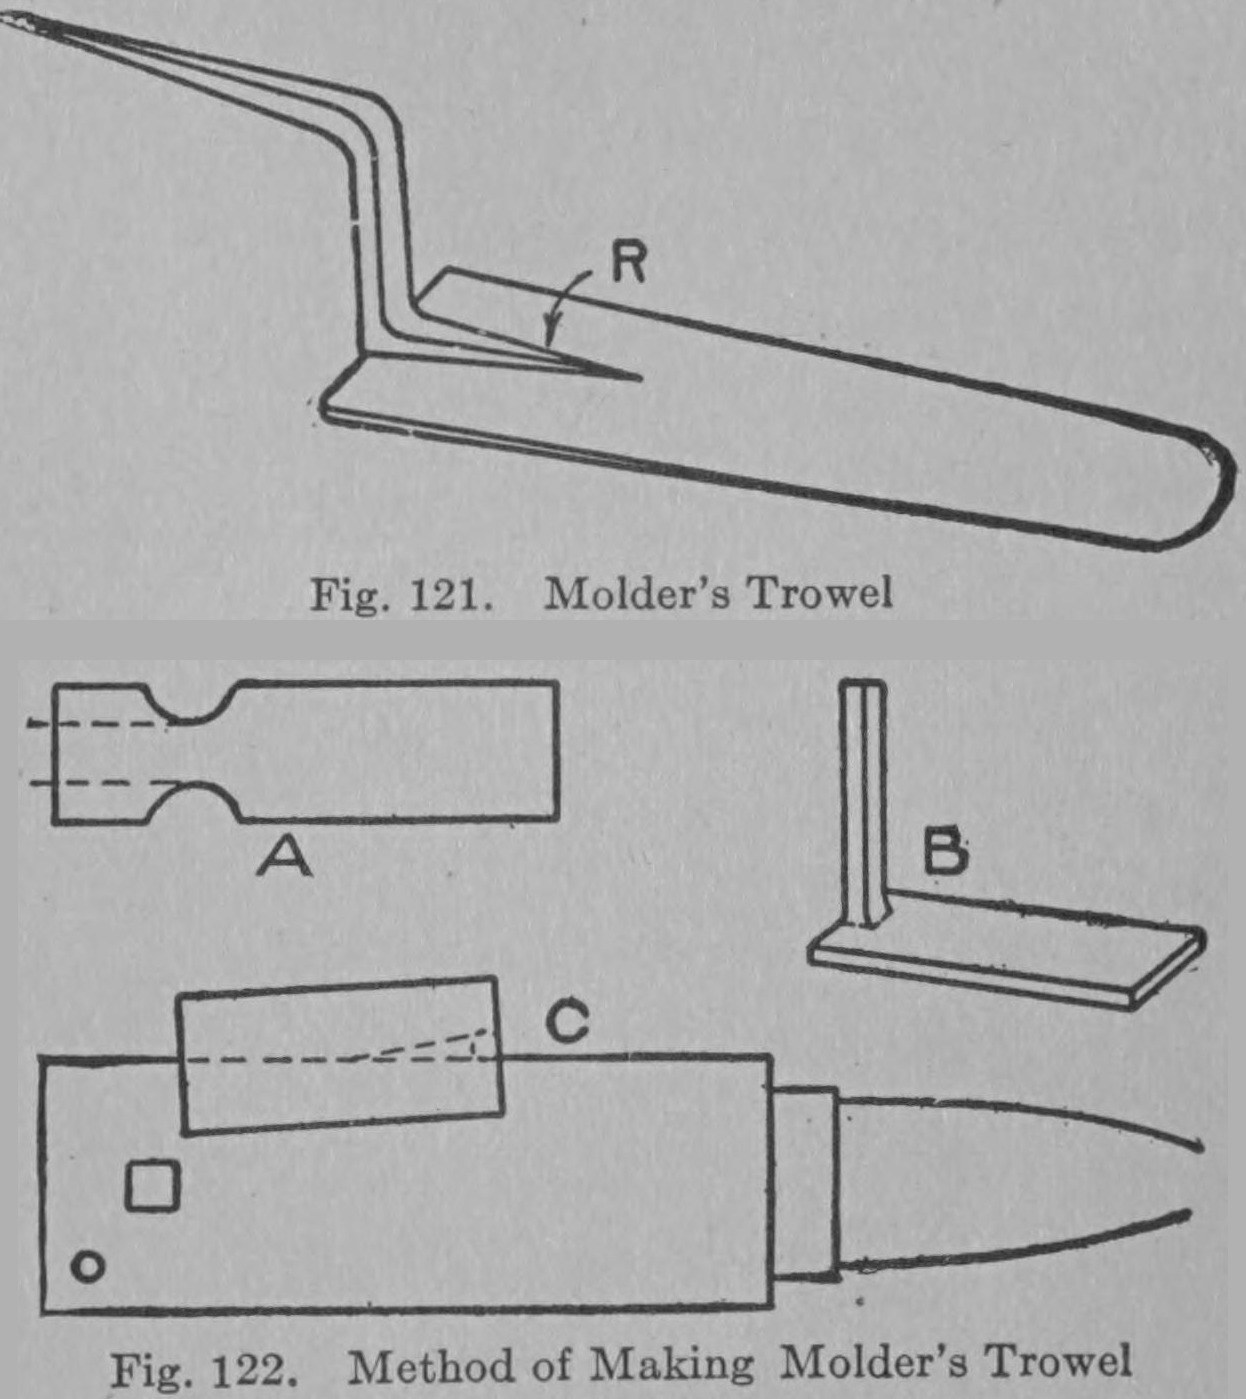


Trowel: the Moulder's Trowel Forged from Flat Steel (Modern Shop Practice, 1916)
A trowel with a wide thin steel blade and a short stem cranked up at a right angle to a round handle. Modern Shop Practice (1916) forges it from steel about 1/4 inch by 1 inch: nick it with fullers, draw down the stem, bend it up to a square corner, then thin the blade edge by edge so a small ridge stays where the stem joins (Fig. 121, R).
The foundry uses it to shape and smooth the larger surfaces of a mould; the bottom is ground slightly crowning so the forward edge does not cut into the sand. Blade size, steel grade and the handle are not given.
Source: Modern Shop Practice, vol. 4 (American Technical Society, 1916), Forging p. 65 and Foundry Work pp. 14-15. Picture: Figs. 121-122.
Intermediate
An hour
Instructions
1
1
Read the source
Read the source
"The molder's trowel illustrated in Fig. 121 is a sample of a large class of forgings, having a wide thin face with a comparatively small thin stem forged at one end. The stock used for the trowel would be about 1/4 inch by 1 inch. This is thick enough to allow for the formation of a ridge at R."
2
2
Nick and draw the stem
Nick and draw the stem
Heat the 1/4 × 1 inch steel. Make two nicks across it with fullers near one end (Fig. 122, A) and draw that end down, roughly to size, into the stem.
Materials for this step:
 Steel Bar Stock1 bar
Tools needed:
 Forge
 Anvil
 Blacksmith Hammer
 Blacksmith Tongs
 Fuller
 Heat-Resistant Gloves
3
3
Bend the square corner
Bend the square corner
Bend the stem up at a right angle and forge it to a square corner (Fig. 122, B), the same way as the square corner of a bracket.
Tools needed:
ForgeAnvilBlacksmith HammerBlacksmith TongsHeat-Resistant Gloves4
4
Flatten the blade
Flatten the blade
Hold the work with the stem pointing down against the side of the anvil (Fig. 122, C). Strike down so the blows cover the part over the edge of the anvil: all the metal on the anvil is flattened. Swing the piece round to thin the other edge. The small triangle left unworked forms the ridge R. The same result comes from laying the work flat on the anvil face and using a set hammer. Blade width and length are not given (unknown).
Tools needed:
ForgeAnvilBlacksmith HammerBlacksmith Tongs Set Hammer
 Unknown DimensionsHeat-Resistant Gloves
5
5
Grind the bottom and fit the handle
Grind the bottom and fit the handle
Grind the bottom of the blade slightly crowning, so it can be rocked a little as it is worked over the sand without the forward edge cutting in. Fit a short round handle that fits the grasp of the hand (Fig. 10); the source does not say what it is made of or how it is fixed to the stem.
Materials for this step:
 Tool Handle1 piece
Tools needed:
 Grinding Wheel
6
6
History and honest limits
History and honest limits
The book counts sixty or more trowel and slick shapes on the market; the square trowel works into square corners, the finishing trowels cope out along curved pattern edges. Trowels are sold by width and length of blade.
Not given: blade size, steel grade, handle material and fixing, any hardening. Steel Bar Stock stands for the plain "steel" of the source.
Materials
2- 1 barPlaceholder
- 1 piecePlaceholder
This blueprint makes

CC0 Public Domain
This blueprint is released under CC0. You are free to copy, modify, distribute, and use this work for any purpose, without asking permission.
Support the Maker by purchasing products through their Blueprint where they earn a Maker Commission set by Vendors, or create a new iteration of this Blueprint and include it as a connection in your own Blueprint to share revenue.