Finding and Preparing River Clay — Zulu Tradition of Pottery Making
Instructions
Understand what clay is
Understand what clay is
Clay is a fine-grained mineral structure composed of hydrated aluminum silicate (Al2Si2O5(OH)4 — kaolinite). It is formed by the weathering of rocks such as feldspar over long periods. Clay is carried by water in rivers and deposited in areas near riverbanks. Clay particles are very small — less than 0.002 mm. When wet, clay becomes plastic and moldable.
Find clay deposits along rivers
Find clay deposits along rivers
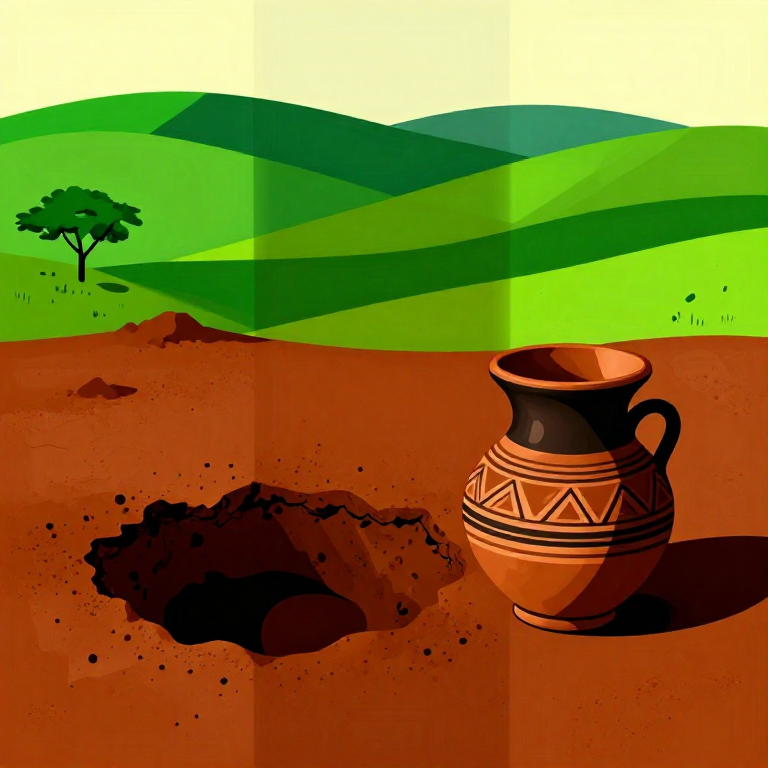
Walk along riverbanks where water has eroded the soil. Look for dense, smooth sections with a solid color — brown, red, gray, or white — beneath the topsoil with plants. In South Africa, red clay with iron oxide content is commonly found in KwaZulu-Natal along rivers such as the Mhlathuze, Thukela, and Pongola. Good locations are where water has heavily eroded the riverbank.
Making a clay ball
Making a clay ball
Take a piece of earth that is equivalent to your hand. Add a little water and then make a ball the size of an orange. If the ball maintains its shape without cracking and you can smooth its surface with your thumb, the clay has sufficient plasticity to make dishes. If it breaks quickly, the earth has too much sand.
Perform the snake test
Perform the snake test
Roll moist clay into a long snake approximately 1 cm wide and 15 cm long. Hold one end and lift it up. If the snake does not break for at least 5 cm, the clay has enough plasticity for making vessels. If it breaks immediately, you will need to find a location with more suitable clay.
Remove the topsoil
Remove the topsoil
Using a trowel or shovel, remove the topsoil with vegetation (10-20 cm). This soil contains roots, insects, and stones and must not be mixed with the clay. Clean clay sits beneath this topsoil. Do not discard this soil — return it to its place when you have finished extracting clay.
Tools needed:
 Digging Hoe (igeja)
 Digging Shovel
Dig the clay
Dig the clay
Dig the clay in large chunks and place them in buckets. Select clay of a uniform color — do not mix different types because the mixture will fire unevenly. Take at least 10 to 15 kg because a lot is lost during the cleaning process. Avoid digging clay that contains gravel or large stones.
Materials for this step:
 Raw Clay from Riverbank15 kilogram
Tools needed:
Digging Hoe (igeja) 20-Liter Bucket
Expose the clay to the sun
Expose the clay to the sun
Spread the clay on the ground or on a wide surface in the sun for 2 to 3 days. Once the clay has completely dried, it will break easily when you press it. Break the clay into small pieces — similar to pebbles — because small pieces dry quickly in water. Proper drying should be until the clay no longer feels wet.
Tools needed:
 Tarp
TarpGrind the dried clay
Grind the dried clay
Take the dried clay pieces and grind them using a grinding stone or grinder. In the traditional Zulu method, women use a broad flat stone (imbokodo) on top of a large round stone (isithebe). Grind until it becomes a dry powder — with no visible large pieces. This powder will be used for the next step of sieving.
Tools needed:
 Grinding Stone (imbokodo)
 Large Flat Stone (isithebe)
Sieve the powder
Sieve the powder
Pass the ground clay powder through a large sieve with holes of 1 mm or less (60 mesh). This removes small stones, gravel, and coarse sand. The proper clay passes through the sieve as fine powder. If needed, repeat with a finer sieve (80 mesh) to obtain the finest clay.
Tools needed:
 Fine Mesh Sieve (60-80 mesh)
Mixing with air and water
Mixing with air and water
Place the prepared clay lump in a large bucket and pour water over it. Ratio: 1 part clay to 2 parts water. Leave the clay in water for 24 to 48 hours to allow it to absorb water completely. Water softens the clay particles, making the clay become a moldable state.
Materials for this step:
 Clean Water30 liters
Tools needed:
 Large Mixing Bucket
 Mixing Stick
Remove excess water
Remove excess water
Let the mixture stand for 24 hours. The clay settles to the bottom of the bucket, while clean water remains on top. Carefully pour or use a tube to siphon off the water on top without disturbing the clay below. Repeat this process until the water runs clear. This removes unwanted dissolved minerals.
Tools needed:
 Siphon Hose
Knead the clay until it reaches working consistency
Knead the clay until it reaches working consistency
Pour the clay slurry onto a porous surface — a clay bat or plaster mold. The bat absorbs excess water. If you are using soil only, first dry the clean bat in the sun then pour the clay slurry onto it. Repeat every few hours. The clay is ready when it has the consistency of play dough — it is malleable but does not stick too much to the hands.
Tools needed:
 Absorbent Cloth
Wedging clay (wedging)
Wedging clay (wedging)
Place the clay on a hard board or wide stone. Press down with both hands under the heel of the hand, then fold the clay over it and turn it a quarter turn. Repeat for 5 to 10 minutes. This removes air bubbles (which can burst during kiln firing) and makes the clay uniform and even. Properly wedged clay has a smooth and uniform consistency.
Tools needed:
 Wedging Board
Testing clay retention
Testing clay retention
Repeat the snake test: a 1 cm snake should not break until it reaches 8 cm. Bend a 1 cm snake into an arch — if it doesn't crack, the clay has enough retention. If it cracks, you need to add more ball clay or leave the clay in water for an extended time. Well-prepared Zulu clay can be used to make dishes, baskets, and pots using traditional methods.
Store the clay
Store the clay
Materials for this step:
 Plastic Wrap1 roll
Tools needed:
 Field Notebook
Materials
3- 15 kilogramPlaceholder
- 30 litersPlaceholder
- 1 rollPlaceholder
Tools Required
13- Placeholder
- Placeholder
- Placeholder
- Placeholder
- Placeholder
- Placeholder
- Placeholder
- Placeholder
- Placeholder
- Placeholder
- Placeholder
- Placeholder
CC0 Public Domain
This blueprint is released under CC0. You are free to copy, modify, distribute, and use this work for any purpose, without asking permission.
Support the Maker by purchasing products through their Blueprint where they earn a Maker Commission set by Vendors, or create a new iteration of this Blueprint and include it as a connection in your own Blueprint to share revenue.