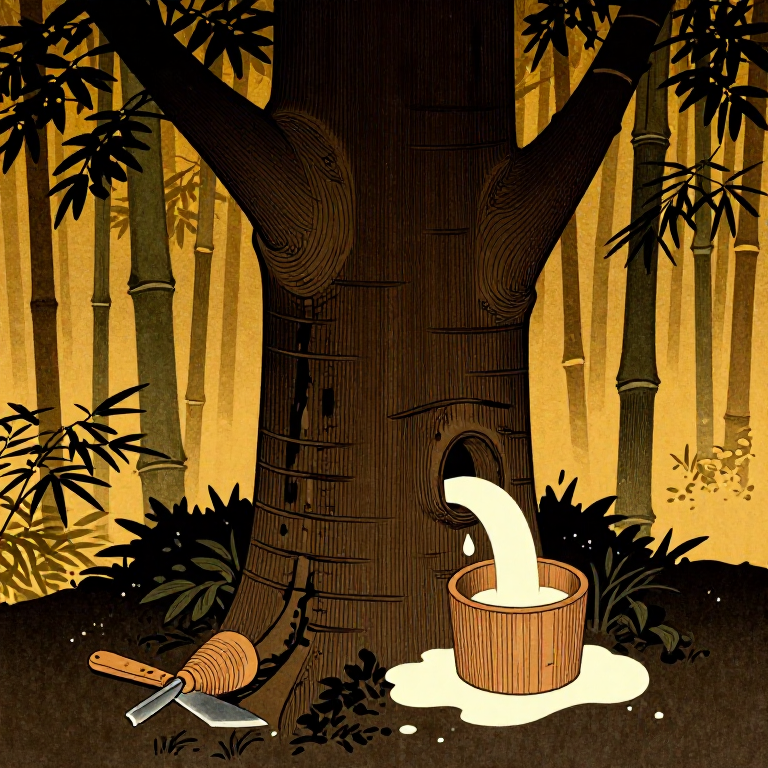
Lacquer Tapping — Traditional Technique for Harvesting Natural Lacquer from Toxicodendron vernicifluum
An explanation of the lacquer harvesting technique that forms the foundation of Japanese traditional craftsmanship. "Lacquer tapping" (漆掻き), the process of extracting lacquer sap from Toxicodendron vernicifluum, is a technology with over 9,000 years of history. This covers the entire process from the harvesting season (June through October), the method of cutting horizontal grooves, collection of lacquer sap, filtration, and grading. Only approximately 200ml of this precious natural resin can be obtained from a single tree per season. Since urushiol contained in lacquer sap causes contact dermatitis, protective measures are essential.
Instructions
Understanding the Lacquer Tree (Urushi no Ki)
Understanding the Lacquer Tree (Urushi no Ki)
Selecting Suitable Lacquer Trees
Selecting Suitable Lacquer Trees
Tools needed:
 Measuring Tape 3m
 Marking Chalk
Safety Precautions for Lacquer Tapping
Safety Precautions for Lacquer Tapping
Materials for this step:
 Long-Sleeve Cotton Work Shirt1 piece
 Long Cotton Work Pants1 piece
 Nitrile Rubber Gloves (Thick)4 pieces
 Adhesive Sealing Tape1 roll
 Safety Goggles1 piece
 Cotton Face Towel2 pieces
Preparing Lacquer Tapping Tools
Preparing Lacquer Tapping Tools
Materials for this step:
 Rapeseed Oil200 milliliter
 Cotton Cleaning Cloth3 pieces
Tools needed:
 Bark Stripping Plane (Kawahagi Kanna)
 Lacquer Scraping Plane (Kaki Kanna)
 Bamboo Scraping Spatula (Hera)
 Wooden Lacquer Collection Cup (Urushi Oke)
 Whetstone 1000 Grit
Understanding the Tapping Season and Schedule
Understanding the Tapping Season and Schedule
Shaving the Outer Bark (Medate)
Shaving the Outer Bark (Medate)
Tools needed:
Bark Stripping Plane (Kawahagi Kanna) Small Hand Brush
Cutting Horizontal Grooves (Urushi-kaki)
Cutting Horizontal Grooves (Urushi-kaki)
Tools needed:
Lacquer Scraping Plane (Kaki Kanna)Collecting the Seeped Lacquer Sap
Collecting the Seeped Lacquer Sap
Tools needed:
Bamboo Scraping Spatula (Hera)Wooden Lacquer Collection Cup (Urushi Oke)Transferring and Storing Collected Sap
Transferring and Storing Collected Sap
Materials for this step:
 Polyethylene Airtight Storage Container 500ml2 pieces
 Record Notebook1 piece
Tools needed:
Bamboo Scraping Spatula (Hera)Filtering the Raw Lacquer (Urushi-koshi)
Filtering the Raw Lacquer (Urushi-koshi)
Materials for this step:
 Yoshino Filtering Paper (Thick Grade)10 sheets
 Yoshino Filtering Paper (Fine Grade)10 sheets
Tools needed:
 Filtering Board (Koshidai)Nitrile Rubber Gloves (Thick)Polyethylene Airtight Storage Container 500ml
Stirring to Homogenize (Nayashi)
Stirring to Homogenize (Nayashi)
Tools needed:
 Shallow Wooden Lacquer Bowl (Urushi Bachi)
 Wooden Mixing Spatula
 Hygrometer
 Room Thermometer
Determining the Lacquer Grade
Determining the Lacquer Grade
Materials for this step:
 Glass Test Plate5 pieces
Tools needed:
 Lacquer Curing Box (Urushi Buro)HygrometerRoom Thermometer
 Lacquer Grading Reference Chart
Tool Maintenance and Storage
Tool Maintenance and Storage
Materials for this step:
Rapeseed Oil100 milliliterCotton Cleaning Cloth3 piecesTools needed:
Whetstone 1000 GritMaterials
13- Placeholder
- 1 piecePlaceholder
- 4 piecesPlaceholder
- 1 rollPlaceholder
- 1 piecePlaceholder
- 2 piecesPlaceholder
- 300 milliliterPlaceholder
- 6 piecesPlaceholder
- Placeholder
- 1 piecePlaceholder
- Placeholder
- 10 sheetsPlaceholder
- 5 piecesPlaceholder
Tools Required
17- Placeholder
- Placeholder
- Placeholder
- Placeholder
- Placeholder
- Placeholder
- Placeholder
- Placeholder
- Placeholder
- Placeholder
- Placeholder
- Placeholder
- Placeholder
- Placeholder
CC0 Public Domain
This blueprint is released under CC0. You are free to copy, modify, distribute, and use this work for any purpose, without asking permission.
Support the Maker by purchasing products through their Blueprint where they earn a Maker Commission set by Vendors, or create a new iteration of this Blueprint and include it as a connection in your own Blueprint to share revenue.