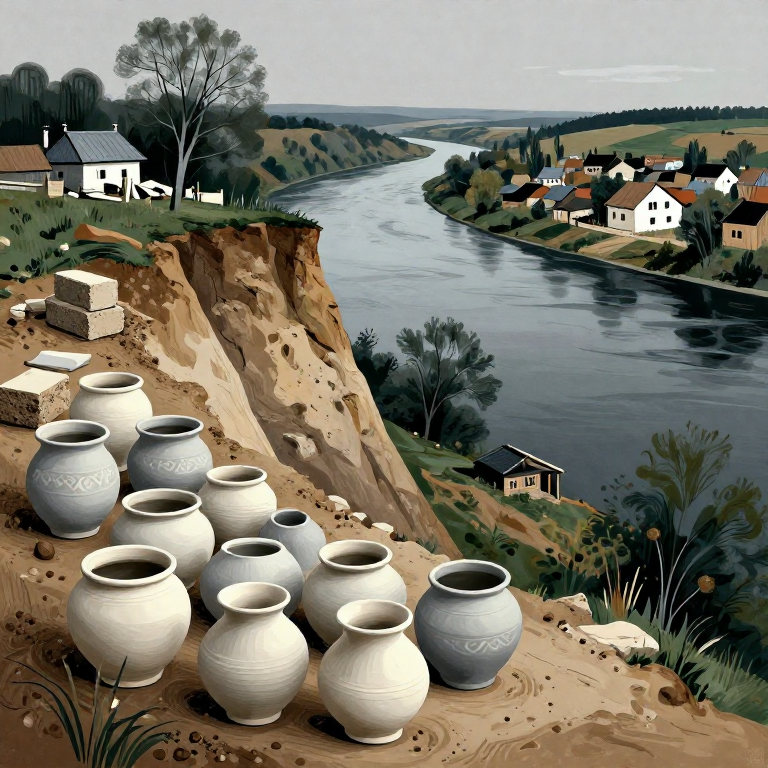
Collecting pottery clay from river banks — Ukrainian tradition of Opishnya ceramics
Instructions
Understand what clay is
Understand what clay is
Clay is a fine-grained natural material composed primarily of hydrated aluminum silicates (Al2Si2O5(OH)4 — kaolinite). It forms through the weathering of feldspars and other minerals over millennia. Clay particles are smaller than 0.002 mm. When moist, clay is plastic and can be shaped. After firing at temperatures above 600 degrees Celsius, it becomes irreversibly hard.
Identify clay deposit locations
Identify clay deposit locations
Look for clay on eroded riverbanks, road cuts, construction excavations, and ravine slopes. In Ukraine, the richest deposits of pottery clay are found in the Poltava region (Opishnya district), along the banks of the Dnipro, Vorskla, and Psel rivers. Clay typically appears as a dense, smooth layer of uniform color — red, yellow, gray, or white — beneath the topsoil with vegetation.
Perform the ball field test
Perform the ball field test
Perform the coil test
Perform the coil test
Remove the top layer of soil
Remove the top layer of soil
Using a shovel or hoe, remove the top layer of soil with vegetation (10 — 20 cm). This layer contains roots, insects and organic debris that contaminate the clay. Pure clay lies below. Set aside the top layer separately — after collecting the clay, return it to its place to preserve the environment.
Tools needed:
 Digging Shovel
 Garden Hoe
Dig the clay
Dig the clay
Materials for this step:
 Raw Clay from River Bluff15 kilogram
Tools needed:
Digging Shovel 20-Liter Bucket
Dry clay pieces
Dry clay pieces
Spread the clay pieces on canvas or film in the sun for 2-3 days until completely dry. Dry clay breaks easily into smaller pieces. Break it into fragments the size of a walnut — the smaller the pieces, the faster they dissolve in water. Clay is considered sufficiently dry when it leaves no moisture marks on your hands.
Tools needed:
 Tarp
TarpSoak the clay in water (slip)
Soak the clay in water (slip)
Materials for this step:
 Clean Water30 liters
Tools needed:
 Large Mixing Bucket
 Mixing Stick
Sieve the slip
Sieve the slip
Tools needed:
 Fine Mesh Sieve (60-80 mesh)
Settle the clay
Settle the clay
Leave the sieved slip in a bucket for 24 hours. The clay settles to the bottom, clear water remains on top. Carefully pour off or siphon out the clear water without touching the clay sediment at the bottom. Repeat the process — fill with fresh water, stir, let it settle and drain the water again. This removes soluble salts and the finest sand.
Tools needed:
 Siphon Hose
Dehydrate clay on a gypsum board
Dehydrate clay on a gypsum board
Pour the clay sediment onto a gypsum board (bat) or spread it on canvas fabric. Gypsum quickly absorbs excess water — within a few hours the clay acquires working consistency. If there is no gypsum, spread the fabric in the sun and pour the clay in a thin layer. Turn the mass every few hours. The clay is ready when in consistency it resembles plasticine — it can be shaped, but does not stick to hands.
Tools needed:
 Plaster Bat
Wedge the clay
Wedge the clay
Tools needed:
 Wedging Table
Check plasticity
Check plasticity
Save clay
Save clay
Form the prepared clay into blocks of 2 — 3 kg. Wrap each block tightly in food film, removing all air. Store in a cool shaded place. Properly wrapped clay retains moisture for months. Before use, remix for 2 — 3 minutes. Record the collection site, color, field test results and date — clays from different locations have different compositions, which affects the color after firing and melting temperature.
Materials for this step:
 Plastic Wrap1 roll
Tools needed:
 Field Notebook
Materials
3- 15 kilogramPlaceholder
- 30 litersPlaceholder
- 1 rollPlaceholder
Tools Required
11- Placeholder
- Placeholder
- Placeholder
- Placeholder
- Placeholder
- Placeholder
- Placeholder
- Placeholder
- Placeholder
- Placeholder
CC0 Public Domain
This blueprint is released under CC0. You are free to copy, modify, distribute, and use this work for any purpose, without asking permission.
Support the Maker by purchasing products through their Blueprint where they earn a Maker Commission set by Vendors, or create a new iteration of this Blueprint and include it as a connection in your own Blueprint to share revenue.