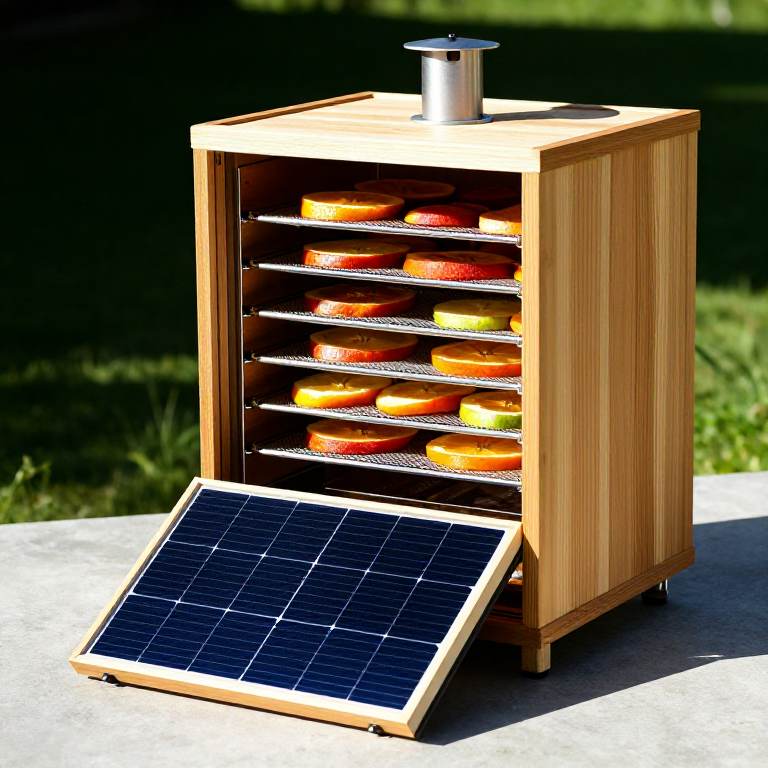
Building a Solar Food Dehydrator — Passive Convection Dryer
निर्देशनहरू
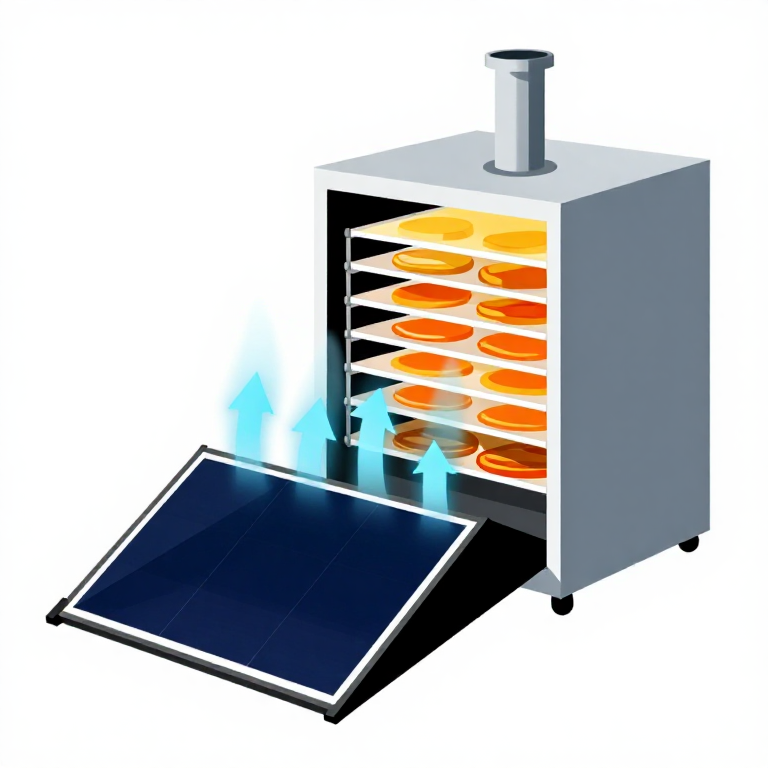
Build the Solar Collector
Build the Solar Collector
Construct a shallow box (approximately 60cm wide, 120cm long, and 10cm deep) from plywood. Paint the interior bottom surface flat black — this absorbs solar radiation and converts it to heat. Cover the top of the box with a clear plastic sheet or glass pane, creating an enclosed air space. Include a screened inlet vent at the low end (bottom) to admit cool ambient air. The collector works like a miniature greenhouse: sunlight passes through the transparent cover, is absorbed by the black surface and converted to heat, which warms the air inside. The heated air exits through an opening at the high end, which connects to the bottom of the drying cabinet. Angle the collector at approximately 30-45 degrees from horizontal, facing the sun (south in the northern hemisphere, north in the southern hemisphere).
Materials for this step:
 Spray Paint (Gloss Black)1 small can टुक्रा
 Wire Mesh / Screen1-2 square metres टुक्रा
 Wood Screwsassorted टुक्रा
Build the Drying Cabinet
Build the Drying Cabinet
Construct a tall, narrow box (approximately 60cm wide, 40cm deep, and 90-120cm tall) from plywood. The heated air from the collector enters at the bottom and exits through a screened vent or chimney at the top. Install internal ledges or runners at 10-15cm intervals to support removable drying trays. The trays are wooden frames with food-grade screen mesh (stainless steel, nylon, or food-safe plastic — not galvanized hardware cloth, which contains zinc that can leach into acidic foods) stretched and stapled across them. Include a hinged or removable door on the front for loading and unloading trays. Screen all openings (inlet, outlet, door gaps) with fine aluminium mesh to prevent insects from reaching the food.
Materials for this step:
Spray Paint (Gloss Black)1 small can टुक्राWire Mesh / Screen1-2 square metres टुक्राWood Screwsassorted टुक्राCreate Airflow and Insulation
Create Airflow and Insulation
The dehydrator relies on natural convection (the chimney effect): hot air is less dense than cool air, so it rises. Cool air is drawn into the collector inlet, heated by the black surface, rises into the cabinet, passes through the food trays picking up moisture, and exits through the top vent. The temperature differential between inlet and outlet drives this airflow without any fan. To maximize efficiency, insulate the cabinet walls (even a layer of cardboard or foam board helps retain heat). The chimney at the top can be extended 30-60cm above the cabinet to increase draft. Paint the chimney exterior black to add additional solar heating to the rising air column.
Prepare and Load Food for Drying
Prepare and Load Food for Drying
Wash and slice food into uniform thin pieces (3-6mm) for even drying. Thicker pieces dry slower and can mould before the centre dries. Common solar-dried foods include apple slices, tomato halves, herb leaves, banana chips, mango slices, chilli peppers, and jerky strips. Pre-treat light-coloured fruits with a citric acid or lemon juice dip to prevent enzymatic browning. Arrange food in a single layer on each tray with space between pieces for airflow. Load the trays into the cabinet. The bottom trays (closest to the heat source) dry fastest; rotate trays from bottom to top periodically for even drying. A well-designed solar dehydrator maintains internal temperatures of 45-60 degrees C on a sunny day.
Monitor Drying and Store Dehydrated Food
Monitor Drying and Store Dehydrated Food
Drying time varies with food type, thickness, humidity, and sun intensity — typically 1-3 days for most fruits and vegetables. Herbs dry in as little as 4-8 hours. Food is properly dried when it feels leathery to brittle with no moist or soft spots. Under-dried food will mould in storage. Test by cutting a piece in half — the interior should be dry with no visible moisture. Bring trays inside overnight (dew and nighttime humidity can re-moisten partially dried food). Store fully dried food in airtight glass jars or zip-lock bags in a cool, dark place. Properly dried food retains most of its nutritional value and stores for 6-12 months without refrigeration. Solar drying preserves food using only free solar energy, producing zero waste and zero carbon emissions.
सामग्री
6- 2-3 sheets (120x240cm) टुक्राप्लेसहोल्डर
- 1 small can टुक्राप्लेसहोल्डर
- 1 piece, sized for collector टुक्राप्लेसहोल्डर
- 1-2 square metres टुक्राप्लेसहोल्डर
- assorted टुक्राप्लेसहोल्डर
- small piece टुक्राप्लेसहोल्डर
आवश्यक उपकरणहरू
4- प्लेसहोल्डर
- प्लेसहोल्डर
- प्लेसहोल्डर
Related blueprints
Other builds that share materials, tools, or techniques with this one.
CC0 सार्वजनिक डोमेन
यो ब्लुप्रिन्ट CC0 अन्तर्गत जारी गरिएको छ। तपाईं अनुमति नसोधी प्रतिलिपि, परिमार्जन, वितरण र प्रयोग गर्न सक्नुहुन्छ।
ब्लुप्रिन्ट मार्फत उत्पादनहरू किनेर सिर्जनाकर्तालाई सहयोग गर्नुहोस् सिर्जनाकर्ता कमिसन विक्रेताले तोकेको, वा यो ब्लुप्रिन्टको नयाँ संस्करण बनाउनुहोस् र आम्दानी बाँड्न आफ्नो ब्लुप्रिन्टमा जडानको रूपमा समावेश गर्नुहोस्।