Pakikipagtulungan
SINING
BEAUTY AT WELLNESS
CRAFTS
KULTURA AT KASAYSAYAN
LIBANGAN
KAPALIGIRAN
PAGKAIN AT INUMIN
REVERSE ENGINEERING
AGHAM
ISPORTS
TEKNOLOHIYA
MGA WEARABLE
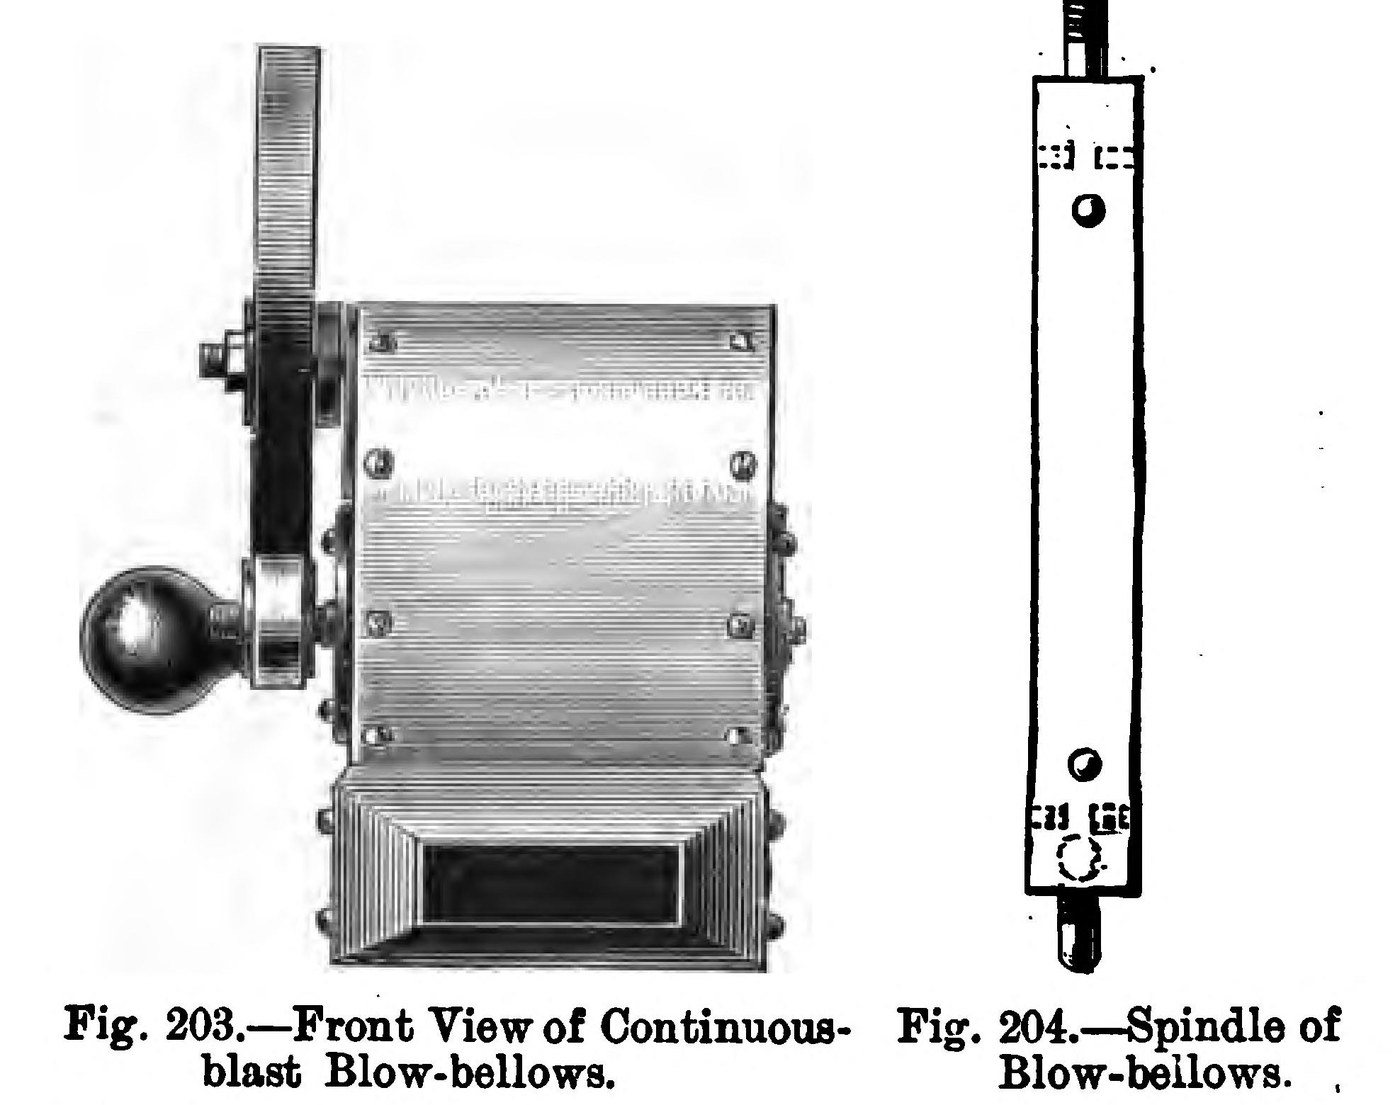


Air Blower: a Hand-Cranked Fan Blow-Bellows for a Portable Forge (Hasluck, 1904)
An air blower gives a fire a steady stream of air. Hasluck's Smiths' Work (1904) shows a small one for a home-made forge: a brass box with a four-winged tin fan on an iron spindle, spun fast by a hand wheel pressing on a rubber-covered roller. Unlike old bellows it blows continuously, through an outlet 2 1/2 in wide and 3/4 in deep.
The book's drawings carry no sizes for the box, so its size, the sheet thickness and the metals of the wire and the plate are unknown here; the tools are ours.
Source: P. N. Hasluck, Smiths' Work (1904), pp. 140-143, Figs. 202-211. Picture: their Figs. 203-204.
Katamtaman
Two days
Mga Tagubilin
1
1
Read Hasluck
Read Hasluck
"When this is all done, turn the handle rapidly; the fan inside will then revolve at a good rate, and a strong draught will be obtained."
2
2
Cut out the box
Cut out the box
Cut the two sides and the bottom of the box from sheet brass, and a piece for the top covering, but do not join them yet. Hasluck gives no sizes for the box (unknown); its outlet is to be 2 1/2 in wide and 3/4 in deep.
Mga materyales para sa hakbang na ito:
 Lapad na Bronse1 sides, bottom and covering
Mga kailangang kasangkapan:
 Gunting na pangyero
 Hindi alam na sukat
3
3
Make the fan
Make the fan
Make the iron spindle (Figs. 204, 205). Drill two holes in each of its four sides, one at each end, tap them, and screw in pieces of wire about 5/16 in long. Cut four pieces of tin, a little narrower than the box, and punch holes in them to match. Slip each wing over its wires, put a washer over each wire and rivet it over. Five or six wings may be used; then solder pieces of wire between them to stiffen them (Fig. 211).
Mga materyales para sa hakbang na ito:
 Bilog na baras na bakal1 spindle
 Hindi alam na metal1 wire
 Plantsa ng lata1 four wings
 Patag na Sinturon8 piraso
Mga kailangang kasangkapan:
 Barenang de-kamay
 Set sa paggawa ng sinulid ng turnilyo
 Lagaring Pang-metalGunting na pangyero
 Martilyong pang-remaches
 Panghinang
4
4
Fit the spindle and close the box
Fit the spindle and close the box
Screw the brass bearings (Fig. 206), a ring with three spokes and a hole in the middle, to the two sides. Fit the iron spindle in the bearings, screw the sides and bottom together, then screw the covering over the top.
Mga materyales para sa hakbang na ito:
Lapad na Bronse1 two bearings Mga turnilyo ng makina1 set
Mga kailangang kasangkapan:
Barenang de-kamaySet sa paggawa ng sinulid ng turnilyo5
5
Fit the hand wheel
Fit the hand wheel
The wheel has to be bought. Turn a brass spindle for it (Fig. 207), thread it at each end and fix it with a nut to a plate (Fig. 208); put on the wheel, hold it with a washer and another nut, and fit the knob on rather loosely. Before fixing the wheel, turn a small piece of wood (Fig. 209), put an india-rubber band over it and screw it onto the projecting end of the iron spindle. Fix the wheel so it presses tightly against this roller. Instead, both wheels may be grooved and driven by a band.
Mga materyales para sa hakbang na ito:
 Bakal na gulong-kamay1 piraso
 Bara ng Bronse1 wheel spindleHindi alam na metal1 plate
 Tuerkang Heksagonal2 pirasoPatag na Sinturon1 piraso
 Tablang kahoy1 roller
 Mga goma1 piraso
Mga kailangang kasangkapan:
 Torno para sa MetalSet sa paggawa ng sinulid ng turnilyoBarenang de-kamay
6
6
Fit the nose-piece
Fit the nose-piece
Cut the nose-piece from sheet brass to the pattern (Fig. 210) and bend it at right angles along the dotted lines so it fits over the outlet end of the box. Rivet or solder its two edges together, drill it and screw it on. Turn the handle quickly to test the draught.
Mga materyales para sa hakbang na ito:
Lapad na Bronse1 nose-pieceMga kailangang kasangkapan:
Gunting na pangyeroPanghinangBarenang de-kamay Salaming pangkaligtasan
7
7
History and honest limits
History and honest limits
Hasluck's "Home-made Portable Forges" chapter offers this fan as a cheaper, steadier alternative to the old leather bellows, costing about half as much. He adds that gun-metal is better than brass for all parts except the covering and nose-piece.
The drawings carry no sizes, so the box size, the sheet thickness and the metals of the wing wires and wheel plate are unknown; the tools are ours.
Mga Materyales
11- 1 nose-piecePlaceholder
- 1 spindlePlaceholder
- 1 platePlaceholder
- 1 four wingsPlaceholder
- 9 pirasoPlaceholder
- Placeholder
- 1 pirasoPlaceholder
- 1 wheel spindlePlaceholder
- 2 pirasoPlaceholder
- 1 rollerPlaceholder
- 1 pirasoPlaceholder
Mga Kinakailangang Kasangkapan
9- Placeholder
- Placeholder
- Placeholder
- Placeholder
- Placeholder
- Placeholder
- 2 vendors sell this, none ship to you yetPlaceholder
- Placeholder
- Placeholder
Ang blueprint na ito ay gumagawa ng

CC0 Pampublikong Domain
Ang blueprint na ito ay inilabas sa ilalim ng CC0. Malaya kang kumopya, magbago, mamahagi, at gumamit nang walang pahintulot.
Suportahan ang Maker sa pamamagitan ng pagbili ng mga produkto sa kanilang Blueprint Komisyon ng Maker itinakda ng mga Vendor, o lumikha ng bagong bersyon ng Blueprint na ito at isama bilang koneksyon sa iyong Blueprint upang ibahagi ang kita.