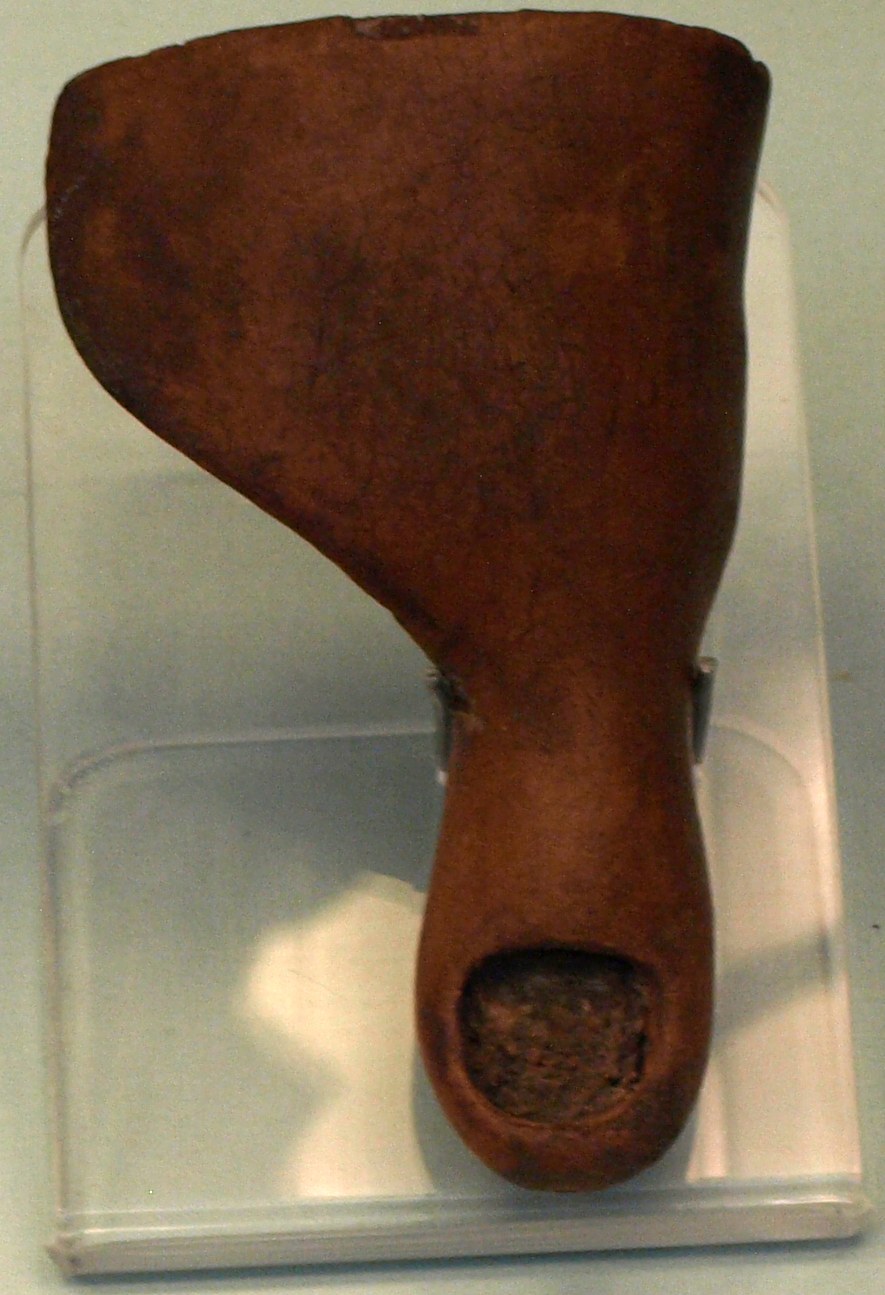


Cairo Toe
The oldest working prosthesis we know of is a wooden big toe, made in Egypt somewhere between about 950 and 710 BC, and found still strapped to the foot of the woman it was made for. It is not a grave good and it is not decoration. It is carved in three articulated parts, sewn together with leather thread, worn smooth by use, and remade at least once to fit a changing stump.
Somebody measured a living person, fitted a device, watched them walk, and adjusted it. That is prosthetics, three thousand years ago, done well enough that two modern gait studies found the replica genuinely helps a wearer walk in Egyptian-style sandals.
This blueprint reconstructs the Greville Chester and Cairo toes as a fitted, wearable device — carving, articulation, lacing and the fitting loop that makes it work.
Mga Tagubilin
Treat this as a fitted device, not a carving
Treat this as a fitted device, not a carving
Everything here depends on one person's foot. If you are making it for someone, measure them and fit it on them repeatedly. A prosthesis that is not fitted is an ornament.
Take the measurements from the intact foot
Take the measurements from the intact foot
Measure the length and width of the opposite big toe, and the girth of the forefoot at the ball. Symmetry with the sound side is what makes the gait work.
Mga kailangang kasangkapan:
 Ruler
RulerTake a wax or clay impression of the stump
Take a wax or clay impression of the stump
Press modelling wax gently over the amputation site to capture its exact shape. The socket face must match this, not an idealised curve — a gap becomes a pressure sore.
Select close-grained hardwood
Select close-grained hardwood
Use a dry, close-grained hardwood such as fig, sycamore or lime, with the grain running along the length of the toe. Cross grain at the narrow joint sections will split in use.
Mga materyales para sa hakbang na ito:
 Tabla ng Matigas na Kahoy1 piraso
Rough out the toe blank oversize
Rough out the toe blank oversize
Saw and rasp a blank about 10 mm longer and wider than the finished toe. Leave the extra for fitting — you will remove material at every trial and cannot put it back.
Mga kailangang kasangkapan:
 Kikil (Kikil na Pangkamay)
Carve the socket face to the impression
Carve the socket face to the impression
Hollow the rear face to seat against the stump, checking constantly against the wax impression. Aim for broad even contact — every high spot becomes a pressure point after a few hundred paces.
Divide the toe into three articulated sections
Divide the toe into three articulated sections
Cut the blank across into a main body and two smaller distal sections, following the Cairo toe's construction. The joints let the toe flex as the foot rolls forward instead of levering against the stump.
Drill the lacing holes through each section
Drill the lacing holes through each section
Drill matching holes through the mating faces so the sections can be sewn together edge to edge. Keep the holes well back from the edges or the wood breaks out under tension.
Sew the sections together with leather thread
Sew the sections together with leather thread
Lace the parts with fine leather thread, pulling firmly but leaving a little movement at each joint. The original is sewn, not glued — the stitching is what provides the articulation.
Mga materyales para sa hakbang na ito:
 Sinulid na balat2 metro
Cut and fit the leather retaining strap
Cut and fit the leather retaining strap
Cut a leather band that passes around the forefoot and anchors to the toe. This is the whole suspension system — there is no socket gripping anything.
Mga materyales para sa hakbang na ito:
 Katad na kinurtido sa halaman1 pilyego
Fit it and walk on it
Fit it and walk on it
Strap it on and take twenty paces barefoot on a hard floor. Watch where the wearer flinches or shortens the step — that tells you where to remove wood.
Relieve every pressure point and refit
Relieve every pressure point and refit
Mark red areas on the skin, rasp those spots back, and walk again. Repeat until the skin stays even in colour after a walk. Expect four or five cycles.
Test it inside a sandal
Test it inside a sandal
Fit it with a thonged sandal and walk again. The Egyptian sandal thong passes between the first and second toes, and the toe has to take that strap — this is the loading the original was designed for.
Finish the surface smooth and seal it
Finish the surface smooth and seal it
Sand every face smooth, paying most attention to the socket and the edges against skin, then rub in beeswax or oil. A rough edge in contact with skin will cause a wound within a day.
Mga materyales para sa hakbang na ito:
 Butil ng Pagkit ng Bubuyog20 g
History & Context — the oldest prosthesis that worked
History & Context — the oldest prosthesis that worked
Two toes, often confused. There are two: the Greville Chester toe, a one-piece cartonnage (linen, glue and plaster) toe in the British Museum, and the Cairo toe, a three-part articulated wooden toe sewn with leather thread, found on a mummy at Sheikh Abd el-Qurna near Luxor and now in Cairo. They are frequently mixed up in popular accounts. The Cairo toe is the more sophisticated device and is usually dated to roughly 950-710 BC; the Greville Chester toe is generally placed somewhat later. Both show clear wear.
The evidence that it was used in life. This is the crucial point and it is genuinely evidential, not assumed. The wear patterns are consistent with walking; the Cairo toe shows signs of having been refitted, meaning someone adjusted it after the original fitting; and it was attached to a foot whose amputation had healed well before death. A purely funerary prosthesis — to make the body whole for the afterlife, which Egyptians certainly did care about — would not need refitting and would not wear. Both purposes may well have applied at once.
It was tested, in a gait laboratory. Researchers at the University of Manchester made replicas of both toes and had volunteers with the same amputation walk on them, with and without Egyptian-style sandals. The replicas performed measurably better than no prosthesis at all, particularly for push-off, and the articulated Cairo design outperformed the rigid one. That is an unusually strong verification for an object of this age — most reconstructions are never tested against a living body.
Why the big toe specifically. The hallux carries a large share of the load at push-off, and losing it disturbs the whole gait cycle. It also matters more in a sandal culture than in a shoe culture: the sandal thong runs against the big toe, and without one the sandal will not stay on the foot correctly. The design solves a mechanical problem and a footwear problem at the same time — and the fact that it is jointed, rather than a simple carved lump, says the maker understood that a toe has to bend.
Mga Materyales
4- 1 pirasoPlaceholder
- 2 metroPlaceholder
- 1 pilyegoPlaceholder
- Placeholder
Ang blueprint na ito ay gumagawa ng
CC0 Pampublikong Domain
Ang blueprint na ito ay inilabas sa ilalim ng CC0. Malaya kang kumopya, magbago, mamahagi, at gumamit nang walang pahintulot.
Suportahan ang Maker sa pamamagitan ng pagbili ng mga produkto sa kanilang Blueprint Komisyon ng Maker itinakda ng mga Vendor, o lumikha ng bagong bersyon ng Blueprint na ito at isama bilang koneksyon sa iyong Blueprint upang ibahagi ang kita.