
Pakikipagtulungan
SINING
BEAUTY AT WELLNESS
CRAFTS
KULTURA AT KASAYSAYAN
LIBANGAN
KAPALIGIRAN
PAGKAIN AT INUMIN
REVERSE ENGINEERING
AGHAM
ISPORTS
TEKNOLOHIYA
MGA WEARABLE
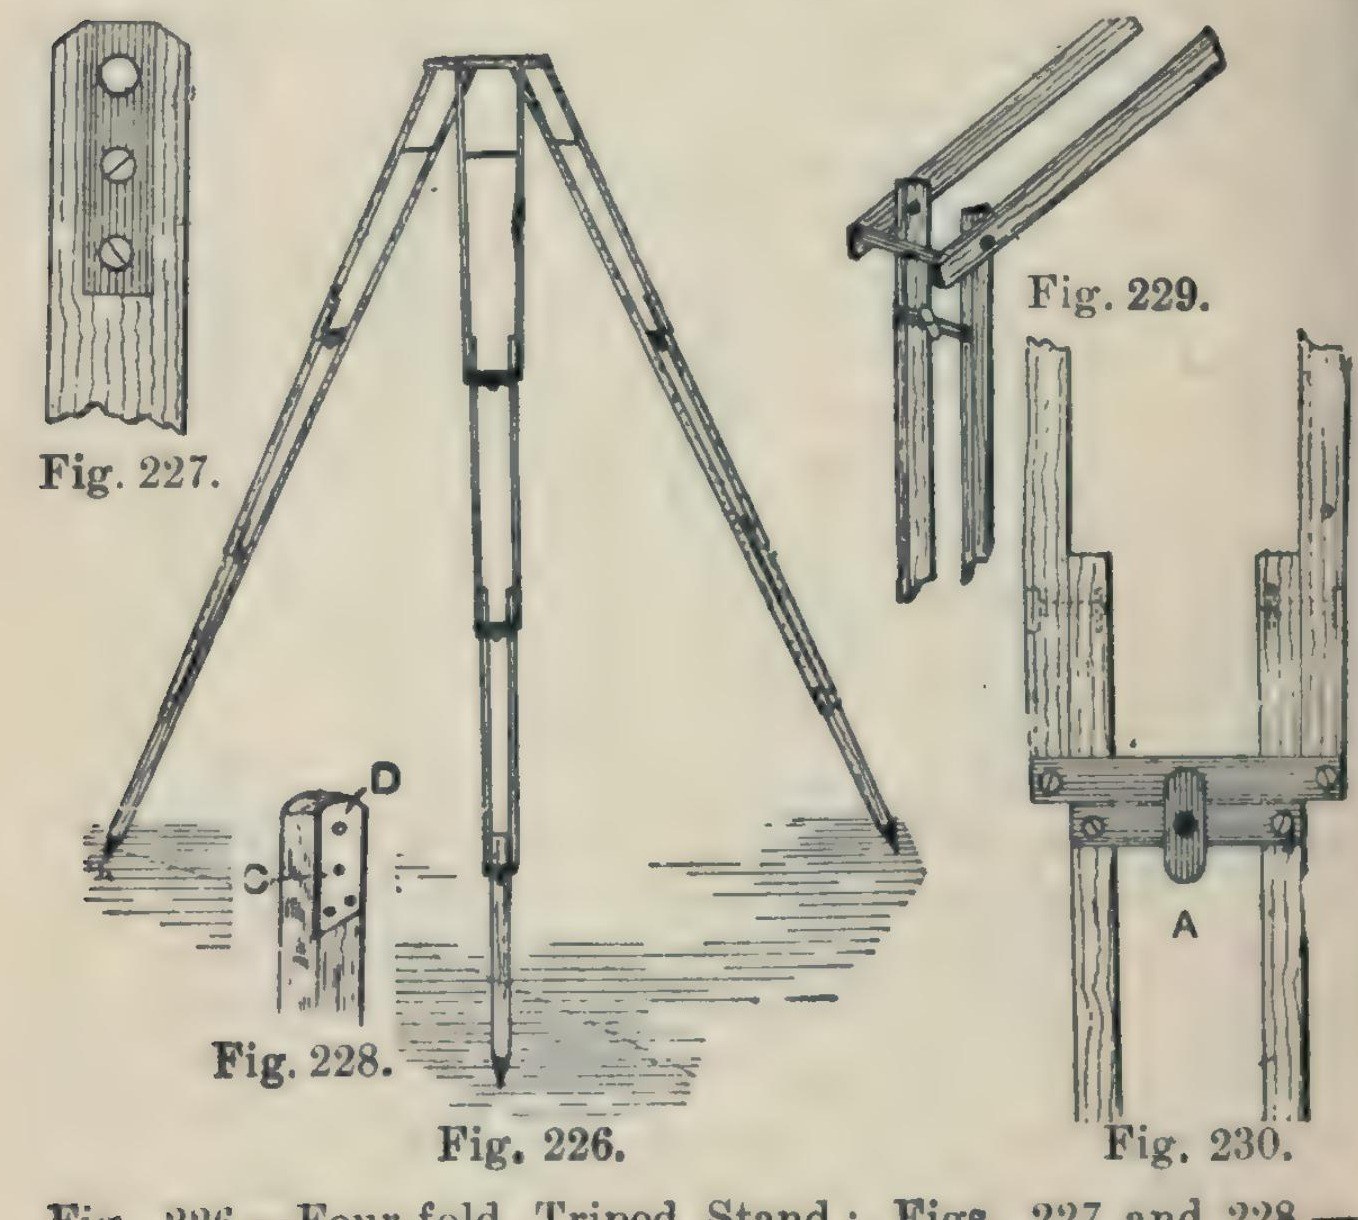
Camera Tripod: a Four-Fold Ash Tripod Stand (Hasluck, 1902)
Woody

Nilikha ni

Woody

4. Nobyembre 2026NO
2
0
0
0
0

Camera Tripod: a Four-Fold Ash Tripod Stand (Hasluck, 1902)

A light, compact folding camera stand: three legs, each of seven ash laths riveted so it folds in four, locked open by brass buttons, on a triangular ash top with brass pins and a hole for the camera screw. Hasluck says the same method makes stands that fold in three or two. Source: Paul N. Hasluck, Photographic Cameras and Accessories (1902), pp. 153-157. Picture: Figs. 226-230 of the book.
Katamtaman
Unknown

Mga Tagubilin

1

Cut the ash laths

Cut laths of good ash, true and square or the stand won't be rigid, and round the edges slightly: six 17 1/4 x 5/8 x 3/8 in, six 16 x 5/8 x 3/8 in, six 15 1/2 x 5/8 x 3/8 in, and three 14 x 5/8 x 5/8 in.

Mga materyales para sa hakbang na ito:
Tabla ng kahoy na ashTabla ng kahoy na ash1 21 laths

Mga kailangang kasangkapan:

Lagaring may gulugodLagaring may gulugod
Block planeBlock plane
2

Fit the top ends and stretcher

On each 17 1/4 in lath let in flush a 1/16 in brass plate, 1 1/4 in long, with a 3/16 in hole 1/4 in from the top, held by two countersunk brass screws; bore the wood to match and take off the top corners. On one lath of each pair cut a groove inside, about 3/16 in deep and 3 1/2 in long, starting 2 in from the top, and hinge a 1/8 in brass rod stretcher in it on a pin. On the other lath cut a curved groove 1 1/2 in long, 3/16 in wide, with a small hole at the bottom where the rod catches.

Mga materyales para sa hakbang na ito:

Lapad na BronseLapad na Bronse1 1/16 in plates
Mga turnilyong pangkahoyMga turnilyong pangkahoy1 small brass screws

Bara ng BronseBara ng Bronse1 1/8 in stretcher

Mga kailangang kasangkapan:
Balangkas ng Lagaring Pang-metal na May TalimBalangkas ng Lagaring Pang-metal na May Talim

Kikil na Pang-metalKikil na Pang-metal
Barenang de-kamayBarenang de-kamay
Mga paitMga pait
Distornilyador na patagDistornilyador na patag
3

Bore and rivet the legs

Bore the rivet holes: in the long laths 1 3/4 in from the lower end, counterbored so the copper rivet head sits flush, then 1/8 in through; in the 16 in and 15 1/2 in laths 1/2 in and 1 3/4 in from the ends; in each 14 in piece 1/2 in from one end, and taper its other end for a pointed iron shoe or a steel point and ferrule. Rivet the 21 laths into three legs with 1/8 in copper rivets and washers: a 16 in lath inside each 17 1/4 in one, a 15 1/2 in lath inside that, the 14 in foot between the last pair. Rivets flush, just tight enough to fold but not loose.

Mga materyales para sa hakbang na ito:

Remaste na tansoRemaste na tanso1 1/8 in, with washers
Hindi alam na metalHindi alam na metal3 iron shoes or steel points

Mga kailangang kasangkapan:

Barena at talimBarena at talim
Barenang de-kamayBarenang de-kamay
Martilyong pang-remachesMartilyong pang-remaches
4

Add cross strips and lock buttons

Screw 1/16 in brass strips across the bottom ends of each pair of laths (Fig. 229). Under them screw strips carrying a small brass button riveted at the centre; turned, the button hooks over the strip above and locks the joint open (Fig. 230).

Mga materyales para sa hakbang na ito:

Lapad na BronseLapad na Bronse1 cross strips, buttons
Mga turnilyong pangkahoyMga turnilyong pangkahoy1 piraso

Mga kailangang kasangkapan:

Balangkas ng Lagaring Pang-metal na May TalimBalangkas ng Lagaring Pang-metal na May Talim
Kikil na Pang-metalKikil na Pang-metal
Distornilyador na patagDistornilyador na patag
Martilyong pang-remachesMartilyong pang-remaches
5

Make the top

Plane ash to 1/2 in and draw an equilateral triangle with 8 1/2 in sides. Bisect the angles; 2 in from each corner draw a line at right angles, go 1/2 in in along the sides, and mark three rectangles 2 7/8 x 3/4 in; cut the outline (Fig. 231). Fix a 3/16 in brass rod, one end tapered, across each rectangle, bored 3/8 in from the outer edge and projecting about 1/2 in, for the legs to hang on. Bore a 1/4 in hole in the centre for the camera screw and glue felt on top.

Mga materyales para sa hakbang na ito:

Tabla ng kahoy na ashTabla ng kahoy na ash1 top
Bara ng BronseBara ng Bronse3 3/16 in pins
Peltrong lanaPeltrong lana1 piraso
Pandikit mula sa hayopPandikit mula sa hayop1 piraso

Mga kailangang kasangkapan:

Block planeBlock plane
Lagaring may gulugodLagaring may gulugod
Barena at talimBarena at talim
Barenang de-kamayBarenang de-kamay
6

Finish

Glasspaper and varnish the wood, and lacquer the brass.

Mga materyales para sa hakbang na ito:

Barnis na shellacBarnis na shellac1 varnish
Hindi kilalang materyalHindi kilalang materyal1 brass lacquer

Mga kailangang kasangkapan:

Papel de LihaPapel de Liha

Mga Materyales

10

Mga Kinakailangang Kasangkapan

10

Ang blueprint na ito ay gumagawa ng

CC0 Pampublikong Domain

Ang blueprint na ito ay inilabas sa ilalim ng CC0. Malaya kang kumopya, magbago, mamahagi, at gumamit nang walang pahintulot.

Suportahan ang Maker sa pamamagitan ng pagbili ng mga produkto sa kanilang Blueprint Komisyon ng Maker itinakda ng mga Vendor, o lumikha ng bagong bersyon ng Blueprint na ito at isama bilang koneksyon sa iyong Blueprint upang ibahagi ang kita.

Talakayan

(0)

Mag-login upang sumali sa talakayan

Naglo-load ng mga komento...