Pakikipagtulungan
SINING
BEAUTY AT WELLNESS
CRAFTS
KULTURA AT KASAYSAYAN
LIBANGAN
KAPALIGIRAN
PAGKAIN AT INUMIN
REVERSE ENGINEERING
AGHAM
ISPORTS
TEKNOLOHIYA
MGA WEARABLE
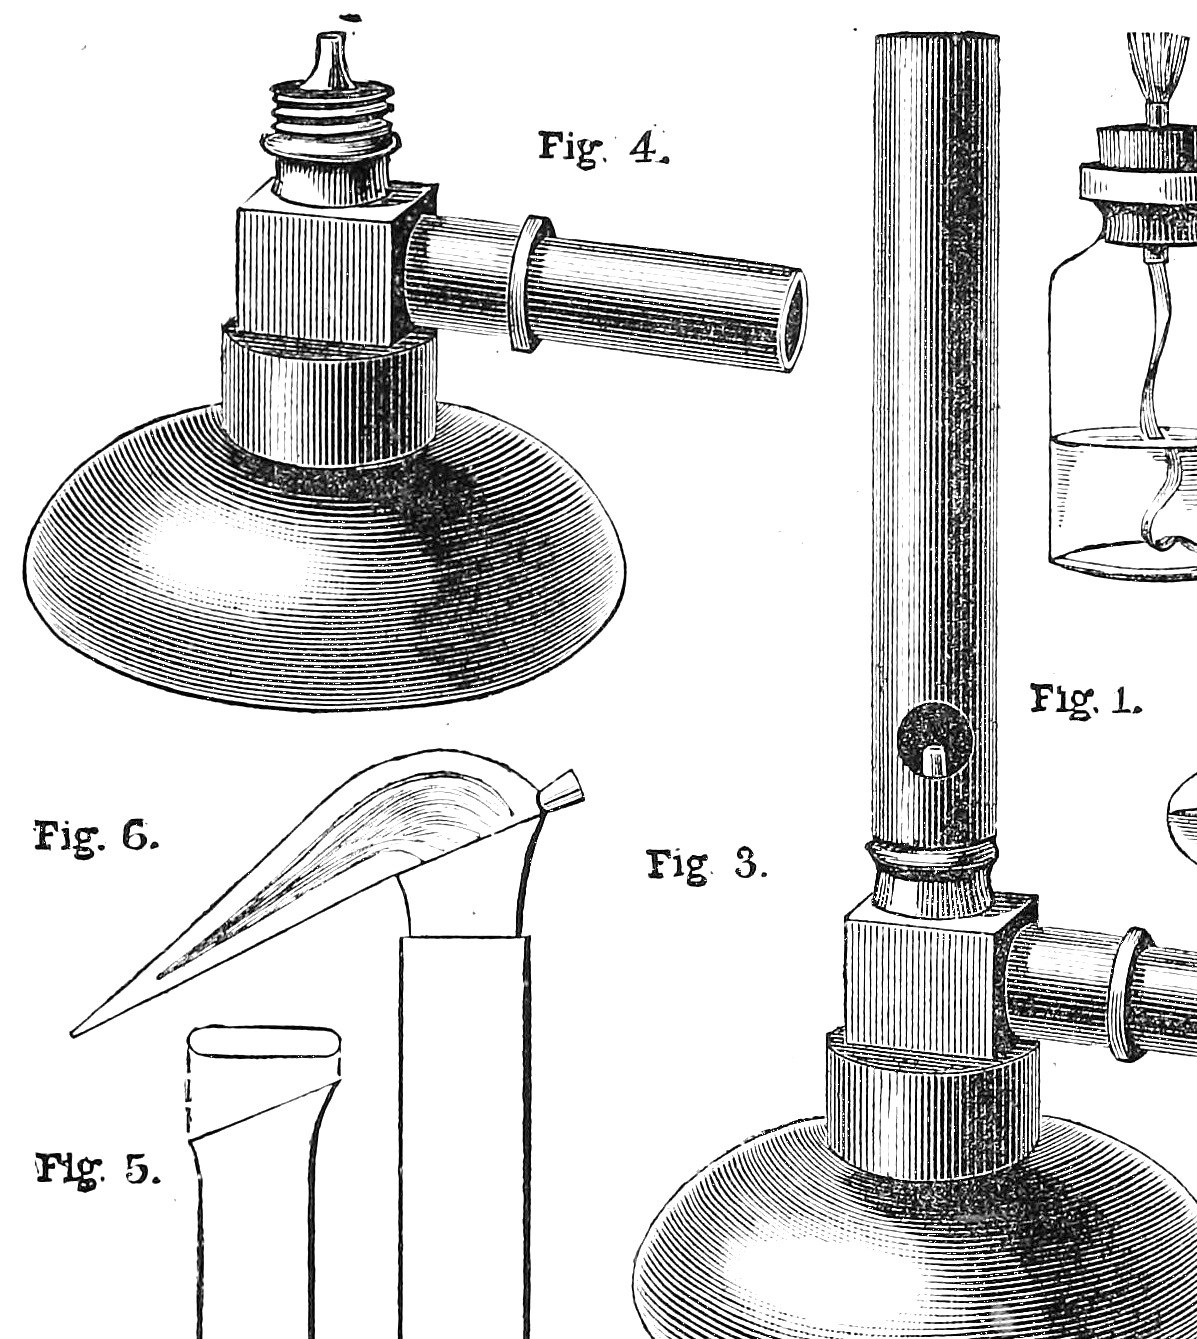


Gas Burner: a Home-Made Bunsen Burner from Brass Tube (Work, 1892)
A Bunsen burner: gas from a fine jet draws air in through two holes at the foot of an upright tube, and the mixture burns at the top with a hot blue flame that leaves no soot. H. B. Stocks (Work, 1892) makes one from a 3 1/2 in. brass tube 1/2 in. across, a short 3/8 in. tube for the gas, a brass boss and elbow from a gas bracket, and a bit of fine-bore tube from an old oil-can as the jet.
A sliding brass collar over the air-holes sets the flame.
Source: H. B. Stocks, How to Make a Cheap Spirit Lamp, Bunsen Burner, Blowpipes, etc., Work No. 167 (28 May 1892), p. 167. Picture: his Figs. 3-4.
Katamtaman
Unknown
Mga Tagubilin
1
1
Read Stocks
Read Stocks
"To make a Bunsen burner the following materials will be necessary:—A piece of brass tube 3 1/2 in. long, 1/2 in. diameter (external); a piece of tube 3/8 in. in diameter, 1 1/2 in. long; a brass boss similar to those on an ordinary bracket, but without a tap; a brass elbow tube; also a piece of tubing with very fine bore (small bit of tube from an old oil-can will do)."
2
2
Solder the elbow on the boss
Solder the elbow on the boss
Solder the brass elbow-piece onto the brass boss, with the tube that has a screw cut for a gallery uppermost.
Mga materyales para sa hakbang na ito:
 Kasukasuan ng tubong may sinulid2 boss and elbow
 Panghinang na lata-tingga1 joint
 Flux1 joint
Mga kailangang kasangkapan:
 Panghinang
3
3
Fit the jet
Fit the jet
Cut the fine-bore tube 3/4 in. to 1 in. long and solder it inside the vertical tube of the elbow-piece so it projects about 1/2 in. If it is too small for the hole, plug round it with a little sheet lead, keeping it perfectly vertical and in the centre of the outer tube, then solder. The metal of the oil-can tube is not given (unknown).
Mga materyales para sa hakbang na ito:
 Hindi alam na metal1 fine-bore tube
 Manipis na tingga1 packingPanghinang na lata-tingga1 joint
Mga kailangang kasangkapan:
Panghinang Gunting na pangyero
4
4
Make the burner tube
Make the burner tube
Take the brass tube 3 1/2 in. long, 1/2 in. across. If it is not of very thick brass it will be a little too large: turn a piece of very thin sheet brass 1/2 in. by 1 1/4 in. into a cylinder and solder it inside one end. Tap that end inside to screw onto the male thread of the elbow-piece. At the same end drill two holes about 3/8 in. across, exactly opposite each other, their centres 5/8 in. from the end: the air-holes.
Mga materyales para sa hakbang na ito:
 Tubong tanso, 1/2 pulgadang labas na diyametro1 3 1/2 in.
 Lapad na Bronse1 1/2 x 1 1/4 in.Panghinang na lata-tingga1 joint
Mga kailangang kasangkapan:
Gunting na pangyeroPanghinang Set sa paggawa ng sinulid ng turnilyo
 Hawakan ng tap sa loob
 Barenang de-kamay
5
5
Assemble and test
Assemble and test
Screw the burner tube onto the elbow-piece and screw the 3/8 in. tube, 1 1/2 in. long, into the side opening. Push the india-rubber tube from the gas supply onto the side tube and light. A purplish-blue flame means air and gas are in the right proportion. A yellow tip means too much gas: plug the hole in the jet slightly.
Mga materyales para sa hakbang na ito:
 Tubong tanso na 9,5 mm ang labas na diyametro1 1 1/2 in.
Mga kailangang kasangkapan:
 Tubong Goma
6
6
Fit the air collar
Fit the air collar
If the gas burns with a green flame and a hissing noise, the air-holes are too large. Cut sheet brass about 3/4 in. wide and 1 3/4 in. long and drill two holes 3/8 in. across, 1/2 in. from each end (their centres 3/16 in. further in). Turn it into a tube and push it onto the burner tube over the air-holes. Turn it until the two sets of holes do not quite match, so the right amount of air reaches the burner.
Mga materyales para sa hakbang na ito:
Lapad na Bronse1 3/4 x 1 3/4 in.Mga kailangang kasangkapan:
Gunting na pangyeroBarenang de-kamayMga Materyales
8- 2 boss and elbowPlaceholder
- 3 jointPlaceholder
- 1 jointPlaceholder
- 1 fine-bore tubePlaceholder
- 1 packingPlaceholder
- Placeholder
- 1 3/4 x 1 3/4 in.Placeholder
- Placeholder
Mga Kinakailangang Kasangkapan
6- 2 vendors sell this, none ship to you yetPlaceholder
- Placeholder
- Placeholder
- Placeholder
- Placeholder
- Placeholder
Ang blueprint na ito ay gumagawa ng

CC0 Pampublikong Domain
Ang blueprint na ito ay inilabas sa ilalim ng CC0. Malaya kang kumopya, magbago, mamahagi, at gumamit nang walang pahintulot.
Suportahan ang Maker sa pamamagitan ng pagbili ng mga produkto sa kanilang Blueprint Komisyon ng Maker itinakda ng mga Vendor, o lumikha ng bagong bersyon ng Blueprint na ito at isama bilang koneksyon sa iyong Blueprint upang ibahagi ang kita.