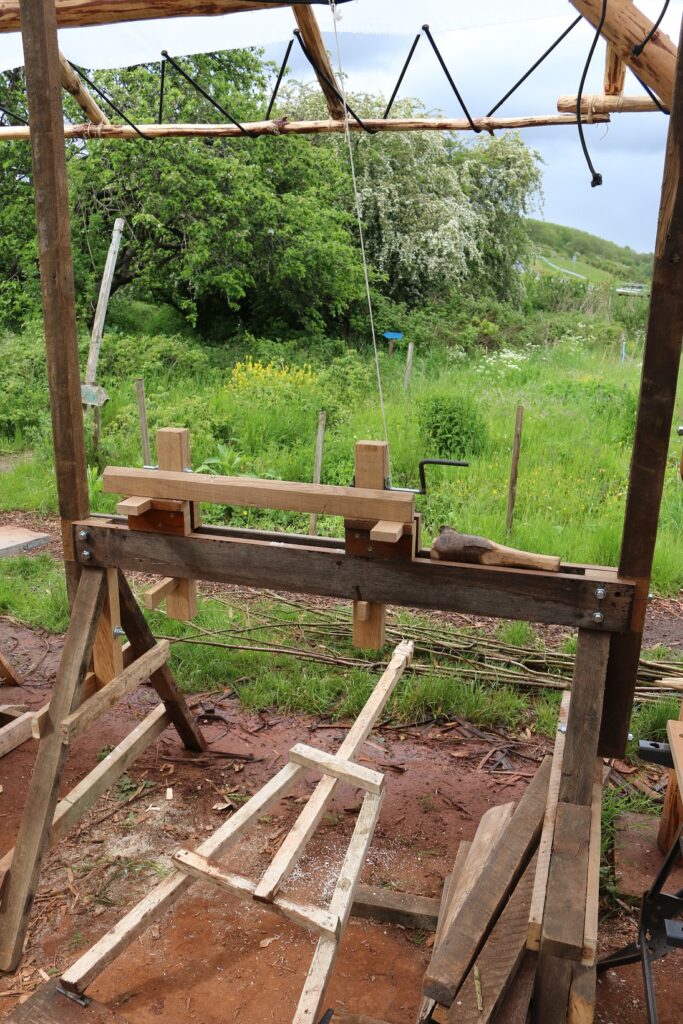


Lumikha ng Pole Lathe para sa Berdeng Kahoy Pagliligid
Mga Tagubilin
Build a Strong Horizontal Beam for the Lathe Bed
Build a Strong Horizontal Beam for the Lathe Bed
Mga materyales para sa hakbang na ito:
 Hiwa ng troso ng ash1 piraso
Add Two Vertical Stands and a Top Rail
Add Two Vertical Stands and a Top Rail
Mga kailangang kasangkapan:
 Palakol
 Palakol na maliit
Install the Pole Lathe Drive System
Install the Pole Lathe Drive System
Create Support Centers
Create Support Centers
Mga materyales para sa hakbang na ito:
 Mga troso ng matigas na kahoy (roble, mapel, beech)1 piraso
Mga kailangang kasangkapan:
 Palakol na panghati
 Tikin na kahoy sa pagpapabagsak
 Kahoy na Pamukpok
Set Up the Chuck
Set Up the Chuck
Mga kailangang kasangkapan:
 Kutsilyong Hinihila
Test the Drive Connection
Test the Drive Connection
Mga kailangang kasangkapan:
 Barenang panlupa
Install a Tool Holder
Install a Tool Holder
Mga materyales para sa hakbang na ito:
Mga troso ng matigas na kahoy (roble, mapel, beech)2 pirasoMga kailangang kasangkapan:
PalakolKutsilyong Hinihila Set ng paitKahoy na Pamukpok
Set Up the First Workpiece
Set Up the First Workpiece
Mga materyales para sa hakbang na ito:
 Mga pako2 piraso
Mga kailangang kasangkapan:
Kahoy na Pamukpok Kikil na Pang-metal
Secure the Workpiece
Secure the Workpiece
Mga materyales para sa hakbang na ito:
Mga troso ng matigas na kahoy (roble, mapel, beech)4 pirasoMga kailangang kasangkapan:
PalakolKutsilyong HinihilaTest Rotation
Test Rotation
Mga kailangang kasangkapan:
Set ng paitKahoy na PamukpokBarenang panlupaBegin Rounding
Begin Rounding
Mga materyales para sa hakbang na ito:
Tikin na kahoy sa pagpapabagsak8 pirasoMga kailangang kasangkapan:
Kahoy na PamukpokAdjust Across the Downstroke
Adjust Across the Downstroke
Mga materyales para sa hakbang na ito:
Hiwa ng troso ng ash2 pirasoMga kailangang kasangkapan:
Set ng paitKahoy na PamukpokBarenang panlupaFinish the Smooth Surface
Finish the Smooth Surface
Mga materyales para sa hakbang na ito:
 Tabla ng kahoy na ash1 piraso
Mga kailangang kasangkapan:
Kutsilyong Hinihila Lagaring pantabas
Remove and Clean the Workpiece
Remove and Clean the Workpiece
Mga materyales para sa hakbang na ito:
 Kahoy na Tarugo1 piraso
Mga kailangang kasangkapan:
Barenang panlupaTest Final Quality
Test Final Quality
Mga materyales para sa hakbang na ito:
 Lubid na Hemp3 metre
Mga kailangang kasangkapan:
 Kutsilyo
Begin the Drying Process
Begin the Drying Process
Mga materyales para sa hakbang na ito:
 Lubid na panali2 metre
Mga kailangang kasangkapan:
Kahoy na PamukpokApply Optional Finishing Techniques
Apply Optional Finishing Techniques
Mga kailangang kasangkapan:
Barenang panlupaPrepare the Lathe for the Next Project
Prepare the Lathe for the Next Project
Mga kailangang kasangkapan:
Kahoy na PamukpokKutsilyoRefine Your Skills
Refine Your Skills
Maintain Tool Sharpness
Maintain Tool Sharpness
Explore Design Variations
Explore Design Variations
Mga kailangang kasangkapan:
 Paet na Hukay
Mga Materyales
8- 1 pirasoPlaceholder
- Placeholder
- 2 pirasoPlaceholder
- 8 pirasoPlaceholder
- 1 pirasoPlaceholder
- 1 pirasoPlaceholder
- 3 metrePlaceholder
- 2 metrePlaceholder
Mga Kinakailangang Kasangkapan
12- Placeholder
- Placeholder
- Placeholder
- Placeholder
- Placeholder
- Placeholder
- Placeholder
- Placeholder
- Placeholder
- Placeholder
- Placeholder
- Placeholder
Ang blueprint na ito ay gumagawa ng

CC0 Pampublikong Domain
Ang blueprint na ito ay inilabas sa ilalim ng CC0. Malaya kang kumopya, magbago, mamahagi, at gumamit nang walang pahintulot.
Suportahan ang Maker sa pamamagitan ng pagbili ng mga produkto sa kanilang Blueprint Komisyon ng Maker itinakda ng mga Vendor, o lumikha ng bagong bersyon ng Blueprint na ito at isama bilang koneksyon sa iyong Blueprint upang ibahagi ang kita.