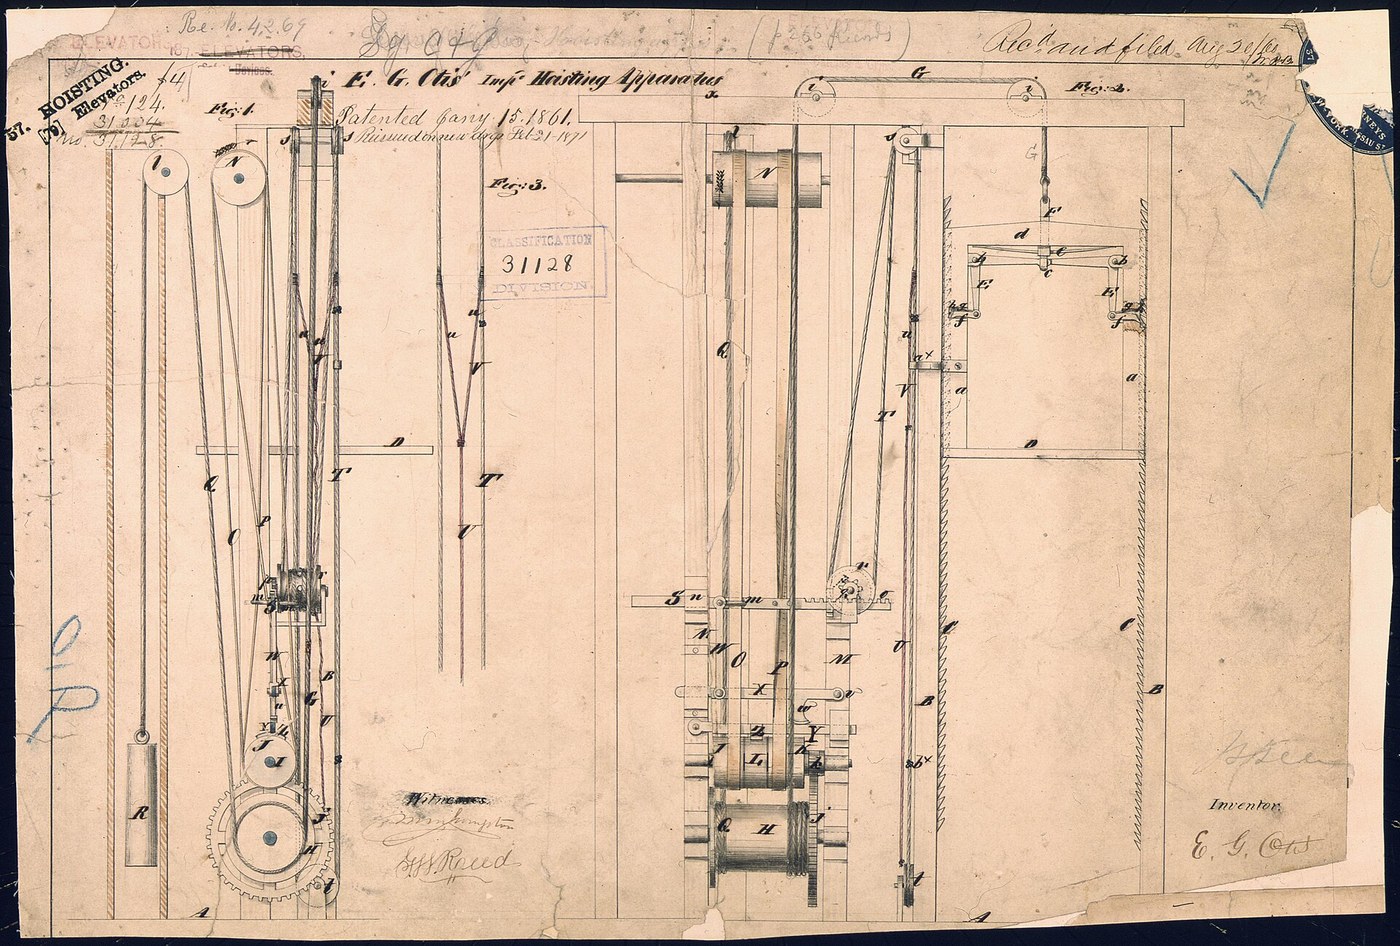


Otis Safety Brake
Hoists existed long before Elisha Otis. What did not exist was a reason to ride one. Ropes rotted, chains failed, and a hoist that dropped its load was an accident; a hoist that dropped a person was a death. So freight went up and people took the stairs, and buildings stayed short.
Otis's answer was not a stronger rope — it was a mechanism that uses the rope's own tension to hold the brake open. While the rope pulls, a leaf spring is bowed flat and the pawls stay clear. Cut the rope and the spring straightens instantly, throwing the pawls into toothed guide rails. Failure of the rope is what triggers the safety.
He proved it at the 1854 New York Crystal Palace by having the rope cut while he stood on the platform. This blueprint builds a working bench model.
Mga Tagubilin
Build it as a model, and keep hands clear
Build it as a model, and keep hands clear
This is a bench demonstration, not a lift. Never load it with anything you mind dropping, never put a hand inside the frame while the platform is raised, and keep the drop under 400 mm.
Build a vertical frame with two side rails
Build a vertical frame with two side rails
Make a rigid open frame about 600 mm tall from hardwood, with two parallel uprights 200 mm apart. Everything depends on those rails staying parallel.
Mga materyales para sa hakbang na ito:
 Tabla ng Matigas na Kahoy2 piraso
Mga kailangang kasangkapan:
 Ruler
RulerCut sawtooth racks into the inner faces
Cut sawtooth racks into the inner faces
Cut a row of angled teeth down the inside face of each upright, about 10 mm pitch, with the flat of each tooth facing UP. The pawl must be able to slide up freely and bite going down.
Make the platform to slide between the rails
Make the platform to slide between the rails
Build a small platform that slides freely with 2-3 mm clearance each side. Binding here will hide whether the brake is doing anything.
Pivot a pawl at each side of the platform
Pivot a pawl at each side of the platform
Mount two pawls on pivots, one per side, positioned so that when they rotate outward their tips engage the rack teeth. Cut them from steel or dense hardwood.
Mga materyales para sa hakbang na ito:
 Plantsang Malambot na Asero1 pilyego
Link the two pawls to one another
Link the two pawls to one another
Connect the pawls with a light rod or cord so they always move together. If one engages alone the platform racks over and jams instead of stopping level.
Make the flat leaf spring
Make the flat leaf spring
Cut a strip of spring steel about 200 mm long and fix it across the top of the platform, standing proud in a shallow arch. This one part is the entire safety system.
Mga materyales para sa hakbang na ito:
 Kawad na asero para sa resorte1 metro
Attach the hoist rope to the centre of the spring
Attach the hoist rope to the centre of the spring
Tie the lifting rope to the middle of the leaf spring — not to the platform. The whole weight of the platform must hang from the spring, and that is what flattens it.
Mga materyales para sa hakbang na ito:
 Pisi ng yute3 metro
Couple the spring ends to the pawls
Couple the spring ends to the pawls
Link each end of the leaf spring to its pawl so that flattening the spring pulls the pawls IN, clear of the teeth, and letting it arch pushes them OUT into engagement.
Check the logic with the rope slack
Check the logic with the rope slack
With no tension the spring should arch and both pawls should stand proud, ready to bite. Engaged is the resting state — the rope's job is to hold the brake OFF.
Tension the rope and watch the pawls retract
Tension the rope and watch the pawls retract
Lift the platform by the rope. As the spring flattens under load, both pawls should draw clear of the teeth and the platform should rise freely.
Adjust until it releases fully but only just
Adjust until it releases fully but only just
Tune the linkage so the pawls clear the teeth by 1-2 mm under load and no more. Excess clearance means a longer fall before the pawls find a tooth.
Test the failure, with the platform low
Test the failure, with the platform low
Raise it 100 mm and cut or release the rope. The spring should snap up and the pawls should catch within a tooth or two. Repeat from higher only once it is reliable.
Measure the stopping distance
Measure the stopping distance
Record the drop before arrest at several heights. It should stay roughly constant — arrest depends on tooth pitch and pawl clearance, not on how far it fell.
History & Context — the invention that let cities grow upward
History & Context — the invention that let cities grow upward
The demonstration came first, the patent later. Otis showed the safety hoist at the New York Crystal Palace exhibition in 1854, standing on the platform and ordering the rope cut — the platform fell a few inches and held. His US Patent 31,128 for the improvement in hoisting apparatus issued on 15 January 1861, and he died that April, aged 49, having seen the principle proved but not the industry it created.
The key idea is inverted logic. Most safety devices are added on and must be triggered by detecting a fault. Otis's brake is engaged by default and held off by the very tension it is protecting against. There is no sensor, no latch to fail and nothing to switch: the loss of the rope IS the trigger. That principle — fail-safe by design rather than by detection — is now standard in lift gear, railway air brakes and countless machine guards, and this is one of its earliest clean expressions.
What it actually changed. Otis did not invent the elevator; hoists are ancient and steam hoists were already common. What he removed was the reason not to ride one. Once a passenger lift could be trusted, the top floor of a building stopped being the cheapest and became the most valuable, and buildings could usefully exceed the five or six storeys people will climb. Steel frames and the skyscraper followed. It is a rare case where a safety device, not a power source, is the enabling technology.
An honest note on the model. A real installation uses governor-driven wedge or roller safeties gripping smooth steel guide rails, not pawls in a toothed rack, because a sawtooth arrest is violently abrupt — survivable in a demonstration, injurious in a lift. The toothed version is Otis's original and it shows the principle perfectly; it is not how a modern lift stops.
Mga Materyales
4- 2 pirasoPlaceholder
- 1 pilyegoPlaceholder
- Placeholder
- 3 metroPlaceholder
Kaugnay na Blueprint
Ang mga blueprint na ito ay nagbabahagi ng kaalaman — mga teknik, materyales, o prinsipyo

CC0 Pampublikong Domain
Ang blueprint na ito ay inilabas sa ilalim ng CC0. Malaya kang kumopya, magbago, mamahagi, at gumamit nang walang pahintulot.
Suportahan ang Maker sa pamamagitan ng pagbili ng mga produkto sa kanilang Blueprint Komisyon ng Maker itinakda ng mga Vendor, o lumikha ng bagong bersyon ng Blueprint na ito at isama bilang koneksyon sa iyong Blueprint upang ibahagi ang kita.