
Pakikipagtulungan
SINING
BEAUTY AT WELLNESS
CRAFTS
KULTURA AT KASAYSAYAN
LIBANGAN
KAPALIGIRAN
PAGKAIN AT INUMIN
REVERSE ENGINEERING
AGHAM
ISPORTS
TEKNOLOHIYA
MGA WEARABLE
Push Button: Normally Open Momentary Switch with a Cushioned Contact (De Reamer, GE 1939)
Ed

Nilikha ni

Ed

28. Oktubre 2026FI
9
0
0
0
0

Push Button: Normally Open Momentary Switch with a Cushioned Contact (De Reamer, GE 1939)

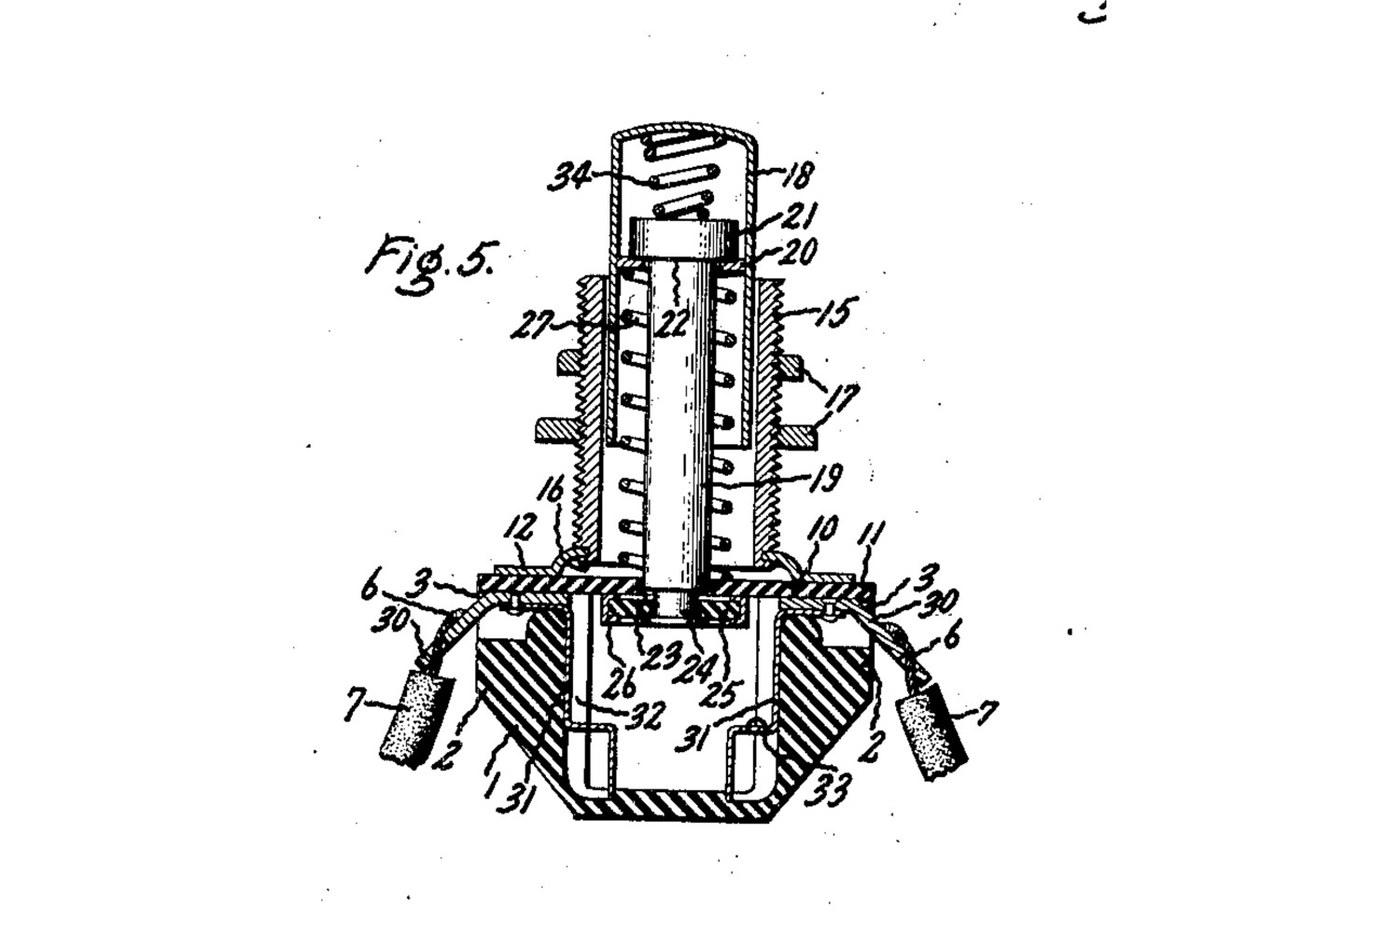
A panel push button that closes a circuit only while you press it. A spring holds the button out, and a metal rim on the end of its rod sits clear of two contacts. Press it and the rim bridges both contacts. A second spring inside the button lets the rod give, so the contacts never take more than that spring's force. Source: Frank C. De Reamer, US 2,166,803 (General Electric, 1939), Fig. 5. Unknown: the insulating material, the metals and every size. De Reamer gives none of them, so they are linked to unknown heads. The tools are ours. Picture: the patent's Fig. 5.
Abantado
2 days

Mga Tagubilin

1

Mould the housing

Mould a cup-shaped housing of insulating material, with a boss on each of two opposite sides, a recess in the top of each boss, a groove inside below each boss, and a bead round the top. Unknown: the material, the sizes and the moulding.

Mga materyales para sa hakbang na ito:

Hindi alam na materyal na insulatorHindi alam na materyal na insulator1 as required

Mga kailangang kasangkapan:

Molde para sa compression moldingMolde para sa compression molding
Hindi alam na sukatHindi alam na sukat
2

Make the terminals and contacts

Bend two angled metal strips. The upper end of each sits in a boss recess, and the lower end is a solder lug. Fix each upper end to a contact that fits the groove inside the housing, stepped at its bottom end. Unknown: the metal.

Mga materyales para sa hakbang na ito:

Hindi alam na metalHindi alam na metal1 as required

Mga kailangang kasangkapan:

Gunting na pangyeroGunting na pangyero
Plais na Patag ang NgusoPlais na Patag ang Nguso
Hindi alam na sukatHindi alam na sukat
3

Make the sleeve, plate and cover

Turn a threaded sleeve and cut its thread. Spin its lower end over onto a metal plate with tangs. Cut a cover of insulating sheet with ears that reach over the bosses and a hole in the middle to guide the rod.

Mga materyales para sa hakbang na ito:

Hindi alam na metalHindi alam na metal1 as required
Hindi alam na materyal na insulatorHindi alam na materyal na insulator1 as required

Mga kailangang kasangkapan:

Torno para sa MetalTorno para sa Metal
Set ng kasangkapan sa lathe (HSS)Set ng kasangkapan sa lathe (HSS)
Hawakan ng die sa labasHawakan ng die sa labas
Gunting na pangyeroGunting na pangyero
Kalipers na VernierKalipers na Vernier
Hindi alam na sukatHindi alam na sukat
4

Make the push button

Make a drawn metal tube closed at the top, and a rod with a head. Put a small coil spring in the top of the tube, then the rod's head. Wedge a washer into the tube under the head. Leave clearance so the rod can swivel a little. Turn the rod's lower end down to a smaller diameter. Unknown: the metal.

Mga materyales para sa hakbang na ito:

Hindi alam na metalHindi alam na metal1 as required
Hanay ng Spring na PanipiHanay ng Spring na Panipi1 spring

Mga kailangang kasangkapan:

Torno para sa MetalTorno para sa Metal
Set ng kasangkapan sa lathe (HSS)Set ng kasangkapan sa lathe (HSS)
Kalipers na VernierKalipers na Vernier
Hindi alam na sukatHindi alam na sukat
5

Assemble

Set the terminals in their recesses and the contacts in their grooves. Slide the button into the sleeve, with a coil spring round the rod between the cover and the wedged washer. Pass the rod's end through the cover's hole. Put on it a loose insulating washer with a metal rim round its edge. Hammer the rod's end over into a flange. Lay the cover on the housing, so its ears clamp the terminals, and bend the plate's tangs over the bead.

Mga materyales para sa hakbang na ito:

Hindi alam na materyal na insulatorHindi alam na materyal na insulator1 as required
Hindi alam na metalHindi alam na metal1 as required
Hanay ng Spring na PanipiHanay ng Spring na Panipi1 spring

Mga kailangang kasangkapan:

Bais sa Mesang PanggawaBais sa Mesang Panggawa
Martilyong bilog ang isang uloMartilyong bilog ang isang ulo
Plais na Patag ang NgusoPlais na Patag ang Nguso
Salaming pangkaligtasanSalaming pangkaligtasan
6

Mount and wire it

Put the sleeve through a hole in the panel and clamp the panel between two nuts on the thread. Solder the bared wire ends to the two lugs.

Mga materyales para sa hakbang na ito:

Tuerkang HeksagonalTuerkang Heksagonal2 pcs
Kawad na PanghinangKawad na Panghinang1 as required

Mga kailangang kasangkapan:

PanghinangPanghinang
Plais na Patag ang NgusoPlais na Patag ang Nguso
7

Check it

At rest, the rim sits against the underside of the cover and the circuit is open. Pressed, the rim meets the stepped ends of both contacts and closes it. The checking is ours: the meter reads open, then closed while pressed.

Mga kailangang kasangkapan:

MultimetroMultimetro

Mga Materyales

5

Mga Kinakailangang Kasangkapan

13

Ang blueprint na ito ay gumagawa ng

Kaugnay na Blueprint

Ang mga blueprint na ito ay nagbabahagi ng kaalaman — mga teknik, materyales, o prinsipyo
CC0 Pampublikong Domain

Ang blueprint na ito ay inilabas sa ilalim ng CC0. Malaya kang kumopya, magbago, mamahagi, at gumamit nang walang pahintulot.

Suportahan ang Maker sa pamamagitan ng pagbili ng mga produkto sa kanilang Blueprint Komisyon ng Maker itinakda ng mga Vendor, o lumikha ng bagong bersyon ng Blueprint na ito at isama bilang koneksyon sa iyong Blueprint upang ibahagi ang kita.

Talakayan

(0)

Mag-login upang sumali sa talakayan

Naglo-load ng mga komento...