Pakikipagtulungan
SINING
BEAUTY AT WELLNESS
CRAFTS
KULTURA AT KASAYSAYAN
LIBANGAN
KAPALIGIRAN
PAGKAIN AT INUMIN
REVERSE ENGINEERING
AGHAM
ISPORTS
TEKNOLOHIYA
MGA WEARABLE
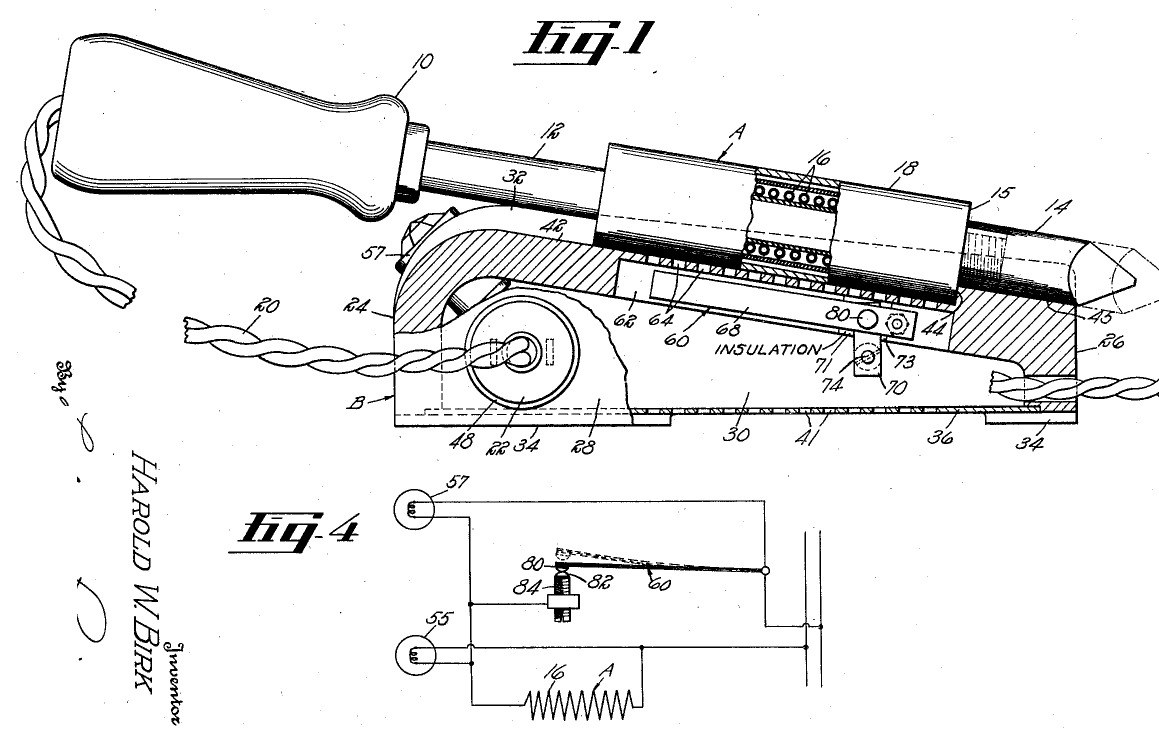


Soldering Station: a Stand Whose Bimetal Switch Reads the Iron's Heat (Birk, Hart Mfg., US 2,248,486, 1941)
A soldering station: an ordinary electric iron plugs into its stand, and the stand controls it. When the iron is laid in the stand's trough, its heater housing sits over a flue with a U-shaped bimetal switch inside; the heat it gives off opens the switch at the temperature you set with a screw, and closes it again as it cools. A red lamp shows the iron heating, a green lamp shows it hot and idling.
Result: a stand that keeps an electric iron at a set temperature between jobs and shows its state.
Source: H. W. Birk (Hart Manufacturing), US 2,248,486 (1941). Unknown: sizes, the bimetal, the lamps. Picture: the patent drawing.
Katamtaman
Unknown
Mga Tagubilin
1
1
Make the stand
Make the stand
Cast or form a box-shaped stand in one piece from a fire-resistant material such as porcelain: a high front wall, a low back wall, two side walls and a top sloping down about 10° toward the back, with feet at the corners so air can pass beneath. Close the bottom with a removable plate screwed to a flange and pierced with air holes. In the top, hollow a trough shaped to the iron's heater housing, ending at a shoulder, then a narrower groove for the tip. Cut a flue through the top along the trough, under a cover with holes. Ours: porcelain. Not given: sizes.
Mga materyales para sa hakbang na ito:
 Hindi kilalang materyal1 porcelain stand
 Hindi alam na metal1 bottom plate, screws
Mga kailangang kasangkapan:
 Hindi alam na sukat
2
2
Fit the bimetal switch
Fit the bimetal switch
Bend a strip of bimetal into a U whose legs spread apart when cool and close together when hot. Rivet one leg to a metal strip fixed beside the flue (on an insulating bracket if the stand conducts); put a contact on the free leg's end. Face it with a fixed contact on a screw stud threaded through a metal plate and out through the side wall in an insulating sleeve, slotted for a screwdriver: turning it sets the temperature, low for wax melting or high for electric branding irons. Not given: the bimetal, the contact metal.
Mga materyales para sa hakbang na ito:
 Piraso ng dalawang metal1 pirasoHindi alam na metal1 strips, plate, contacts, stud
 Hindi alam na materyal na insulator1 bracket, sleeve, plate
Mga kailangang kasangkapan:
 Set ng remaches
 Set sa paggawa ng sinulid ng turnilyo
3
3
Wire the outlet and lamps
Wire the outlet and lamps
Set an outlet in a side wall for the iron's plug, held by a flange and a split ring, and wire it in series with the switch to the supply cord. At the top of the front wall, set two lamp sockets at about 45°, one with a red lens and one with a green: wire the red in parallel with the iron's heater, the green in parallel with the switch. Not given: the lamp ratings, the outlet type.
Mga materyales para sa hakbang na ito:
 Hindi alam na konektor1 outlet
 Sokete ng bombilya2 piraso
 Bombilya2 pirasoHindi kilalang materyal2 red and green lenses
 Malambot na kordon na may plug1 piraso
Mga kailangang kasangkapan:
 Set ng mga distornilyador
4
4
Use it
Use it
Set the temperature by turning the slotted stud with a screwdriver. Plug an electric soldering iron into the stand's outlet and lay it in the trough so its heater housing closes the flue. While the bimetal is cool the switch is closed and the red lamp lights: the iron heats. At the set temperature the switch opens; the green lamp glows, the red goes dark and the iron idles. Lift the iron off and air rushes up the flue, cooling the bimetal so the iron heats again. Because it senses the heater, not the tip, the heater cannot burn out even if the tip is loose.
Mga materyales para sa hakbang na ito:
 Panghinang1 electric soldering iron
Mga kailangang kasangkapan:
Set ng mga distornilyadorMga Materyales
9- 2 red and green lensesPlaceholder
- 1 strips, plate, contacts, studPlaceholder
- 1 pirasoPlaceholder
- 1 bracket, sleeve, platePlaceholder
- 1 outletPlaceholder
- 2 pirasoPlaceholder
- 2 pirasoPlaceholder
- 1 pirasoPlaceholder
- Placeholder
Mga Kinakailangang Kasangkapan
4- Placeholder
- Placeholder
- Placeholder
- Placeholder
Mga Materyales ng Nakakonektang Blueprint



Ang blueprint na ito ay gumagawa ng

CC0 Pampublikong Domain
Ang blueprint na ito ay inilabas sa ilalim ng CC0. Malaya kang kumopya, magbago, mamahagi, at gumamit nang walang pahintulot.
Suportahan ang Maker sa pamamagitan ng pagbili ng mga produkto sa kanilang Blueprint Komisyon ng Maker itinakda ng mga Vendor, o lumikha ng bagong bersyon ng Blueprint na ito at isama bilang koneksyon sa iyong Blueprint upang ibahagi ang kita.