تعاون
فن
خوبصورتی اور تندرستی
دستکاری
ثقافت اور تاریخ
تفریح
ماحول
خوراک اور مشروبات
ریورس انجینئرنگ
سائنسز
کھیل
ٹیکنالوجی
پہننے والے آلات
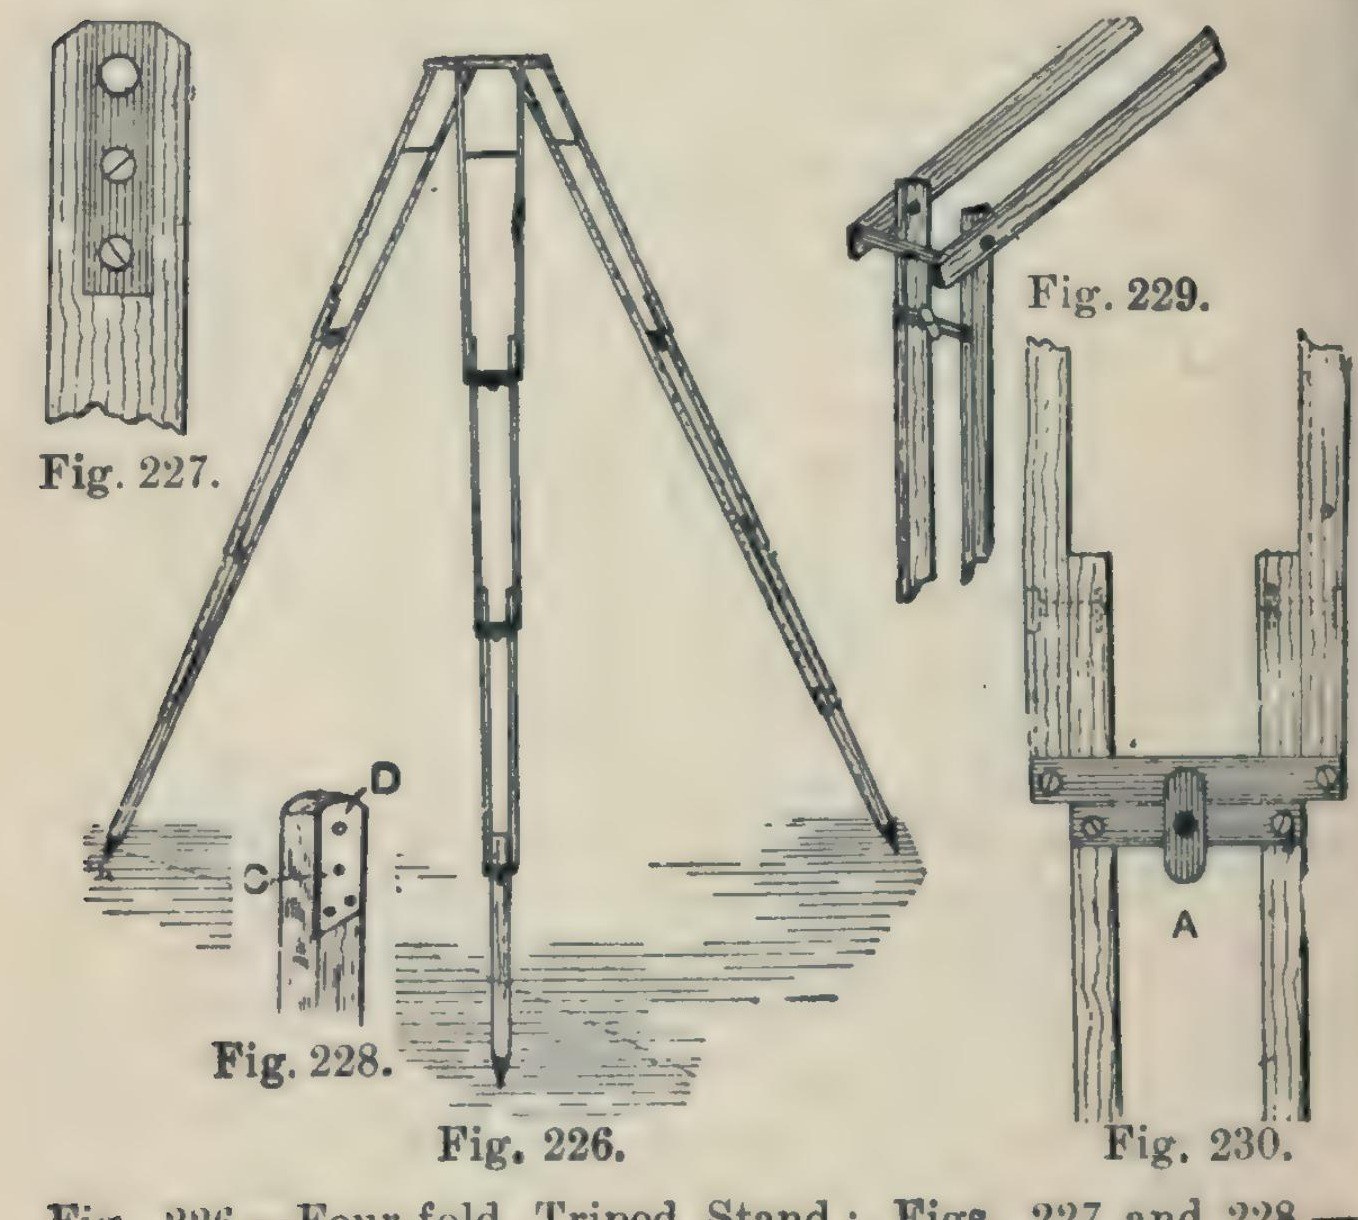


Camera Tripod: a Four-Fold Ash Tripod Stand (Hasluck, 1902)
A light, compact folding camera stand: three legs, each of seven ash laths riveted so it folds in four, locked open by brass buttons, on a triangular ash top with brass pins and a hole for the camera screw.
Hasluck says the same method makes stands that fold in three or two.
Source: Paul N. Hasluck, Photographic Cameras and Accessories (1902), pp. 153-157. Picture: Figs. 226-230 of the book.
درمیانہ
Unknown
ہدایات
1
1
Cut the ash laths
Cut the ash laths
Cut laths of good ash, true and square or the stand won't be rigid, and round the edges slightly: six 17 1/4 x 5/8 x 3/8 in, six 16 x 5/8 x 3/8 in, six 15 1/2 x 5/8 x 3/8 in, and three 14 x 5/8 x 5/8 in.
اس مرحلے کے لیے مواد:
 ایش کا تختہ1 21 laths
درکار اوزار:
 پشت دار آری
 بلاک رندا
2
2
Fit the top ends and stretcher
Fit the top ends and stretcher
On each 17 1/4 in lath let in flush a 1/16 in brass plate, 1 1/4 in long, with a 3/16 in hole 1/4 in from the top, held by two countersunk brass screws; bore the wood to match and take off the top corners. On one lath of each pair cut a groove inside, about 3/16 in deep and 3 1/2 in long, starting 2 in from the top, and hinge a 1/8 in brass rod stretcher in it on a pin. On the other lath cut a curved groove 1 1/2 in long, 3/16 in wide, with a small hole at the bottom where the rod catches.
اس مرحلے کے لیے مواد:
 پیتل کی چادر1 1/16 in plates
 لکڑی کے پیچ1 small brass screws
 پیتل کی سلاخ1 1/8 in stretcher
درکار اوزار:
 لوہا کاٹنے کی آری کا چوکھٹا اور پھل
 دھات کی ریتی
 ہاتھ کا برما
 رکھانیاں
 پیچ کس - چپٹا
3
3
Bore and rivet the legs
Bore and rivet the legs
Bore the rivet holes: in the long laths 1 3/4 in from the lower end, counterbored so the copper rivet head sits flush, then 1/8 in through; in the 16 in and 15 1/2 in laths 1/2 in and 1 3/4 in from the ends; in each 14 in piece 1/2 in from one end, and taper its other end for a pointed iron shoe or a steel point and ferrule. Rivet the 21 laths into three legs with 1/8 in copper rivets and washers: a 16 in lath inside each 17 1/4 in one, a 15 1/2 in lath inside that, the 14 in foot between the last pair. Rivets flush, just tight enough to fold but not loose.
اس مرحلے کے لیے مواد:
 تانبے کی ریوٹ1 1/8 in, with washers
 نامعلوم دھات3 iron shoes or steel points
درکار اوزار:
 دستے دار برما اور پھلہاتھ کا برما
 ریوٹ کا ہتھوڑا
4
4
Add cross strips and lock buttons
Add cross strips and lock buttons
Screw 1/16 in brass strips across the bottom ends of each pair of laths (Fig. 229). Under them screw strips carrying a small brass button riveted at the centre; turned, the button hooks over the strip above and locks the joint open (Fig. 230).
اس مرحلے کے لیے مواد:
پیتل کی چادر1 cross strips, buttonsلکڑی کے پیچ1 ٹکڑادرکار اوزار:
لوہا کاٹنے کی آری کا چوکھٹا اور پھلدھات کی ریتیپیچ کس - چپٹاریوٹ کا ہتھوڑا5
5
Make the top
Make the top
Plane ash to 1/2 in and draw an equilateral triangle with 8 1/2 in sides. Bisect the angles; 2 in from each corner draw a line at right angles, go 1/2 in in along the sides, and mark three rectangles 2 7/8 x 3/4 in; cut the outline (Fig. 231). Fix a 3/16 in brass rod, one end tapered, across each rectangle, bored 3/8 in from the outer edge and projecting about 1/2 in, for the legs to hang on. Bore a 1/4 in hole in the centre for the camera screw and glue felt on top.
اس مرحلے کے لیے مواد:
ایش کا تختہ1 topپیتل کی سلاخ3 3/16 in pins اونی نمدہ1 ٹکڑا
 حیوانی سریش1 ٹکڑا
درکار اوزار:
بلاک رنداپشت دار آریدستے دار برما اور پھلہاتھ کا برما6
6
Finish
Finish
Glasspaper and varnish the wood, and lacquer the brass.
اس مرحلے کے لیے مواد:
 شیلیک کی وارنش1 varnish
 نامعلوم مادہ1 brass lacquer
درکار اوزار:
 ریگ مال
مواد
10- 1 topپلیس ہولڈر
- 1 cross strips, buttonsپلیس ہولڈر
- 1 ٹکڑاپلیس ہولڈر
- 3 3/16 in pinsپلیس ہولڈر
- 1 1/8 in, with washersپلیس ہولڈر
- 3 iron shoes or steel pointsپلیس ہولڈر
- 1 ٹکڑاپلیس ہولڈر
- 1 ٹکڑاپلیس ہولڈر
- 1 varnishپلیس ہولڈر
- 1 brass lacquerپلیس ہولڈر
یہ بلوپرنٹ بناتا ہے

CC0 پبلک ڈومین
یہ بلیو پرنٹ CC0 کے تحت جاری کیا گیا ہے۔ آپ اجازت لیے بغیر اس کام کو نقل، ترمیم، تقسیم اور کسی بھی مقصد کے لیے استعمال کرنے کے لیے آزاد ہیں۔
میکر کی حمایت کریں ان کے بلیو پرنٹ کے ذریعے پروڈکٹس خرید کر جہاں وہ میکر کمیشن وینڈرز کی طرف سے مقرر، کماتے ہیں، یا اس بلیو پرنٹ کی نئی تکرار بنائیں اور آمدنی شیئر کرنے کے لیے اسے اپنے بلیو پرنٹ میں کنکشن کے طور پر شامل کریں۔