فن
خوبصورتی اور تندرستی
دستکاری
ثقافت اور تاریخ
تفریح
ماحول
خوراک اور مشروبات
ریورس انجینئرنگ
سائنسز
کھیل
ٹیکنالوجی
پہننے والے آلات
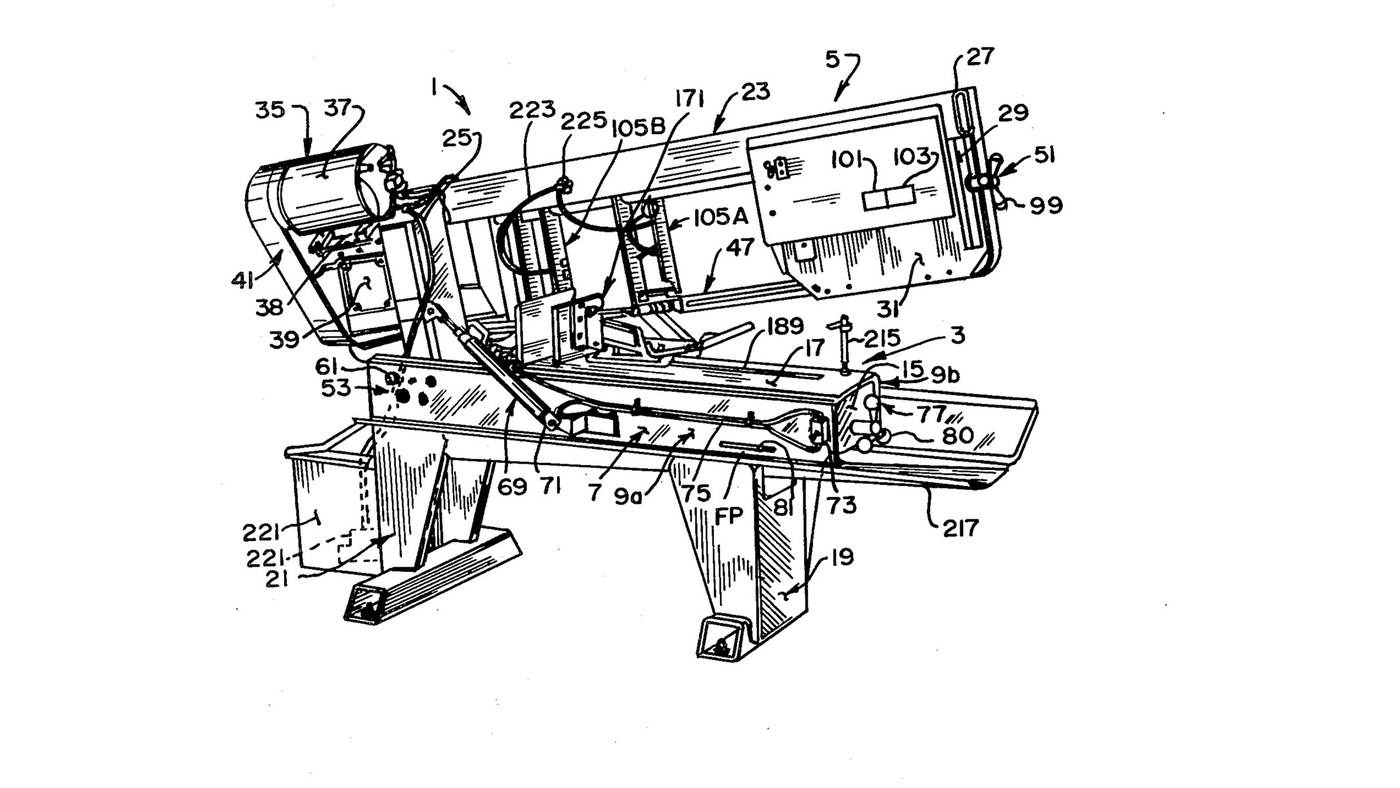


Metal Band Saw: Horizontal Saw on a Welded Steel Frame
Curtis Eccardt's horizontal power band saw (Emerson Electric, US 4,364,294, 1982), built from welded steel channel and tube instead of iron castings to cut its cost. The saw head swings down on trunnions over the bed; a hydraulic cylinder with a valve sets how fast it feeds, a spring counterbalances it, and a spring tensioner shows the blade tension on a scale. Two guides with rollers twist the blade's lower run 90° so its teeth face down into the work, and carbide inserts hold it there.
The patent gives no sizes, speeds or ratings; the welder and wrenches are ours. The picture: the patent's Fig. 1.
اعلیٰ
4 days
ہدایات
1
1
Weld the bed
Weld the bed
Stand two steel channels (9a, 9b) parallel, webs upright and flanges facing in, and weld gussets (15) between their webs. Bolt a bed plate (17) across the top flanges as the work surface. Ours: MIG welder, drill press for the bolt holes.
اس مرحلے کے لیے مواد:
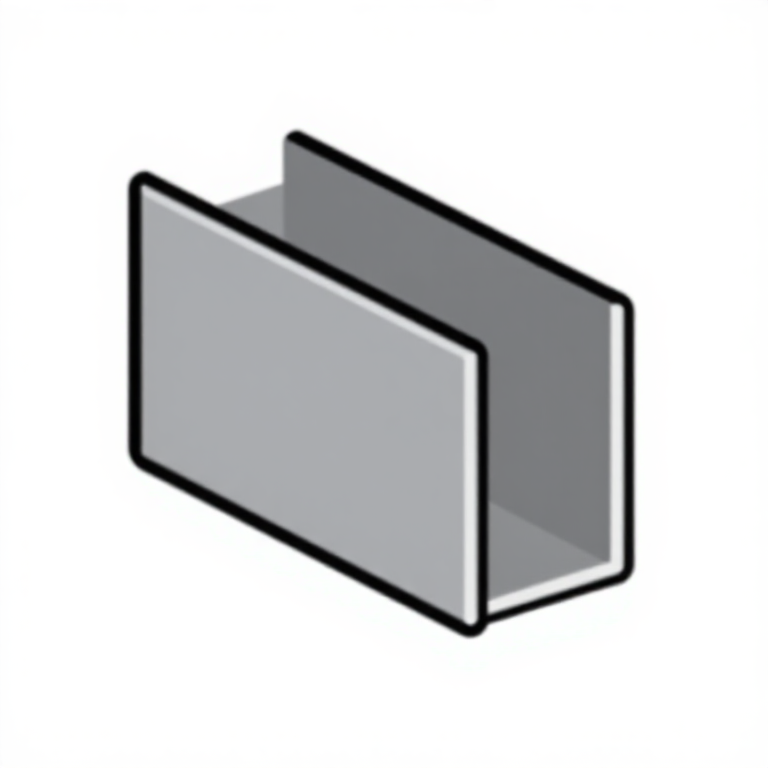 فولاد کا U قطاع2 ٹکڑے
 نرم فولاد کی پلیٹ1 ٹکڑا
 چھ کونے والے سر کا بولٹ - درجہ 8.81 ٹکڑا
درکار اوزار:
 MIG ویلڈنگ مشین
 ستون والی مشق مشین
 انگریزی پانا
2
2
Weld and bolt on the legs
Weld and bolt on the legs
Weld formed sheet-steel legs onto horizontal floor members to make front and rear leg weldments (19, 21), and bolt them under the bed.
اس مرحلے کے لیے مواد:
 فولاد کی چادر1 ٹکڑا
 فولادی نلکی1 ٹکڑاچھ کونے والے سر کا بولٹ - درجہ 8.81 ٹکڑا
درکار اوزار:
MIG ویلڈنگ مشینانگریزی پانا3
3
Weld the head
Weld the head
Weld a head post (25) of square or rectangular steel tube square to a head beam (27) of rectangular tube. Weld a bracket leg (29) down from the beam's outer end, and fix support plates at both ends (31, 33).
اس مرحلے کے لیے مواد:
فولادی نلکی1 ٹکڑانرم فولاد کی پلیٹ1 ٹکڑادرکار اوزار:
MIG ویلڈنگ مشین4
4
Fit the trunnions and align the pivot
Fit the trunnions and align the pivot
Fix a shaft through the head post with its ends out as trunnions (55a, 55b), in bushings in two bearing blocks (59a, 59b) bolted inside the channel webs. Each block has one close-fit bolt hole and three oversize ones: shift the blocks until the pivot is parallel to the bed plate, then torque the bolts. A set screw (67) takes out end play.
اس مرحلے کے لیے مواد:
 فولادی شافٹ1 ٹکڑا
 دھاتی بُشنگ2 ٹکڑے
 بیئرنگ بلاک2 ٹکڑےچھ کونے والے سر کا بولٹ - درجہ 8.88 ٹکڑے
 پیالہ نما سرے والا سیٹ اسکرو1 ٹکڑا
درکار اوزار:
ستون والی مشق مشین ٹارک رنچ
5
5
Mount motor, belt drive and gearbox
Mount motor, belt drive and gearbox
Mount the electric motor (37) on a plate (38) pivoted on the head beam, and couple it by a multi-speed belt and pulleys (41) to a gearbox (39). Fit the drive wheel (43) on the gearbox output shaft.
اس مرحلے کے لیے مواد:
 برقی موٹر1 ٹکڑانرم فولاد کی پلیٹ1 ٹکڑا
 ڈرائیو بیلٹ1 ٹکڑا
 گھرنی1 ٹکڑا
 گیئر باکس1 ٹکڑا
 بینڈ آری کا پہیہ1 ٹکڑا
درکار اوزار:
انگریزی پانا6
6
Build the idler tensioner
Build the idler tensioner
Weld an idler yoke (87) of rolled steel plate, pivot it on the head beam with a pin (89), and cantilever the idler axle from it with the idler wheel (45) on bearings (85). A threaded rod (91) pulls the yoke through a coil spring (93) held between compression plates and a U-bolt (97); a knob (99) turns the rod. An indicator (101) on the spring reads the tension on a scale (103).
اس مرحلے کے لیے مواد:
نرم فولاد کی پلیٹ1 ٹکڑا فولادی پن1 ٹکڑافولادی شافٹ1 ٹکڑابینڈ آری کا پہیہ1 ٹکڑا
 بال بیئرنگ1 ٹکڑا
 چوڑی دار سلاخ1 ٹکڑا
 Coil Spring1 ٹکڑا
 U شکل کا کنڈا1 ٹکڑا
 کنٹرول گھنڈی1 ٹکڑا
درکار اوزار:
MIG ویلڈنگ مشینانگریزی پانا7
7
Build the two blade guides
Build the two blade guides
In each guide channel (111) mount two guide rollers (115a, 115b) on ball bearings on eccentric bushings, one fixed and one adjusted to the blade thickness. Add a carbide thrust insert (133) on the blade's back edge and two carbide side inserts (137a fixed, 137b on a sprung swing bracket set by a bolt and knob). Clamp the guides on two bar tracks (107).
اس مرحلے کے لیے مواد:
 گائیڈ رولر4 ٹکڑےبال بیئرنگ4 ٹکڑے
 غیر مرکزی بشنگ4 ٹکڑے
 کاربائیڈ انسرٹ6 ٹکڑےCoil Spring2 ٹکڑےکنٹرول گھنڈی2 ٹکڑےفولادی نلکی1 ٹکڑا
درکار اوزار:
انگریزی پانا8
8
Fit the blade and set the tension
Fit the blade and set the tension
By hand, run the endless blade (47) round the drive and idler wheels and through both guides; the rollers twist its lower run about 90° so the teeth face down. Turn the tension knob until the scale shows the tension you want.
اس مرحلے کے لیے مواد:
 پٹی آری کا پھل1 ٹکڑا
9
9
Fit the feed cylinder and counterbalance
Fit the feed cylinder and counterbalance
Connect a hydraulic cylinder (71) between bed channel and head post above the trunnions, filled with oil and piped through tubing (75) to a control valve (73): the valve sets the feed rate and, closed, holds the head. Fit a coil spring (78) on a threaded linkage (79) between an end gusset and the head post below the trunnions, adjusted by a knob (80), to counterbalance the head.
اس مرحلے کے لیے مواد:
 آبی دباؤ کا سلنڈر1 ٹکڑا
 ہائیڈرولک تیل1 batch
 ہائیڈرولک نلکی1 ٹکڑا
 فلو کنٹرول والو1 ٹکڑاCoil Spring1 ٹکڑاچوڑی دار سلاخ1 ٹکڑاکنٹرول گھنڈی1 ٹکڑا
درکار اوزار:
انگریزی پانا10
10
Bolt on the vice
Bolt on the vice
Bolt the quick-acting vice to the bed plate to clamp the work square under the blade.
اس مرحلے کے لیے مواد:
 مشین کا شکنجہ1 ٹکڑاچھ کونے والے سر کا بولٹ - درجہ 8.81 ٹکڑا
درکار اوزار:
انگریزی پانامواد
29- 2 ٹکڑےپلیس ہولڈر
- 1 ٹکڑاپلیس ہولڈر
- پلیس ہولڈر
- 1 ٹکڑاپلیس ہولڈر
- 1 ٹکڑاپلیس ہولڈر
- 1 ٹکڑاپلیس ہولڈر
- 2 ٹکڑےپلیس ہولڈر
- 2 ٹکڑےپلیس ہولڈر
- پلیس ہولڈر
- 1 ٹکڑاپلیس ہولڈر
- 1 ٹکڑاپلیس ہولڈر
- 1 ٹکڑاپلیس ہولڈر
- 1 ٹکڑاپلیس ہولڈر
- 1 ٹکڑاپلیس ہولڈر
- 1 ٹکڑاپلیس ہولڈر
- پلیس ہولڈر
- 1 ٹکڑاپلیس ہولڈر
- 4 ٹکڑےپلیس ہولڈر
- 1 ٹکڑاپلیس ہولڈر
- پلیس ہولڈر
- 4 ٹکڑےپلیس ہولڈر
- 4 ٹکڑےپلیس ہولڈر
- 6 ٹکڑےپلیس ہولڈر
- 1 ٹکڑاپلیس ہولڈر
- 1 ٹکڑاپلیس ہولڈر
- 1 batchپلیس ہولڈر
- 1 ٹکڑاپلیس ہولڈر
- 1 ٹکڑاپلیس ہولڈر
- 1 ٹکڑاپلیس ہولڈر
یہ بلوپرنٹ بناتا ہے
CC0 پبلک ڈومین
یہ بلیو پرنٹ CC0 کے تحت جاری کیا گیا ہے۔ آپ اجازت لیے بغیر اس کام کو نقل، ترمیم، تقسیم اور کسی بھی مقصد کے لیے استعمال کرنے کے لیے آزاد ہیں۔
میکر کی حمایت کریں ان کے بلیو پرنٹ کے ذریعے پروڈکٹس خرید کر جہاں وہ میکر کمیشن وینڈرز کی طرف سے مقرر، کماتے ہیں، یا اس بلیو پرنٹ کی نئی تکرار بنائیں اور آمدنی شیئر کرنے کے لیے اسے اپنے بلیو پرنٹ میں کنکشن کے طور پر شامل کریں۔