Making an End-Grain Cutting Board — Butcher Block Construction
ہدایات
Mill and Glue the Face-Grain Panel
Mill and Glue the Face-Grain Panel
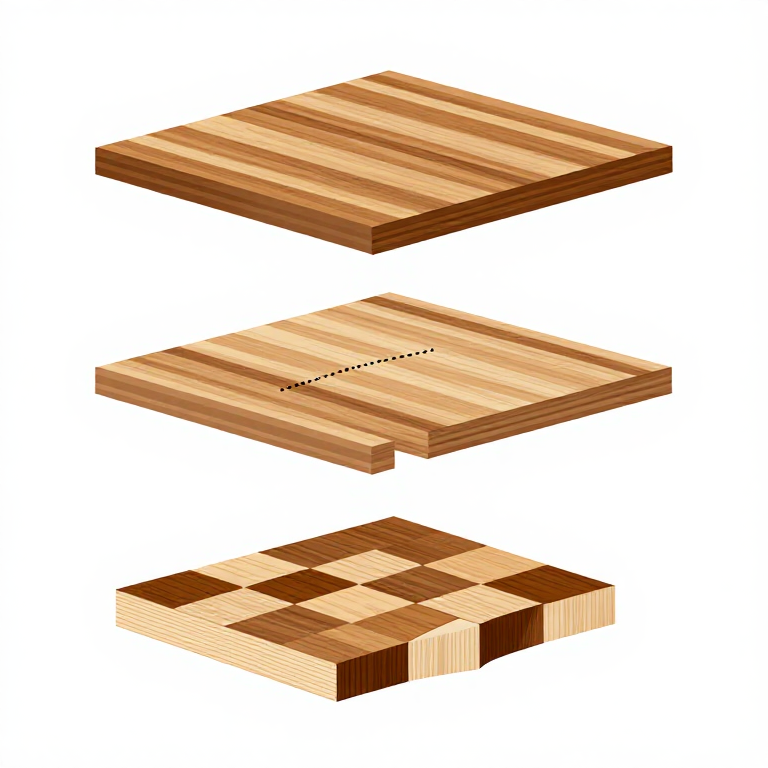
Mill hardwood strips to identical thickness (approximately 40mm) and width (approximately 40mm). Alternate species (e.g., maple-walnut-cherry-maple) for visual contrast in the finished board. Joint the edges of each strip perfectly straight and square — gaps in the glue line are structural weaknesses. Apply waterproof wood glue to each mating edge and clamp the strips together into a flat panel using bar or pipe clamps. Alternate clamp pressure above and below the panel to prevent bowing. Tighten until a thin, even bead of glue squeezes from every joint. Allow to cure for the glue manufacturer's recommended time (typically 24 hours for full strength under waterproof conditions).
اس مرحلے کے لیے مواد:
 Hardwood Ashboard feet sufficient for desired size, ~20mm thick mm
 Wood Glue200-300ml ml
 Beeswax (Optional)50g g
درکار اوزار:
 Table Saw
 Belt Sander
 Router
 Random Orbital Sander
Cross-Cut into Strips and Rotate
Cross-Cut into Strips and Rotate
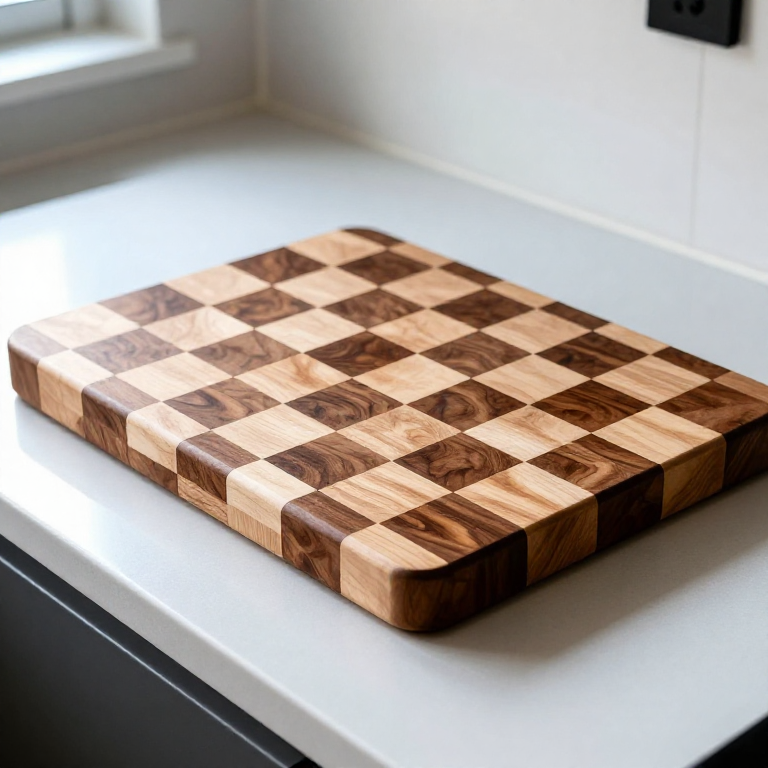
After the glue has fully cured, scrape off the squeeze-out and plane or sand one face flat. Cross-cut the face-grain panel into strips of equal width (matching the original strip width, approximately 40mm) using a table saw with a crosscut sled for safety and accuracy. Each cross-cut strip now shows end grain on two faces and edge grain on the other two. Rotate each strip 90 degrees so the end grain faces upward. This is the key transformation: the exposed end grain surface is what gives the board its self-healing and knife-friendly properties.
Second Glue-Up (End Grain Up)
Second Glue-Up (End Grain Up)
Apply waterproof wood glue to the long-grain edges of the rotated strips and clamp them together into the final panel with end grain facing upward. End grain absorbs glue rapidly, so apply a generous coat, wait 2-3 minutes for the grain to absorb the first application, then apply a second coat before clamping. This double-application ensures sufficient glue remains in the joint for structural strength. Clamp firmly and check that the top surface is as level as possible before the glue sets — misaligned strips require more planing to flatten, which wastes thickness.
Flatten and Sand
Flatten and Sand
After the second glue-up cures, flatten both faces. A drum sander or wide belt sander is ideal for end grain (which is much harder than face grain and resists hand planing). Alternatively, use a router sled to flatten the surface. Sand progressively through 80, 120, 180, and 220 grit on a random orbital sander. End grain shows scratches more prominently than face grain, so do not skip grits. After final sanding, round over all edges and corners with a router and roundover bit (a 6mm radius is comfortable) or by sanding a bevel by hand. Sharp corners on a thick cutting board are uncomfortable to grip and chip more easily.
Apply Food-Safe Finish
Apply Food-Safe Finish
Flood the board surface with food-safe mineral oil, applying it generously and allowing it to soak in for 15-20 minutes. End grain absorbs significantly more oil than face grain — apply 3-5 coats over 2-3 days, allowing each coat to soak in before wiping off the excess and applying the next. The oil fills the wood cells and prevents water from absorbing during use (water absorption leads to warping, cracking, and bacterial growth). After the final oil coat has dried, apply a thin layer of board butter (a mixture of mineral oil and beeswax) and buff to a soft sheen. Never use drying oils (linseed, tung) or film-forming finishes (polyurethane, lacquer) on a cutting board — they crack under knife cuts and contaminate food. Re-oil the board monthly with regular use.
مواد
4- board feet sufficient for desired size, ~20mm thick pieceپلیس ہولڈر
- Food-safe mineral oil100ml piece
You can swap these in
Can't get one of the materials? Swap it for an equivalent — these work just as well.
- Instead of Food-grade Mineral Oil, try:
 Essential Oil (Floral)
 Frankincense Essential Oil (Boswellia carterii)
 Hemp Seed Oil (Cold-Pressed)
 Lamp Oil
 Boiled Linseed Oil
 - Instead of Table Saw, try:
 Portable Band Saw
 Band Saw (9-inch, Benchtop)
 - Instead of Router, try:
 Trim Router
 - Instead of Pipe Clamp, try:
 Injection Mold Clamp Kit
 Parallel Clamp
 - Instead of Wood Glue, try:
 Polyurethane Glue
 - Instead of Random Orbital Sander, try:
 Belt Sander (3x21 inch)
Recommended for this build
Products makers often use with builds like this one.
 Chisel SetUsed together and in similar builds
 Wooden MalletUsed together and in similar builds
 Dovetail SawUsed in similar builds
 DrawknifeUsed together and in similar builds
 Marking GaugeUsed together and in similar builds
 Plywood SheetUsed together and in similar builds
 HacksawFrequently used with this build's materials
 Bevel GaugeUsed in similar builds
Related blueprints
Other builds that share materials, tools, or techniques with this one.


CC0 پبلک ڈومین
یہ بلیو پرنٹ CC0 کے تحت جاری کیا گیا ہے۔ آپ اجازت لیے بغیر اس کام کو نقل، ترمیم، تقسیم اور کسی بھی مقصد کے لیے استعمال کرنے کے لیے آزاد ہیں۔
میکر کی حمایت کریں ان کے بلیو پرنٹ کے ذریعے پروڈکٹس خرید کر جہاں وہ میکر کمیشن وینڈرز کی طرف سے مقرر، کماتے ہیں، یا اس بلیو پرنٹ کی نئی تکرار بنائیں اور آمدنی شیئر کرنے کے لیے اسے اپنے بلیو پرنٹ میں کنکشن کے طور پر شامل کریں۔