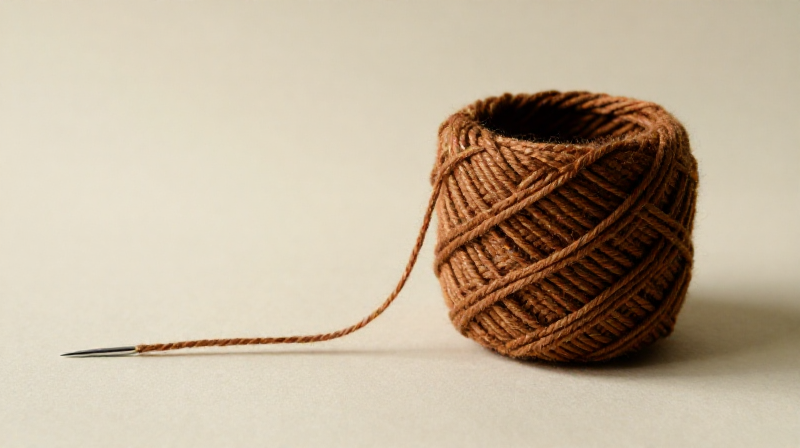
Nålbinding with the Oslo Stitch — Looped Fabric from a Single Needle
Nålbinding (literally 'needle-binding') is the oldest known technique for constructing textile fabric. The earliest confirmed fragment — a mesh of plant fiber loops — comes from the Nahal Hemar cave in Israel, dated to approximately 6500 BCE. Unlike knitting, which uses continuous yarn on two needles, nålbinding uses a single blunt needle threaded with short lengths of yarn (~1.5 meters). Each stitch interlocks with both the previous stitch in the current row and the stitch in the row below, creating a dense, elastic fabric that cannot unravel even if the yarn is cut.
The Oslo stitch (also called UOO — Under one, Over one, Over one) is one of the most common historical nålbinding stitches, documented across Viking-age Scandinavia, medieval Europe, and Coptic Egypt. Archaeological finds include socks from York (10th century), mittens from Mammen, Denmark (10th century), and Coptic socks from Egypt (4th–5th century CE). The technique was gradually replaced by knitting after the 16th century but never fully disappeared in Scandinavian folk tradition.
This blueprint teaches the Oslo stitch worked in a spiral to create a small cup or pouch — the fundamental form from which hats, mittens, and socks are shaped. The materials are minimal: wool yarn and a blunt needle. Wool is ideal because its microscopic scales grip adjacent stitches and allow felted yarn splices.
ہدایات
Select medium-weight wool yarn
Select medium-weight wool yarn
Choose a medium-weight (worsted or aran) wool yarn that has not been superwash-treated. Wool's natural scales are essential — they grip adjacent stitches and allow felted yarn splices. Smooth, slippery yarns (cotton, silk, acrylic) work poorly for nålbinding because the stitches slide apart. Handspun yarn with a firm twist is ideal. Plan approximately 50 grams for a small practice cup.
اس مرحلے کے لیے مواد:
 Wool Yarn Skein (Undyed)50 g
Cut yarn to arm's length
Cut yarn to arm's length
Cut a length of yarn approximately 1.5 meters long — roughly the distance from your fingertips to the opposite shoulder. Nålbinding always uses short lengths because the entire yarn must pass through each stitch. Longer pieces tangle and abrade from repeated pulling. You will splice in new lengths as you work.
درکار اوزار:
 Sharp Scissors
Thread the nålbinding needle
Thread the nålbinding needle
Thread one end of the yarn through the large eye of the nålbinding needle. Leave a tail of approximately 15 cm hanging free — this tail will be woven in later. A nålbinding needle is blunt-tipped and 6–10 cm long with a wide eye, similar to a large darning needle. Bone, wood, or blunt metal needles all work.
درکار اوزار:
 Nålbinding Needle
Create the foundation loop
Create the foundation loop
Make a small loop at the tail end of the yarn, approximately 2 cm in diameter. Hold this loop between your thumb and forefinger of your non-dominant hand. This loop is the anchor point — all first-round stitches will be worked into it. Do not tie a knot; simply pinch the crossing point.
Work the first stitch into the foundation loop
Work the first stitch into the foundation loop
Insert the needle through the foundation loop from back to front. Pull the yarn through until a new loop forms on the needle side. Hold this new loop open with your thumb — it becomes the first stitch. Keep gentle tension on the working yarn so the stitch does not collapse.
Work five more stitches into the foundation loop
Work five more stitches into the foundation loop
Repeat the same motion: insert the needle through the foundation loop AND through the previous stitch's loop, then pull through to form a new stitch. Work a total of six stitches into the foundation loop. Each stitch should connect to both the foundation loop and the stitch before it — this interlocking is what distinguishes nålbinding from simple chain stitching.
Pull the foundation loop closed
Pull the foundation loop closed
Tug the starting tail firmly to cinch the foundation ring tight. The six stitches will gather into a small rosette or disc — this is the center of your spiral. If the center hole is still visible, pull harder on the tail. The rosette should lie flat with stitches radiating outward like petals.
Identify the stitch anatomy for the Oslo stitch
Identify the stitch anatomy for the Oslo stitch
Each completed stitch has two visible elements: a front loop (the arch on top) and a back loop (the strand running behind it). The Oslo stitch (UOO) works through the back loop of the stitch in the previous row. Look at your rosette — each of the six stitches has a distinct back loop running along the underside. These are your targets for the next round.
Work the Oslo stitch into the previous round
Work the Oslo stitch into the previous round
Insert the needle under the back loop of the next stitch in the previous round (going from inside the cup outward). Then bring the needle over the connecting yarn and through the current working loop. Pull the yarn through to complete one Oslo stitch. The path is: Under the back loop, Over the connector, Out through the working loop — UOO.
Continue the second round with increases
Continue the second round with increases
Work one Oslo stitch into each of the six foundation stitches. To keep the fabric flat, work two stitches into every other foundation stitch — this increases the stitch count from 6 to 9. Without increases, the fabric will curl into a cup immediately. For a flat disc (coaster, hat crown), increase every round; for a cup or pouch, increase only in the first two rounds.
Splice in a new length of yarn
Splice in a new length of yarn
When approximately 15 cm of yarn remains, it is time to splice. Cut a new 1.5 m length. Fray the last 3 cm of both the old and new yarn ends by untwisting the plies. Overlap the frayed ends in your palm, add a drop of water, and roll vigorously between your palms for 10–15 seconds. The wool scales will felt together, creating a seamless join with no knot. Tug firmly to test — a good splice holds without slipping.
Thread the new yarn and continue
Thread the new yarn and continue
Thread the needle with the spliced yarn and continue working Oslo stitches into the previous round. The splice should be invisible within two or three stitches as subsequent loops cover the join. This is why wool is the preferred nålbinding fiber — no other natural fiber felts reliably enough for spliced joins.
Work even rounds without increasing
Work even rounds without increasing
After the first two rounds of increases (approximately 12–15 stitches total), stop increasing. Work one Oslo stitch into each stitch of the previous round without adding any extra stitches. The fabric will begin to curve upward, forming the sides of a cup or pouch. Maintain even tension — stitches that are too loose create gaps, too tight and the fabric buckles.
Build the walls to desired height
Build the walls to desired height
Continue working even rounds, splicing new yarn as needed, until the walls reach your desired height — approximately 6–8 cm for a small cup or pouch. Count your stitches periodically to ensure you are not accidentally increasing or decreasing. The fabric should feel dense and slightly stiff compared to knitting — this is correct. Nålbound fabric is naturally thicker because each stitch interlocks in two directions.
Begin decreasing to shape the opening
Begin decreasing to shape the opening
To narrow the top (optional — for a pouch shape), skip every fourth stitch in the previous round. Instead of working into each stitch, insert the needle through two adjacent back loops at once and work them as a single stitch. This decreases one stitch per skip. Spread decreases evenly around the round to avoid lopsided shaping.
Secure the final stitch
Secure the final stitch
When you reach the desired opening size, pass the needle through the last three stitches a second time, pulling snug after each pass. This locks the final row in place. Unlike knitting, nålbinding does not require a separate bind-off — the interlocking structure holds without unraveling. Cut the yarn, leaving a 10 cm tail.
Weave in the tail ends
Weave in the tail ends
Thread each loose tail (starting tail and ending tail) onto the needle and weave it through 4–5 adjacent stitches on the inside of the fabric. Pull gently to match the surrounding tension, then trim the excess close to the surface. The dense interlocking structure hides woven-in tails completely.
Block the finished piece in warm water
Block the finished piece in warm water
Soak the finished piece in warm water (30–40°C) for 10 minutes. Gently squeeze out excess water — do not wring. Shape the cup or pouch with your hands while damp, pressing the base flat and smoothing the walls. Lay on a towel to air-dry. Blocking relaxes the stitches into their final position and gives the fabric a more even appearance. The wool fibers will felt slightly during blocking, making the fabric even denser and more durable.
مواد
1- پلیس ہولڈر
درکار اوزار
2- پلیس ہولڈر
- پلیس ہولڈر
منسلک بلیو پرنٹ مواد

Using a Drop Spindle to Spin Wool — Hand Spinning Yarn
Tex کی طرف سے![]()
کپڑا اور چمڑا

Carding and Combing Raw Wool for Spinning — Preparing Fleece for the Drop Spindle
Tex کی طرف سے![]()
قدیم

Making a Bone Sewing Needle — Splinter and Polish Technique
Tex کی طرف سے![]()
کپڑا اور چمڑا
متعلقہ بلیو پرنٹ
یہ بلیو پرنٹ علم بانٹتے ہیں — تکنیک، مواد یا اصول


CC0 پبلک ڈومین
یہ بلیو پرنٹ CC0 کے تحت جاری کیا گیا ہے۔ آپ اجازت لیے بغیر اس کام کو نقل، ترمیم، تقسیم اور کسی بھی مقصد کے لیے استعمال کرنے کے لیے آزاد ہیں۔
میکر کی حمایت کریں ان کے بلیو پرنٹ کے ذریعے پروڈکٹس خرید کر جہاں وہ میکر کمیشن وینڈرز کی طرف سے مقرر، کماتے ہیں، یا اس بلیو پرنٹ کی نئی تکرار بنائیں اور آمدنی شیئر کرنے کے لیے اسے اپنے بلیو پرنٹ میں کنکشن کے طور پر شامل کریں۔