Forging Roman Square-Shanked Iron Nails — Essential Roman Fastener
ہدایات
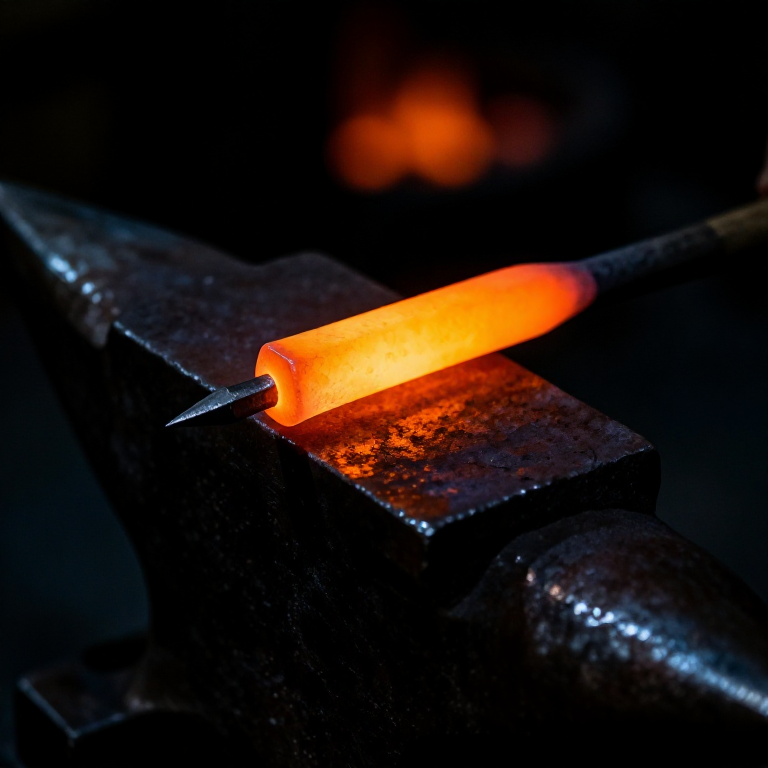
Taper the Nail Point
Taper the Nail Point
Heat the end of a square iron rod to bright orange (approximately 1000 °C) in the forge. Place the heated end on the anvil face and hammer a four-sided taper over the last 4 to 6 cm, rotating the rod 90 degrees between each set of blows to maintain the square cross-section. The taper should end in a blunt point — Roman nails were not needle-sharp but had a robust pyramidal tip that spread wood fibres apart rather than cutting them, which reduced the tendency to split the timber. Work quickly while the iron is hot, returning it to the forge if it drops below dull red. The finished taper should transition smoothly from the full-thickness shank to the point without any abrupt shoulders or cold shuts.
اس مرحلے کے لیے مواد:
درکار اوزار:
 Anvil
Anvil Forge Tongs
Cut the Nail to Length
Cut the Nail to Length
Determine the desired nail length — common Roman construction nails were approximately 7 to 12 cm long. Measure from the tip of the taper and mark the cut point by nicking the rod with the hardy (a chisel set in the anvil's hardy hole). Heat the cut area to bright orange and place the nick over the hardy edge. Strike the rod above the nick with the hammer to cut approximately three-quarters through, then bend the nail free from the parent rod with a twist. The remaining nub of metal at the cut end will be incorporated into the nail head in the next step. Leave this end slightly proud — approximately 5 to 8 mm of extra length beyond the intended shank — to provide material for forming the head.
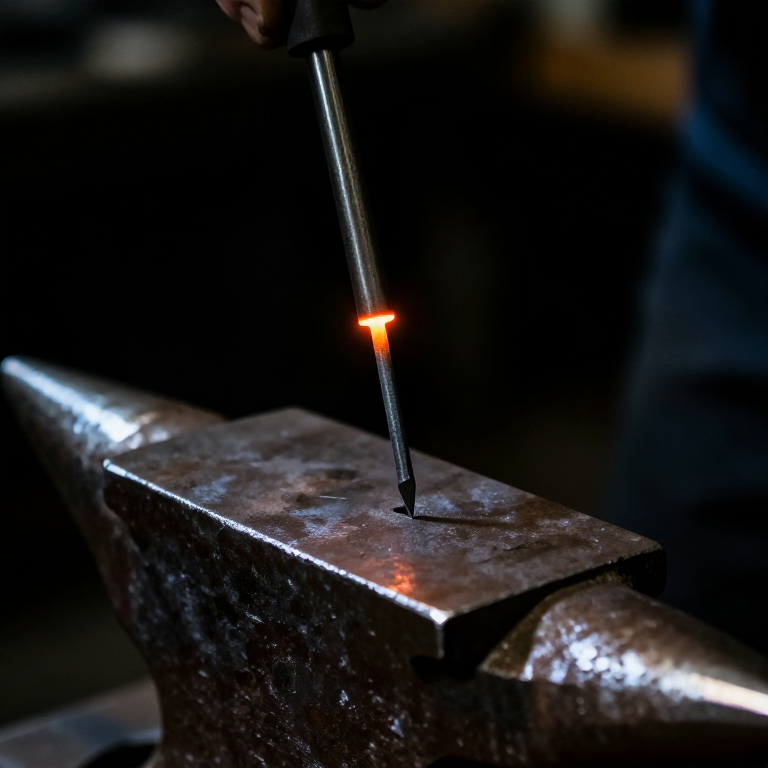
Upset and Form the Head
Upset and Form the Head
Heat the cut end of the nail to bright orange. Insert the nail point-first through the tapered hole in a nail header plate (a thick steel plate with a hole that matches the nail shank size, placed over the pritchel hole or held in a vice). The shank should pass through until only 5 to 8 mm protrudes above the header plate. Strike the protruding end with the hammer face to upset (spread) the metal outward, forming a flat circular head. Rotate the nail slightly between blows to keep the head symmetrical. Three to five firm blows are usually sufficient to form a head approximately twice the shank width in diameter. Lift the nail out of the header by tapping it from below with a punch through the pritchel hole.
Straighten and Inspect
Straighten and Inspect
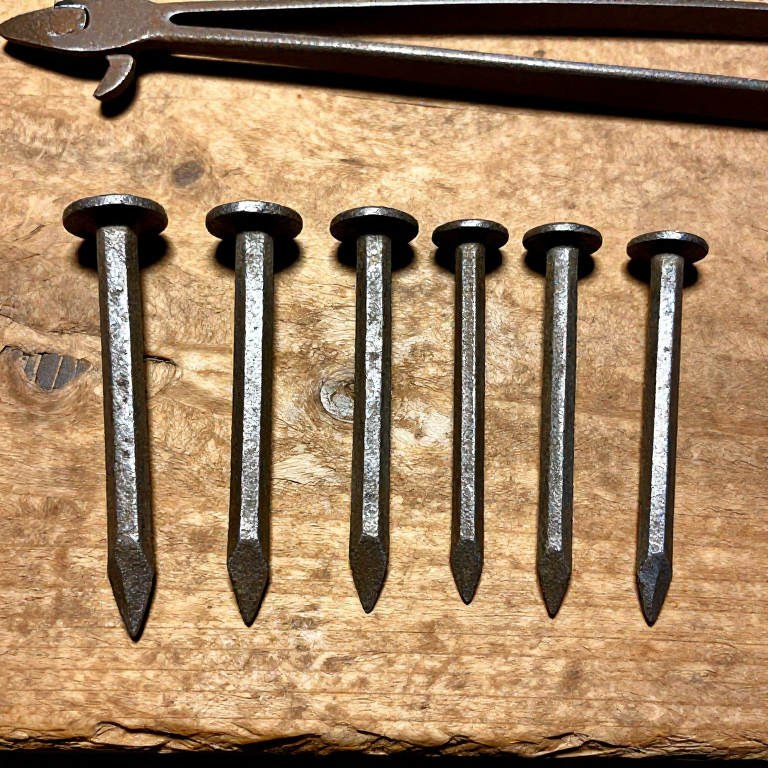
While the nail is still warm, lay it on the anvil face and check for straightness by rolling it — a straight nail will roll smoothly without wobbling. Correct any bends by placing the concave side down on the anvil and tapping the high point with light hammer blows. Inspect the head for cracks — if the metal was too cold when headed, it may have cracked around the edge. A cracked head means the nail must be reforged. Check that the taper is centred and the point is aligned with the shank axis. A well-made nail should stand upright on its head without tipping. An experienced Roman-era smith could produce several hundred nails per day using this method.
Quench and Finish a Batch
Quench and Finish a Batch
Quench the finished nail in water to cool it for handling. Mild steel and wrought iron nails do not require heat treatment — they are not hardened like tool steel. Wire-brush or lightly file any heavy scale from the surface if desired, though Roman nails were typically used as-forged with their black oxide scale intact, which actually provides some corrosion resistance. Repeat the process to forge a batch of nails. For efficiency, many smiths would taper several rods in sequence, then cut and head them in a second pass, maintaining a rhythm with the forge. The Inchtuthil hoard demonstrates the astonishing scale of Roman nail production — the nails were buried to deny them to the enemy, as iron was a strategic material in the Roman military supply chain.
مواد
1- 30 cm per nail, 8-10 mm sq pieceپلیس ہولڈر
درکار اوزار
6- پلیس ہولڈر
- پلیس ہولڈر
- پلیس ہولڈر
- پلیس ہولڈر
Required Equipment
Equipment this kind of build typically needs — buy from any maker below.
- CriticalWelding Mask·
 MIG Welder
 Auto-Darkening Welding Helmet
 Welding Principles Manual
 Welding Gloves
 Battery Spot Welder
 Welding Fire Watch Kit
 - RecommendedAngle Grinder·
 Die Grinder
 Bench Grinder
 Bench Grinder (6-inch)
 Bench Grinder Wheel Set (6-inch)
 Angle Grinder
 Meat Grinder
 - RecommendedBench Vise·
 Bench Vise (4-inch, Cast Iron)
 Milling Vise (4-inch, Precision)
 Heavy Bench Vice
 Bench Vise
 Milling Vise
 Bench Vise Press Attachment
 - RecommendedDust Mask / Respirator·
 Full-Face Gas Mask (ABEK multi-gas cartridge)
 Dust Mask
 Venetian Mask Blank (Papier-Mache)
 Full-Face Respirator
 Respirator Fit Test Kit
 Respirator with Acid Gas Cartridge
 - RecommendedSafety Glasses·
 Safety Sign (Caution/Warning)
 Splash-Proof Safety Goggles
 Reflective Safety Vest Kit (DIY)
 Chemical Splash Goggles
 Safety Netting for Rockfall
 Steel-Toed Safety Boots
 - RecommendedWork Gloves·
 Boxing Gloves (Training)
 Leather Gauntlet Gloves
 Cotton GlovesWelding Gloves
 Heavy-Duty Gloves
 Leather Work Gloves
 - OptionalFire Extinguisher·
 ABC Fire Extinguisher
 Fire Extinguisher
 - OptionalFirst Aid Kit·
 First Aid Kit
 Mountain First Aid Kit (Altitude)
 Workshop First Aid Kit
 Bow Release Aid
You can swap these in
Can't get one of the materials? Swap it for an equivalent — these work just as well.
- Instead of Cross Peen Hammer, try:
 Dead Blow Hammer
 Forge Hammer (Cross-Peen)
 Raising Hammer
 - Instead of Forge Tongs, try:
 Long-Handled Tongs
 Jar Tongs
 Crucible Tongs (long-handled)
 Long-Handled Fire Tongs
 - Instead of Steel Wire, try:
 Tie Wire
 Thin Brass Wire (for cleaning spouts)
 Slip Ring - 6 Wire (2A)
 Bezel Wire
 Bronze Wire
Recommended for this build
Products makers often use with builds like this one.
Forge Hammer (Cross-Peen)Used together and in similar builds CharcoalUsed together and in similar builds
 Quench BucketUsed together and in similar builds
 Bloom Iron (Sponge Iron)Used together and in similar builds
 Mild Steel SheetUsed together and in similar builds
 Drill PressUsed together and in similar builds
 Files (Hand File)Used together and in similar builds
 BellowsUsed together and in similar builds
Related blueprints
Other builds that share materials, tools, or techniques with this one.


CC0 پبلک ڈومین
یہ بلیو پرنٹ CC0 کے تحت جاری کیا گیا ہے۔ آپ اجازت لیے بغیر اس کام کو نقل، ترمیم، تقسیم اور کسی بھی مقصد کے لیے استعمال کرنے کے لیے آزاد ہیں۔
میکر کی حمایت کریں ان کے بلیو پرنٹ کے ذریعے پروڈکٹس خرید کر جہاں وہ میکر کمیشن وینڈرز کی طرف سے مقرر، کماتے ہیں، یا اس بلیو پرنٹ کی نئی تکرار بنائیں اور آمدنی شیئر کرنے کے لیے اسے اپنے بلیو پرنٹ میں کنکشن کے طور پر شامل کریں۔