Reading a Soft Potentiometer — SIK Circuit 10
ہدایات
Parts & Introduction
Parts & Introduction
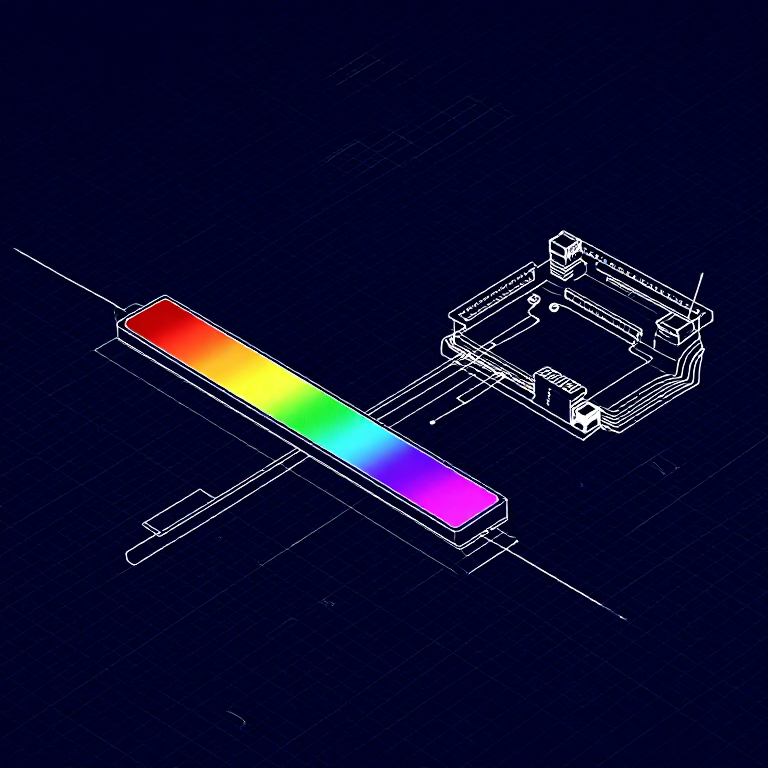
A soft potentiometer is a thin, flexible strip that acts as a variable resistor based on where you press. Combined with an RGB LED, you can create an intuitive color picker — slide your finger to change colors!
Parts Needed
- 1x Arduino Uno + USB cable
- 1x Breadboard
- 1x Soft Potentiometer
- 1x RGB LED (Common Cathode)
- 3x 330Ω Resistors
- 1x 10KΩ Resistor (pull-down)
- 9x Jumper Wires
اس مرحلے کے لیے مواد:
 SparkFun Inventors Kit - V3.21 kit
 RGB LED (Common Cathode)1 piece
 330 Ohm Resistor3 pieces10K Ohm Resistor1 piece
 Jumper Wires8 pieces
درکار اوزار:
Hardware Hookup
Hardware Hookup
Wiring Instructions
Soft Potentiometer
- Connect the middle pin to Analog Pin A0.
- Connect one side pin to 5V.
- Connect the other side pin to GND.
- Add a 10K pull-down resistor from Analog Pin A0 to GND.
RGB LED (pin order from flat edge: Red, GND, Green, Blue)
- Connect Red through 330Ω resistor to Pin 9.
- Connect GND (longest pin) to GND rail.
- Connect Green through 330Ω resistor to Pin 10.
- Connect Blue through 330Ω resistor to Pin 11.
اس مرحلے کے لیے مواد:
RGB LED (Common Cathode)1 piece330 Ohm Resistor3 pieces10K Ohm Resistor1 pieceJumper Wires8 piecesArduino Code
Arduino Code
Open the Arduino IDE and upload the following sketch to your Arduino board.
اس مرحلے کے لیے مواد:
درکار اوزار:
Test & Experiment
Test & Experiment
What You Should See
The RGB LED changes color as you slide your finger along the soft potentiometer strip. The color smoothly transitions through the spectrum: red → green → blue → red.
Troubleshooting
- LED dark or wrong color: Four pins close together are easy to misplace. Verify each RGB LED connection.
- Bizarre color jumps: Pressing the soft pot in multiple spots simultaneously gives unpredictable results. Use one finger.
Experiments to Try
- Add Serial output to see the raw sensor values as you slide.
- Map the soft pot to servo position instead of color.
مواد
8- $105.00
- پلیس ہولڈر
- $3.00
- $3.00
CC0 پبلک ڈومین
یہ بلیو پرنٹ CC0 کے تحت جاری کیا گیا ہے۔ آپ اجازت لیے بغیر اس کام کو نقل، ترمیم، تقسیم اور کسی بھی مقصد کے لیے استعمال کرنے کے لیے آزاد ہیں۔
میکر کی حمایت کریں ان کے بلیو پرنٹ کے ذریعے پروڈکٹس خرید کر جہاں وہ میکر کمیشن وینڈرز کی طرف سے مقرر، کماتے ہیں، یا اس بلیو پرنٹ کی نئی تکرار بنائیں اور آمدنی شیئر کرنے کے لیے اسے اپنے بلیو پرنٹ میں کنکشن کے طور پر شامل کریں۔