فن
خوبصورتی اور تندرستی
دستکاری
ثقافت اور تاریخ
تفریح
ماحول
خوراک اور مشروبات
ریورس انجینئرنگ
سائنسز
کھیل
ٹیکنالوجی
پہننے والے آلات
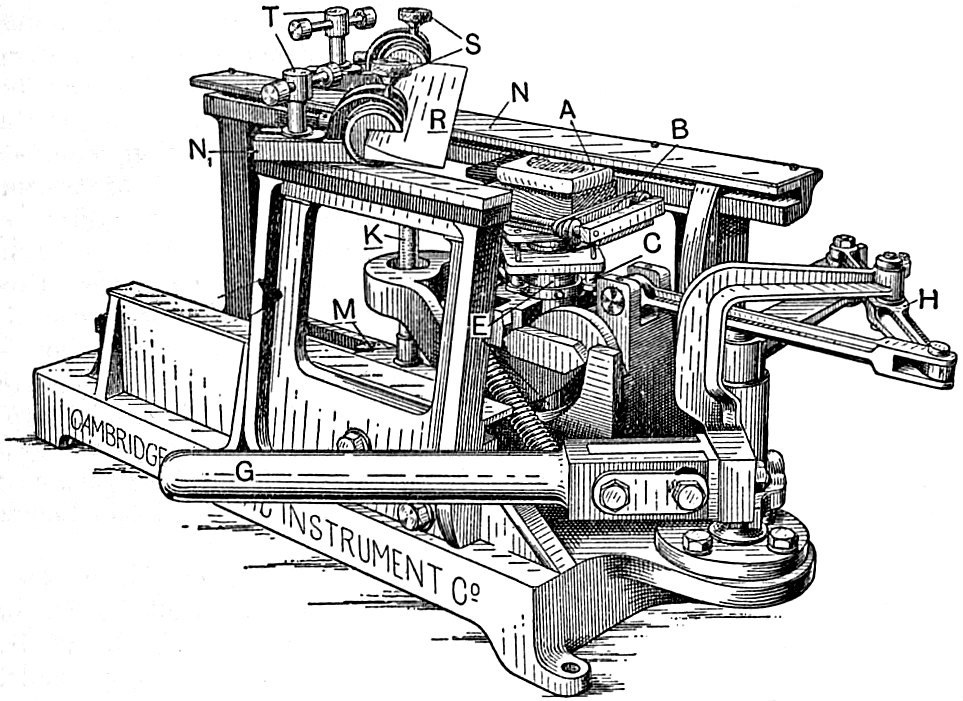


The Microtome: Cutting Sections Thin Enough to See Through
Hand-sectioning with a razor, already published here, gets a skilled worker down to perhaps 50 micrometres on a good day and a co-operative stem. That is thin enough for plant anatomy and hopelessly thick for anything else — five or ten cells stacked on top of one another, all in focus at once, all overlapping.
A microtome replaces the steady hand with a screw. The specimen advances by a fixed amount, the blade sweeps past, and the thickness is whatever the screw was set to — every time, for hundreds of sections in a row. Charles Minot's rotary design of 1886 is still the shape of the machine in every histology laboratory today.
The hard part is not the mechanism. It is holding something soft and wet rigidly enough to be cut at ten micrometres, which is why half this blueprint is about the wax.
اعلیٰ
2 days
ہدایات
1
1
Build the advance mechanism around a fine screw
Build the advance mechanism around a fine screw
Mount the specimen holder on a carriage driven by a fine-pitch screw, with a graduated knob. A metric M6×0.5 screw advances 500 micrometres per turn, so a knob divided into 50 marks gives 10 micrometres per mark.
Work out your own numbers from the pitch you actually have and engrave them. And eliminate backlash: always approach the setting from the same direction, because the slack in a screw thread is easily 20 or 30 micrometres, which is larger than every section you are trying to cut.
درکار اوزار:
 پیمانہ
2
2
Make the blade path rigid, not just sharp
Make the blade path rigid, not just sharp
Clamp the blade in a heavy holder that slides on a flat, well-supported way, with the edge set at a shallow clearance angle of a few degrees to the block face.
Any flex in the blade or its mount turns into a thickness variation, and a section that starts at 10 micrometres and ends at 25 is worse than useless because you cannot tell which. Rigidity matters more than sharpness here — a merely sharp blade on a solid mount beats a razor-sharp one that springs.
اس مرحلے کے لیے مواد:
 استرے کا پھل10 ٹکڑے
3
3
Infiltrate the specimen with wax
Infiltrate the specimen with wax
After fixing and dehydrating, move the specimen through a solvent the wax will mix with, then into melted paraffin held just above its melting point, for several hours with two or three changes of clean wax.
This is the step that decides everything. The wax must replace the solvent inside every cell, not merely coat the outside — a block that is waxy outside and soft inside tears, compresses and crumbles rather than sectioning. Keep the wax barely molten: too hot and the tissue hardens and goes brittle, which ruins it just as thoroughly in the other direction.
اس مرحلے کے لیے مواد:
 پیرافین موم500 گرام
 ایتھینول - تجربہ گاہ درجہ، 95 %300 ملی لیٹر
درکار اوزار:
 گرم پلیٹ
 بوروسلیکیٹ بیکر
 شیشے کا مرتبان
4
4
Cast and trim the block
Cast and trim the block
Pour the specimen and wax into a small mould, orient it, and cool it quickly — floating the mould on cold water works well. Then trim the block to a small trapezium with the parallel edges top and bottom.
Fast cooling gives fine wax crystals and a block that cuts cleanly; slow cooling grows coarse crystals that shatter. The trapezium shape is not decoration: parallel leading and trailing edges are what make consecutive sections stick together into a ribbon, and a ribbon is how you keep serial sections in order.
اس مرحلے کے لیے مواد:
پیرافین موم200 گرامدرکار اوزار:
 نشتربوروسلیکیٹ بیکر
5
5
Cut a ribbon, and float it flat
Cut a ribbon, and float it flat
Cut steadily at an even speed and let the sections adhere edge to edge into a ribbon. Float the ribbon onto warm water — around 45 °C — and watch the compression creases relax out.
Every section comes off the knife compressed in the direction of cutting, sometimes by a tenth of its length. Warm water lets the wax relax and the section expand back to its true shape. Too hot and it melts; too cool and the creases stay. Then lift it onto a slide and dry it flat.
اس مرحلے کے لیے مواد:
 خوردبینی سلائیڈیں اور ڈھکن20 ٹکڑے
درکار اوزار:
بوروسلیکیٹ بیکرگرم پلیٹ6
6
Practise on elder pith before anything precious
Practise on elder pith before anything precious
Elder pith is the traditional practice material and the traditional support: split a piece of hollow elder branch, clamp a small specimen inside the pith, and section the whole thing together.
The pith is soft, uniform and free, so you can waste twenty attempts learning what an even cutting stroke feels like. It also solves the problem of sectioning something too small or too floppy to clamp — a leaf, a hair, a thin root — by giving it a rigid sleeve that cuts at the same rate it does.
اس مرحلے کے لیے مواد:
 ایلڈر کی ٹہنی (کھوکھلی)2 ٹکڑے
 کارک5 ٹکڑے
 آلو1 ٹکڑا
درکار اوزار:
نشتراسترے کا پھل7
7
How thin is thin enough
How thin is thin enough
Jupyter نوٹ بک لوڈ ہو رہی ہے…
درکار اوزار:
پیمانہ8
8
Diagnose the faults from the section
Diagnose the faults from the section
Sections tell you what is wrong. Thick-and-thin alternating bands mean the block or blade is vibrating — chatter. Sections that curl and will not ribbon mean the block is too cold or the clearance angle is too large.
Crumbling means the wax did not infiltrate. Scratches in the same place on every section mean a nick in the blade — move the block to a fresh stretch of edge. Learning to read these is faster than guessing, and every one of them has a specific cause rather than a general lack of skill.
درکار اوزار:
 خردبین
مواد
7- 10 ٹکڑےپلیس ہولڈر
- 500 گرامپلیس ہولڈر
- 300 ملی لیٹرپلیس ہولڈر
- 20 ٹکڑےپلیس ہولڈر
- 2 ٹکڑےپلیس ہولڈر
- 5 ٹکڑےپلیس ہولڈر
- 1 ٹکڑاپلیس ہولڈر
یہ بلوپرنٹ بناتا ہے
متعلقہ بلیو پرنٹ
یہ بلیو پرنٹ علم بانٹتے ہیں — تکنیک، مواد یا اصول

CC0 پبلک ڈومین
یہ بلیو پرنٹ CC0 کے تحت جاری کیا گیا ہے۔ آپ اجازت لیے بغیر اس کام کو نقل، ترمیم، تقسیم اور کسی بھی مقصد کے لیے استعمال کرنے کے لیے آزاد ہیں۔
میکر کی حمایت کریں ان کے بلیو پرنٹ کے ذریعے پروڈکٹس خرید کر جہاں وہ میکر کمیشن وینڈرز کی طرف سے مقرر، کماتے ہیں، یا اس بلیو پرنٹ کی نئی تکرار بنائیں اور آمدنی شیئر کرنے کے لیے اسے اپنے بلیو پرنٹ میں کنکشن کے طور پر شامل کریں۔