Współpraca
SZTUKA
Piękno i dobre samopoczucie
RZEMIOSŁO
KULTURA I HISTORIA
ROZRYWKA
ŚRODOWISKO
JEDZENIE I NAPOJE
INŻYNIERIA ODWROTNA
NAUKI
LEKKOATLETYKA
TECHNOLOGIA
URZĄDZENIA DO NOSZENIA
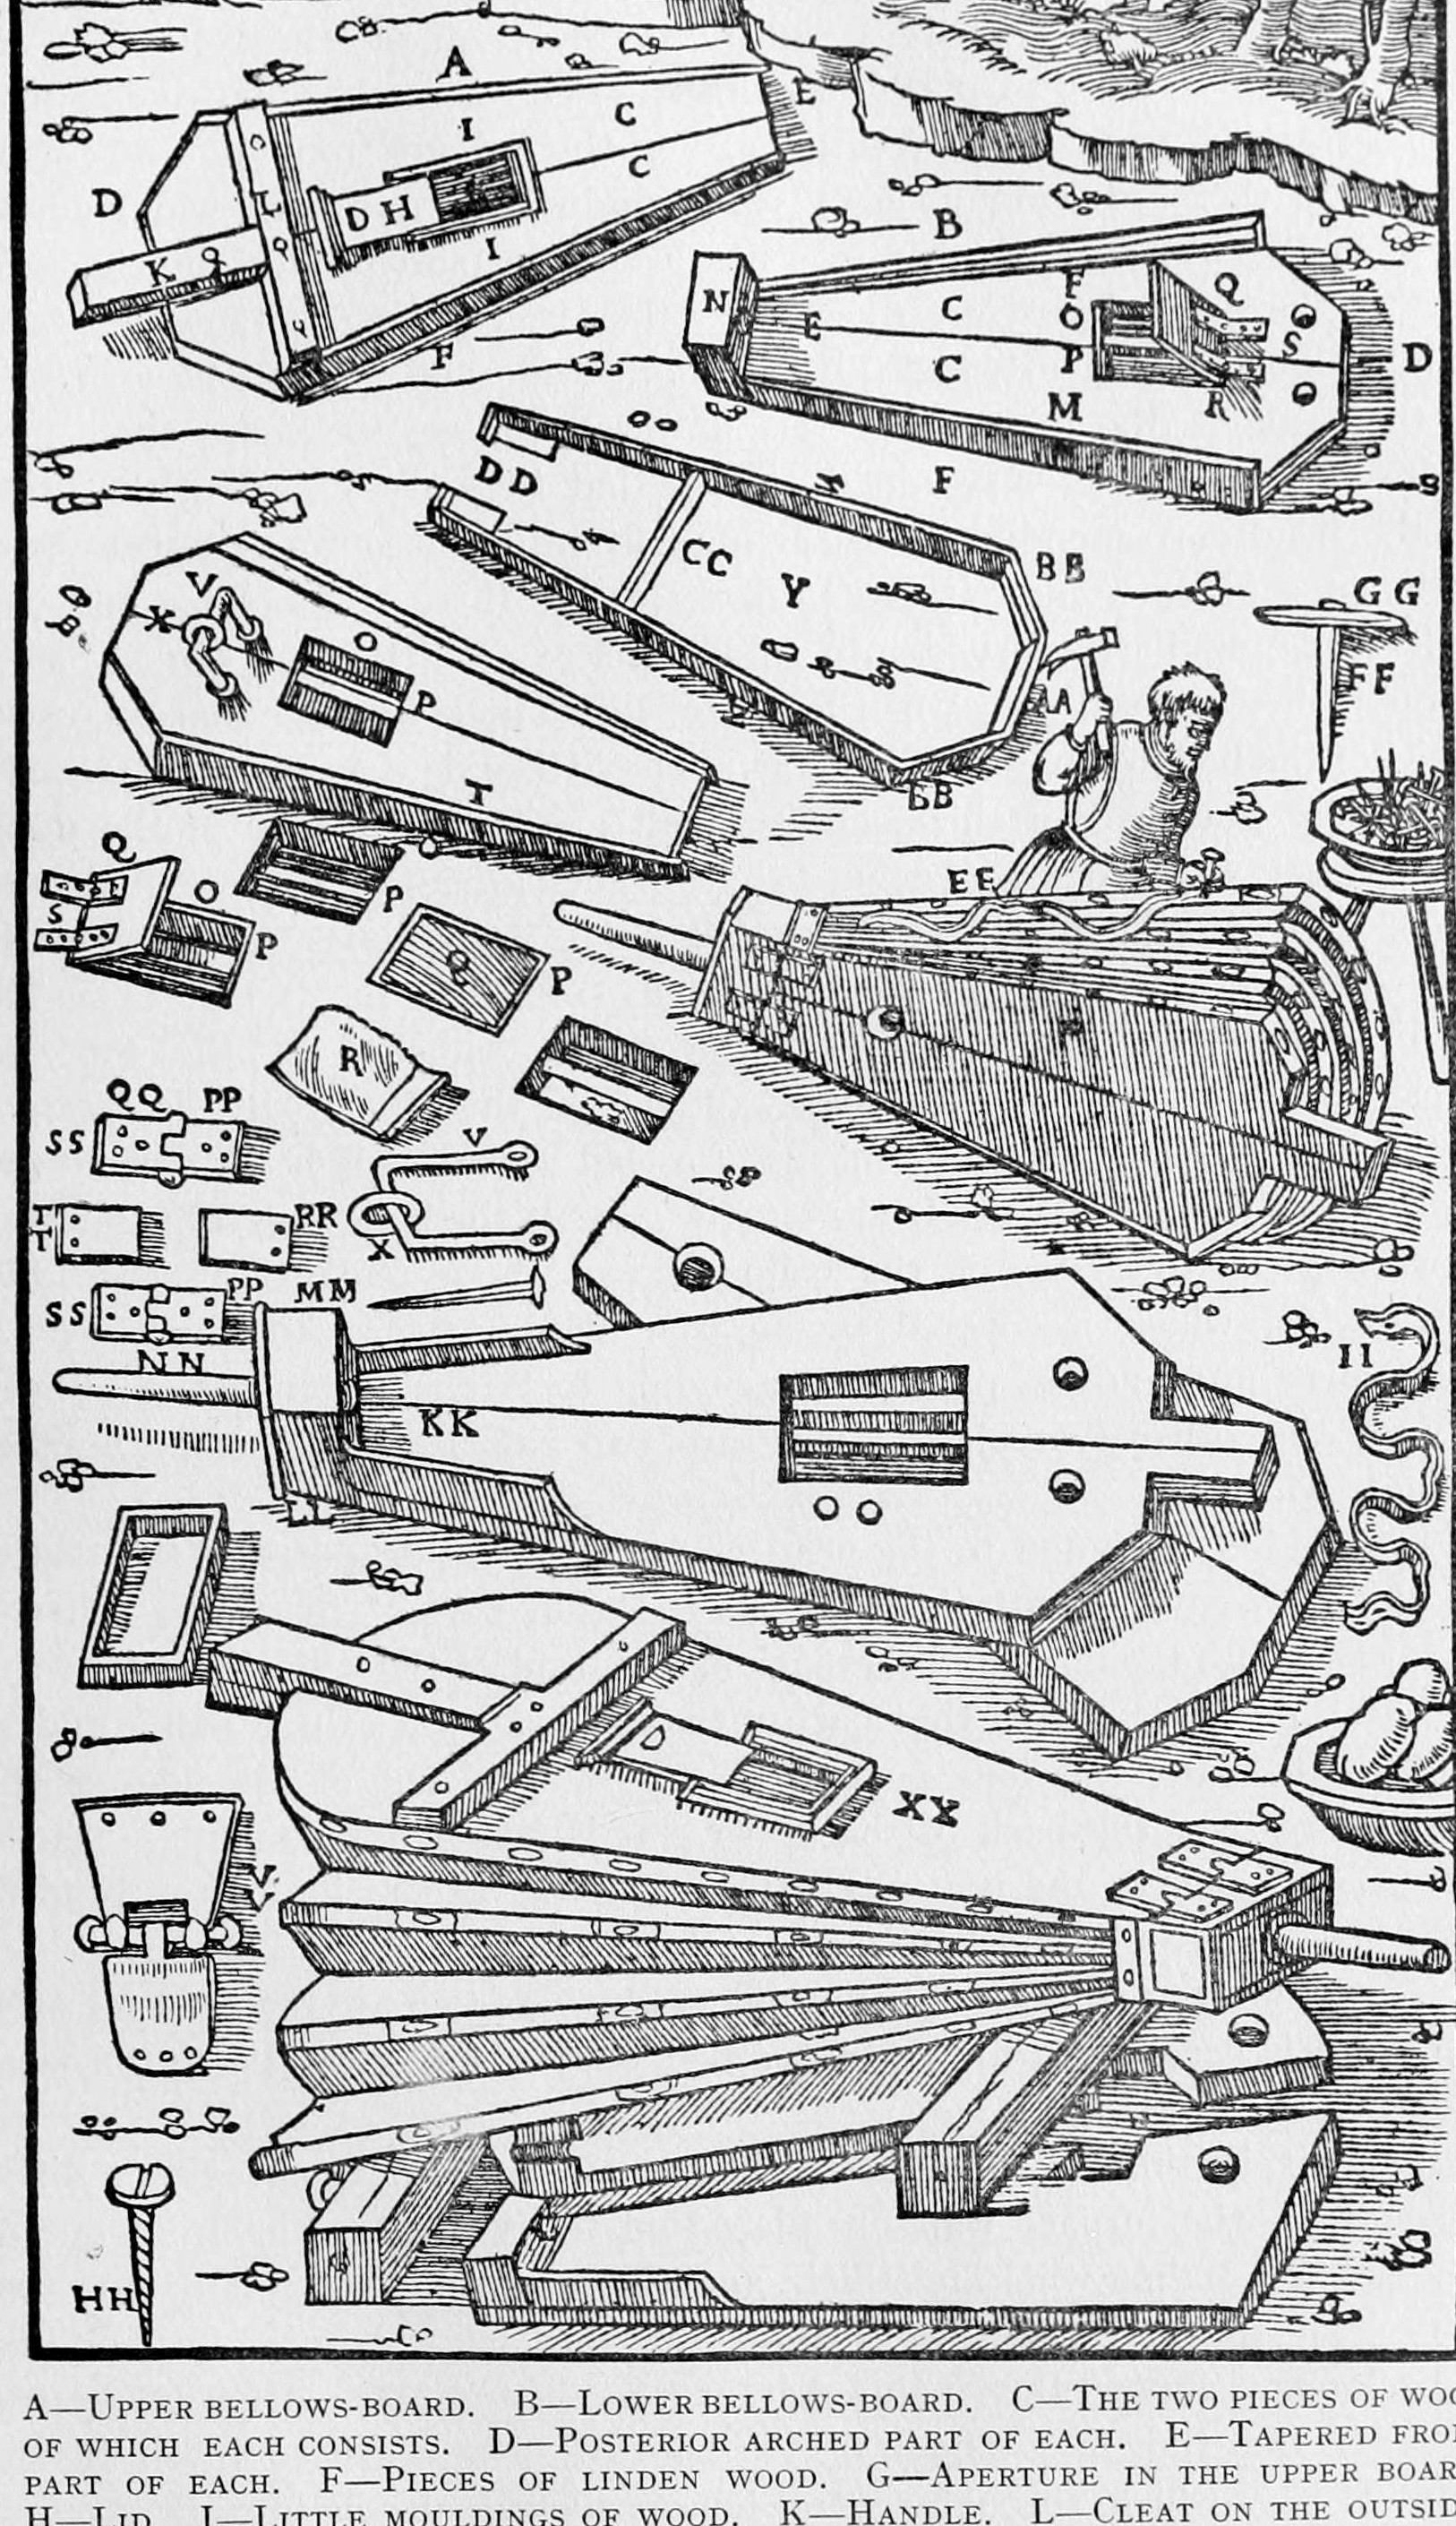


Great Bellows of the Smelting Works: Pine Boards, Linden Bows, Ox-Hide and Iron Nozzle (Agricola, 1556)
The large blast bellows of a 16th-century smelting works, every part measured, from Agricola's De Re Metallica, Book IX (1556): two tapered boards of glued pine edged with linden, about 1.7 m long, two linden bows, two ox-hides nailed on with T-headed nails, a goatskin flap valve in the lower board, and a glued head carrying a 3 ft iron nozzle.
Zaawansowany
About 2 weeks
Instrukcje
1
1
Roman units in metric
Roman units in metric
Wczytywanie notatnika Jupyter…
2
2
Read De Re Metallica, Book IX
Read De Re Metallica, Book IX
"Each bellows consists of a body and a head. The body is composed of two 'boards', two bows, and two hides."
3
3
Make the upper board
Make the upper board
Glue two pieces of pine into a board a palm thick, 5 ft 3 palms long, 2-1/2 ft wide at the back (sides a little curved) and a cubit wide at the front, tapering to the head. Glue on linden edge strips, 7 digits wide at the back and 1-1/2 at the front, to take the nails. Cut an aperture 6 by 4 digits in the middle, 1 ft 3 palms from the head, with a sliding lid 2 palms 1 digit square and 3 digits thick running in mouldings a palm wide and 3 digits thick (or bore 2-3 round holes with plugs). Glue and peg a handle 7 palms or longer (2 palms wide, 1 thick on the board; rounded and 7 digits thick beyond), with a 2 ft cleat 2 palms wide and a palm thick over it and another 2 ft cleat underneath, 3 palms from the end.
Materiały do tego kroku:
 Deska sosnowa2 sztuk
 Płytka lipowa1 sztuka
 Klej skórny1 sztuka
 Kołek drewniany1 sztuka
Potrzebne narzędzia:
 Piła ręczna
 Strug ręczny
 Dłuta
 Świder korbowy z wiertłem
 Ścisk stolarski listwowy
4
4
Make the lower board and flap valve
Make the lower board and flap valve
Make the lower board the same way and a cubit longer (the extra length is part of the head). About a cubit from the back, centred, cut an air-hole a foot long and 3 palms wide, leaving a rib a palm long and 1/3 digit wide across it. Make the flap a foot 3 digits by 3 palms 3 digits of thin board covered with goatskin, hair toward the ground, hinged with a doubled strip of leather a palm wide nailed to it and tied through two holes 7 digits apart. A foot beyond, fix a slightly elliptical iron ring 2 palms by 1 on a staple, 3 palms from the back, for the wooden bolt that holds the board to its frame (or use two iron screws).
Materiały do tego kroku:
Deska sosnowa2 sztukPłytka lipowa1 sztukaKlej skórny1 sztuka Surowa skóra kozia1 sztuka
 Rzemień skórzany1 sztuka
 Pierścień metalowy1 sztuka
 Gwoździe1 sztuka
Potrzebne narzędzia:
Piła ręcznaDłutaŚwider korbowy z wiertłem Młotek
5
5
Make the bows
Make the bows
Make each bow as long as the upper board from four pieces of linden 3 digits thick: two long pieces 7 digits wide at the back and 2-1/2 at the front, a back piece 2 palms wide, its ends a little over a digit thick, bent to meet the long pieces, mortised, bored and pegged with glued pegs. Mortise in a crossbar a cubit from the head, a foot long without tenons and a palm 2 digits wide. Glue and peg two small pieces, 3 palms 2 digits long, a palm high and a digit thick, at the head to keep the bow ends off the air passage.
Materiały do tego kroku:
Płytka lipowa2 sztukKlej skórny1 sztukaKołek drewniany1 sztukaPotrzebne narzędzia:
Piła ręcznaDłutaŚwider korbowy z wiertłem Pobijak drewniany
6
6
Make the head and nozzle
Make the head and nozzle
Glue the upper head board, a cubit long and 1-1/2 palms thick, onto the lower board's extension (a palm and a digit thick). Shape it a cubit wide at the back, 2 digits narrower 3 palms forward, then round the front to 2 palms 2 digits across and bind it with an iron ring 3 digits wide. Bore it for the nozzle: a pipe of thin iron plate 3 ft long, 3 digits across in front and a palm high by 2 palms wide at the back.
Materiały do tego kroku:
Deska sosnowa1 sztukaKlej skórny1 sztuka Blacha żelazna (kuta)1 sztukaPierścień metalowy1 sztuka
Potrzebne narzędzia:
Piła ręcznaŚwider korbowy z wiertłem Palenisko kowalskie
 KowadłoMłotek
7
7
Hide the bellows
Hide the bellows
Use ox-hide (far better than horse), two hides each 3-1/2 ft wide at the back. Lay a long leather thong along each board and bow and nail the hide through it with T-shaped iron nails 5 digits long, horns 2-1/2 digits long and half a digit wide, the horn of one nail almost touching the next along the boards; on each bow two nails in the back piece and four in each long piece, ten in all. Pine strips nailed over the hide on the long pieces guard against tearing; iron screws through strips over the hide hold even better.
Materiały do tego kroku:
 Skóra garbowana roślinnie2 sztukRzemień skórzany1 sztukaGwoździe1 sztuka
Potrzebne narzędzia:
Młotek Nóż do skóry
 Nożyczki
8
8
Troubleshooting
Troubleshooting
Bellows troubleshooting.
Flow
Loading...
9
9
History and honest limits
History and honest limits
From Georgius Agricola, **De Re Metallica** (1556), Book IX, translated by Herbert C. and Lou H. Hoover, 1912 (checked on the archive.org scan georgiusagricola00agri, pp. 362-365). The frame and the machinery that work the bellows are not covered here. The metric conversions (digit ~1.85 cm, palm ~7.4 cm, Roman foot ~29.6 cm, cubit ~44.4 cm) and the tools are ours.
Materiały
10- 2 sztukZastępnik
- 2 sztukZastępnik
- 1 sztukaZastępnik
- 1 sztukaZastępnik
- 1 sztukaZastępnik
- 2 sztukZastępnik
- 1 sztukaZastępnik
- 2 sztukZastępnik
- 1 sztukaZastępnik
- 2 sztukZastępnik
Wymagane narzędzia
11- Zastępnik
- Zastępnik
- Zastępnik
- Zastępnik
- Zastępnik
- Zastępnik
- Zastępnik
- Zastępnik
- Zastępnik
- Zastępnik
- Zastępnik
Według tego planu powstaje
Powiązane blueprinty
Te blueprinty dzielą się wiedzą — technikami, materiałami lub zasadami
CC0 Domena publiczna
Ten plan jest udostępniany na licencji CC0. Możesz go swobodnie kopiować, modyfikować, rozpowszechniać i wykorzystywać do dowolnych celów, bez konieczności uzyskiwania zgody.
Wesprzyj Makera kupując produkty przez jego plan, za co zarabia Prowizja Makera ustalony przez sprzedawców, lub stwórz nową iterację tego planu i dołącz go jako połączenie w swoim własnym planie, aby dzielić się przychodami.