Współpraca
SZTUKA
Piękno i dobre samopoczucie
RZEMIOSŁO
KULTURA I HISTORIA
ROZRYWKA
ŚRODOWISKO
JEDZENIE I NAPOJE
INŻYNIERIA ODWROTNA
NAUKI
LEKKOATLETYKA
TECHNOLOGIA
URZĄDZENIA DO NOSZENIA
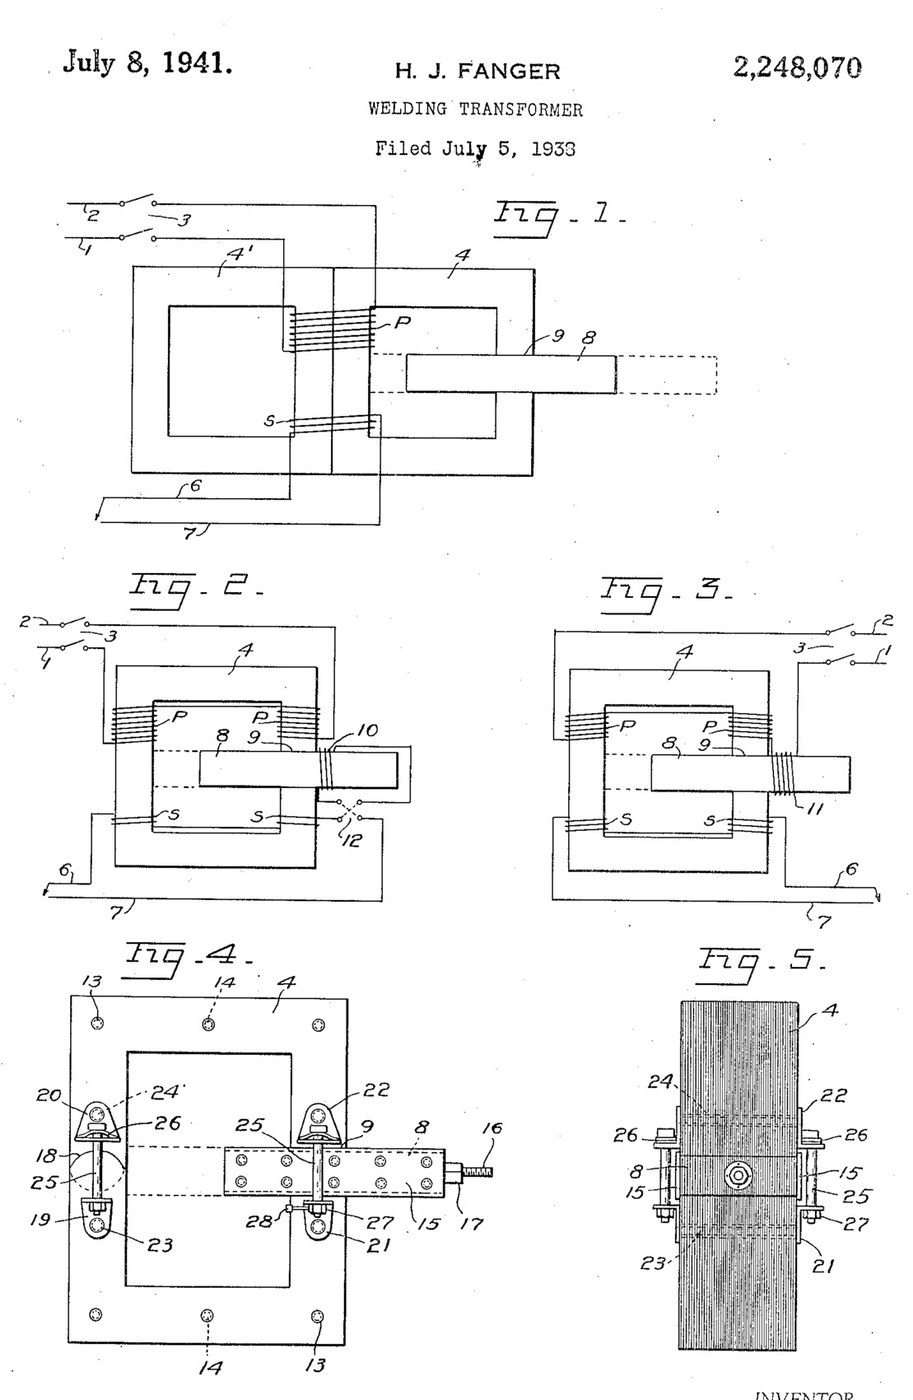


Arc Welder: AC Transformer with a Sliding Shunt Core (Fanger, US 2,248,070)
An AC arc welder is a step-down transformer whose current can be turned up and down. H. J. Fanger (US 2,248,070, 1941) cuts a gap through one leg of a laminated ring core and slides a laminated iron shunt bar through it: pushed in, it carries flux past the secondary and lowers the welding current; pulled out, the current rises.
For arc welding he gives about 60 to 68 volts open circuit, 15 to 200 amps, dropping to 38 or 40 volts at the working arc, with a small coil on the shunt bar in series with the secondary.
Source: H. J. Fanger, "Welding Transformer", US Patent 2,248,070 (filed 1938, granted 1941). Picture: its Figs. 1-5.
Zaawansowany
Unknown
Instrukcje
1
1
Read Fanger
Read Fanger
"With arc welding, infinite control of the volume of the secondary current, between maximum and minimum is obtained by adjustment of the slidable shunt core without altering the welding characteristics of the current, also better ignition of the arc is had at a given voltage, and greater stability of the arc".
2
2
Stack the core
Stack the core
Build a single rectangular ring core of insulated iron laminations, held together with brass (or insulated) bolts or rivets in insulating tubes (Fig. 4). Cut a gap straight through one leg, accurately machined and finished, and make a circular joint through the opposite leg with the segments staggered to overlap in successive laminations. Core size, lamination iron and thickness are not given (ours: the tools).
Materiały do tego kroku:
 Nieznany metal1 iron laminations
 Zestaw śrub sześciokątnych1 brass bolts
 Nieznany materiał izolacyjny1 insulating tubes
Potrzebne narzędzia:
 Nożyce do blachy
 Wiertarka stołowa
 Zestaw wierteł
 Pilniki (pilnik ręczny)
 Nieznane wymiary
3
3
Make the shunt bar
Make the shunt bar
Make the sliding shunt section of the same laminated iron, a snug fit in the gap with its laminations edge-to-edge with the core's, and long enough to fill the gap at every position. Sheath both sides with a slightly wider plate of Bakelite that overlaps the edges of the gap to guide it. Fit a threaded rod on its outer end, working in a nut fixed to the section (or move it by hand, with calibration marks along one edge).
Materiały do tego kroku:
Nieznany metal1 shunt laminations Bakelit2 side platesZestaw śrub sześciokątnych1 brass bolts
 Pręt gwintowany1 sztuka
 Nakrętka sześciokątna1 sztuka
Potrzebne narzędzia:
Wiertarka stołowaZestaw wiertełPilniki (pilnik ręczny)4
4
Wind the coils
Wind the coils
Wind the primary and secondary windings on both legs of the core (Fig. 2), in series or in parallel to suit the line voltage and the current wanted. Wind a small auxiliary coil round the shunt bar's path, fixed so the bar slides through it, and connect it in series with the secondary through a reversing switch (some jobs weld better with the current through it one way). Turns and wire sizes are not given.
Materiały do tego kroku:
 Drut miedziany1 insulation and size not given
Potrzebne narzędzia:
Nieznane wymiary5
5
Spring the joints
Spring the joints
On both sides of the gap and of the circular joint fit pairs of confronting angle plates, held by brass bolts in insulating sleeves and drawn together by spring bolts whose heads rest on slightly arched spring plates, so the joints close snugly on the sliding bar. A small lever on the gap-joint nut gives a half turn to release the bar for moving. The angle-plate material is not given.
Materiały do tego kroku:
 Nieznany materiał4 angle platesZestaw śrub sześciokątnych1 brass and spring boltsNieznany materiał izolacyjny1 sleeves
 Taśma ze stali sprężynowej1 arched spring platesNakrętka sześciokątna4 sztuk
Potrzebne narzędzia:
Wiertarka stołowaZestaw wierteł Klucz nastawny
6
6
Connect and set
Connect and set
Connect the primary to the line through a line switch, and the secondary leads to the electrode holder and the work. Pull the shunt bar out for more current, push it in for less: Fanger gives about 60-68 volts open circuit and 15-200 amps, dropping to 38-40 volts at the arc.
Materiały do tego kroku:
 Wyłącznik zasilania1 line switch
Potrzebne narzędzia:
Klucz nastawnyMateriały
10- 1 shunt laminationsZastępnik
- 1 brass and spring boltsZastępnik
- 1 sleevesZastępnik
- 2 side platesZastępnik
- 1 sztukaZastępnik
- 5 sztukZastępnik
- 1 insulation and size not givenZastępnik
- 4 angle platesZastępnik
- 1 arched spring platesZastępnik
- 1 line switchZastępnik
Według tego planu powstaje

CC0 Domena publiczna
Ten plan jest udostępniany na licencji CC0. Możesz go swobodnie kopiować, modyfikować, rozpowszechniać i wykorzystywać do dowolnych celów, bez konieczności uzyskiwania zgody.
Wesprzyj Makera kupując produkty przez jego plan, za co zarabia Prowizja Makera ustalony przez sprzedawców, lub stwórz nową iterację tego planu i dołącz go jako połączenie w swoim własnym planie, aby dzielić się przychodami.