Współpraca
SZTUKA
Piękno i dobre samopoczucie
RZEMIOSŁO
KULTURA I HISTORIA
ROZRYWKA
ŚRODOWISKO
JEDZENIE I NAPOJE
INŻYNIERIA ODWROTNA
NAUKI
LEKKOATLETYKA
TECHNOLOGIA
URZĄDZENIA DO NOSZENIA
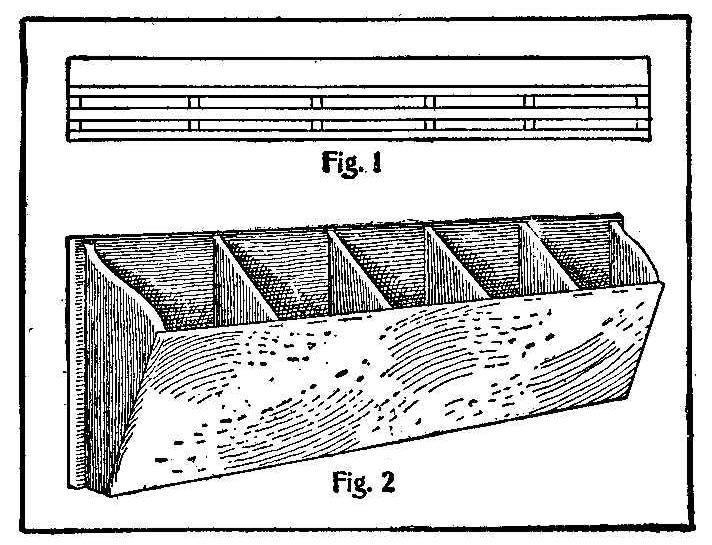


Closet Shoe Rack: Wedge-Shaped Pockets on the Wall With a Slatted Bottom for Dirt to Fall Through (Boy Mechanic, 1913)
A shoe rack "that can be placed on the wall in the clothes closet", from The Boy Mechanic (1913): two boards 9 in wide and about 3 ft long, held apart by six wedge-shaped partitions so the pockets open wider at the top, and a slatted bottom that lets the dirt fall through. Sizes are the book's.
Contributed to Popular Mechanics by Guy H. Harvey of Mill Valley, California.
Początkujący
About 2 hours
Instrukcje
1
1
The partitions
The partitions
Wczytywanie notatnika Jupyter…
2
2
Read The Boy Mechanic
Read The Boy Mechanic
"Two boards, 9 in. wide and about 3 ft. long, with six partitions between, as shown, will make pockets about 6 in. long. The width of the pockets at the bottom is 2 in. and at the top 5 in."
3
3
Cut the boards and partitions
Cut the boards and partitions
Cut two pine boards 9 in wide and about 3 ft long, the back and the front. Cut six partitions as wedges from the notebook, 9 in tall, 2 in deep at the bottom and 5 in at the top.
Materiały do tego kroku:
 Deska sosnowa1 sztuka
Potrzebne narzędzia:
 Miara zwijana
 Ołówek
 Kątownik stolarski
 Piła ręczna
4
4
Assemble the pockets
Assemble the pockets
Nail the partitions to the back board, square to it, one at each end and the rest spaced about 6 in apart. Nail the front board to their sloping edges, so it leans out and the pockets open wider at the top.
Materiały do tego kroku:
 Gwoździe1 sztuka
Potrzebne narzędzia:
 Młotek ciesielski
5
5
Fit the slatted bottom
Fit the slatted bottom
Nail strips across the bottom of the pockets with gaps between them, as his Fig. 1, so the dirt from the shoes falls through.
Materiały do tego kroku:
 Listwa z drewna twardego1 sztukaGwoździe1 sztuka
Potrzebne narzędzia:
Piła ręcznaMłotek ciesielski6
6
Hang it
Hang it
Screw the back board to the wall of the clothes closet (ours), and put a pair of shoes toe-down in each pocket.
Materiały do tego kroku:
 Wkręty do drewna1 sztuka
Potrzebne narzędzia:
 Wiertarka ręczna
 Zestaw wkrętaków
7
7
Troubleshooting
Troubleshooting
Shoe rack troubleshooting.
Flow
Loading...
8
8
History and honest limits
History and honest limits
From **The Boy Mechanic, Volume 1**, edited by H. H. Windsor, Popular Mechanics, Chicago, 1913 (Project Gutenberg #12655), "Homemade Shoe Rack", contributed by Guy H. Harvey of Mill Valley, California. The board sizes, pocket sizes and six partitions are the book's; the wood, nails, slat sizes and hanging screws are ours.
Materiały
4- 1 sztukaZastępnik
- 2 sztukZastępnik
- 1 sztukaZastępnik
- 1 sztukaZastępnik
Wymagane narzędzia
7- 1 vendor sell this, none ship to you yetZastępnik
- 1 vendor sell this, none ship to you yetZastępnik
- Zastępnik
- Zastępnik
- Zastępnik
- Zastępnik
- Zastępnik
Według tego planu powstaje
Powiązane blueprinty
Te blueprinty dzielą się wiedzą — technikami, materiałami lub zasadami

CC0 Domena publiczna
Ten plan jest udostępniany na licencji CC0. Możesz go swobodnie kopiować, modyfikować, rozpowszechniać i wykorzystywać do dowolnych celów, bez konieczności uzyskiwania zgody.
Wesprzyj Makera kupując produkty przez jego plan, za co zarabia Prowizja Makera ustalony przez sprzedawców, lub stwórz nową iterację tego planu i dołącz go jako połączenie w swoim własnym planie, aby dzielić się przychodami.